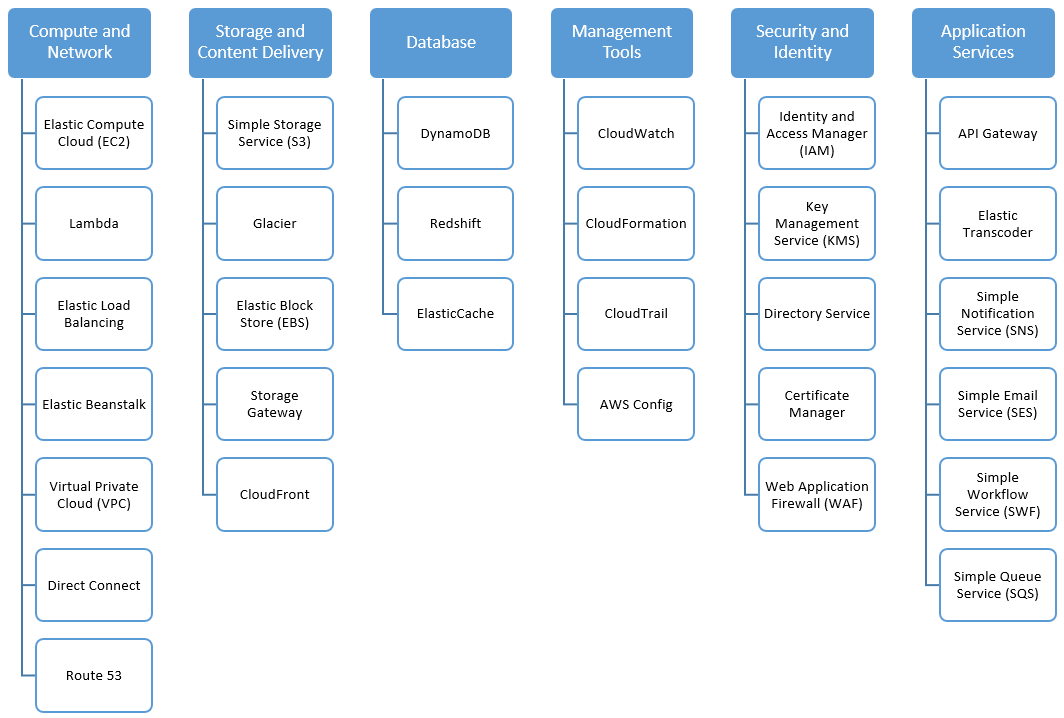
Amazon AWS
- AWS Fundamentals
- Storage and Content Delivery Service
- Compute and Network Services
- Database service
- DevOps & Management Tools
- Security and Identity
- Application Services
- Analytics
- Terminology
- References
AWS Fundamentals
- Cloud Computing - Deployment Models
- All-in cloud-based application is fully deployed in the cloud, with all components of the app running in the cloud
- Hybrid deployment is a common approach taken by many enterprises that connects infrastructure and apps between cloud-based resources and existing resources, typically in an existing data center.
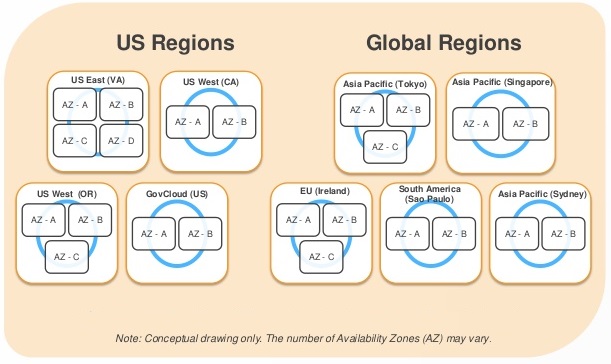
- Global Infrastructure
- Each region is a separate geographic area.
- Each region has multiple, isolated locations known as Availability Zones.
- Resources aren’t replicated across regions unless organizations choose to do so.
- For fault tolerance and stability, each region is completely isolated from each other.
- Each Availability Zone is also isolated, but they are connected through low-latency links.
- Each Availability Zone is located in lower-risk flood plains using a discrete UPS and on-site backup generators. They are each fed via different grids from independent utilities to reduce single points of failures further.
- Organizations retain complete control and ownership over the region in which their data is physically located, allowed them to meet regional compliance and data residency requirements.
- www.cloudping.info - to estimate the latency from your browser to each AWS region
- Accessing the platform
- via Amazon console
- via CLI
- via SDK
Storage and Content Delivery Service
Storage Basics
- Traditional Storage Types
- Block storage:
- operates at low-level - the raw storage device level - and manages data as a set of numbered, fixed-size blocks
- accessed over a network in the form of a Storage Area Network (SAN) using protocols such as iSCSI or Fiber channel
- very closely associated with the server and the OS
- E.g., Amazon Elastic Block Storage (EBS)
- File storage:
- operates at higher-level - the operating system level - and manages data as a named hierarchy of files and folders
- accessed over a network as a Network Attached Storage (NAS) file server or “filer” using protocols such as Common Internet File System (CIFS) or Network File System (NFS)
- very closely associated with the server and the OS
- E.g., AWS Elastic File System (EFS)
- Block storage:
- Cloud Storage
- Object storage
- Independent of a server and is accessed over the Internet.
- Instead of managing data as blocks or files using SCSI, CIFS or NFS protocols, data is managed as objects using REST API
- E.g., Amazon S3
- Object storage
S3 (Simple Storage Service)
S3 Overview
- S3 is a highly-durable and highly-scalable cloud object store
- By default, every object is world-readable
- Scalability: S3 automatically partitions buckets to support very high request rates and simultaneous access by many clients
- Data consistency
- S3 offers read-after-write consistency for
PUTs on new objects - otherwise offers eventual consistency
- S3 offers read-after-write consistency for
S3 Buckets
- Buckets are a simple flat folder with no file system hierarchy.
- Limitations
- It cannot have a sub-bucket within a bucket.
- Bucket name: max 63 lowercase letters, numbers, hyphens and periods
- Each bucket can hold an unlimited number of objects.
- Max 100 buckets per account.
S3 Objects
- Objects reside in containers called buckets
- An object can virtually store any kind of data in any formats
- Max object size = 5TB
- Each object has
- data (the file itself)
- metadata - set of name/value pairs
- System metadata - created and used by Amazon S3. e.g., last modified date, MD5, object size, etc
- User metadata - optional
- Object Key
- Each object is identified by a unique key (similar to a file name).
- Combination of
bucket + key + optional version IDuniquely identifies an S3 object - Limitations
- Max 1024 bytes of UTF-8 characters (including slashes, backslashes, dots, dashes)
- Keys must be unique within a single bucket
- You cannot incrementally update portions of the object as you would with a file
- ARNs (Amazon Resource Name) uniquely identify AWS resources. (AWS ARNs and Namespaces
- Object in an Amazon S3 bucket. e.g.,
arn:aws:s3:::my-family-photos-2017/birthday.jpgarn:aws:s3:::bucket_namearn:aws:s3:::bucket_name/key_name
- General formats
arn:partition:service:region:account-id:resourcearn:partition:service:region:account-id:resourcetype/resourcearn:partition:service:region:account-id:resourcetype:resource
- Object in an Amazon S3 bucket. e.g.,
S3 Durability & Availability
- Durability
- answers the question will my data still be there in the future?
- S3 provides 99.999999999% durability - meaning for 10K objects stored, you can on average expect to incur a loss of 1 object every 10,000,000 years
- Durability achieved by
- automatically storing data redundantly on multiple devices in multiple facilities within a region.
- design to sustain concurrent loss of data in 2 facilities without loss of user data
- highly durable infrastructure
- Availability
- answers the question can I access my data right now?
- S3 provides 99.99% availability
- S3 is an eventually consistent system
- S3 offers read-after-write consistency for
PUTs to new objects. Read-after-write guarantees immediate visibility of new data to all clients. PUTs to existing objects andDELETEs are offered at eventual consistency- Updates to a single key are atomic - for eventual-consistency reads, you will get the new data or the old data, but never an inconsistent mix of data.
- S3 offers read-after-write consistency for
S3 Storage Classes
- Hot - frequently accessed data
- Warm - less frequently accessed data as it ages
- Cold - long-term backup or archive data before eventual deletion
| S3 Standard | S3 Standard - Infrequent Access (IA) | Reduced Redundancy Storage (RRS) | Amazon Glacier | |
|---|---|---|---|---|
| Well-suited for | short-term or long-term storage of frequently accessed data | long-lived, less frequently accessed data that is stored for longer than 30 days | derived data that can be easily reproduced (e.g., thumbnails) | data that does not require real-time access, such as archives and long-term backups, where a retrieval time of several hours is suitable |
| Offers | high durability (99.999999999%), high availability, high performance, first low-byte latency, high throughput |
same durability, low latency, high throughput |
slightly lower durability (99.9999%) | secure, high durability (99.999999999%) |
| Cost | Has lower per GB-month cost than Standard Price model also includes a minimum object size (128KB), minimum duration (30 days), and per-GB retrieval costs. |
Reduced cost than Standard or Standard-IA | Extremely low-cost |
- Reduce storage costs by automatically transitioning data from one storage class to another or eventually deleting data after a period of time. For example,
- Store backup data initially in S3 Standard
- After 30 days, move to Standard-IA
- After 90 days, transition to Glacier,
- After 3 years, delete
- Lifecycle configurations are attached to bucket or specific objects
S3 Data Protection
- Bucket-level permissioning - existing permissioning policies can be copied or generated using ‘Bucket policy generator’
- By default, all S3 objects and buckets are private and can only be accessed by the owner.
- Access Control
- S3 Access Control Lists (ACLs) (Coarse-grained access controls)
- legacy mechanism, created before IAM
- Limited to read, write, or full-control at object/bucket level
- Best used for enabling bucket logging or making a bucket that hosts a static website be readable
- S3 bucket policies (Fine-grained access controls)
- Recommended access control mechanism
- Can specify
- who can access the bucket
- from where (by CIDR block or IP address)
- at what time of the day
- Bucket policies allows to assign cross-account access to S3 resources
- Similar to IAM but
- associated with bucket resource instead of an IAM principal
- includes an explicit reference to the IAM principal in the policy. This principal can be associated with a different AWS account
- AWS Identity and Access Management (IAM) policies
- Query String Authentication
- S3 Access Control Lists (ACLs) (Coarse-grained access controls)
- Encryption
- Encrypt data in-flight
- Transmit data using HTTPS protocol to SSL API endpoints
- Encrypt data at rest
- Server-Side Encryption (SSE)
- S3 encrypts data at the object level as it writes it to disks and decrypts it for you when you access it
- SSE-S3 (AWS Managed Keys)
- AWS handles the key management and key protection
- Every object is encrypted with a unique key
- The object encryption key is then encrypted using a separate master key
- A new master key is issued at least monthly with AWS rotating the keys.
- Encrypted data, keys and master keys are all stored separately on secure hosts
- SSE-KMS (AWS KMS Keys)
- AWS handles management and protection of your key
- SSE-KMS offers additional benefits
- provides audit of who used the key to access, which object, when.
- Allows to view failed attempts to access data from users who did not have permissions
- SSE-C (Customer Provided Keys)
- You maintain your own encryption keys, but don’t want to manage or implement your own client-side encryption library
- AWS will do the encryption/decryption of your objects while you maintain full control of the keys
- Client-Side Encryption (CSE)
- You encrypt the data before sending it to S3
- 2 options for using data encryption keys
- Use an AWS KMS-managed customer master key
- Use a client-side master key
- Server-Side Encryption (SSE)
- Encrypt data in-flight
| who creates the key? | who protects and manages the key? | who encrypts and decrypts data? | |
|---|---|---|---|
| SSE-S3 | AWS | AWS | AWS |
| SSE-KMS | You | AWS | AWS |
| SSE-C | You | You | AWS |
| CSE | You | You | You |
- Versioning
- If an object is accidentally changed/deleted, one can restore the object to its original state by referencing the version ID in addition to the bucket and object key
- Versioning is turned on at the bucket level. Once enabled, versioning cannot be removed from a bucket; it can only be suspended.
- Multi-Factor Authentication (MFA) Delete
- requires additional authentication in order to permanently delete an object version or change the versioning state of a bucket.
- MFA delete can only be enabled by the root account
- Pre-Signed URLs
- All S3 objects are by default private.
- Owner can share objects with others by creating pre-signed URL, using their own security credentials to grant time-limited permission to download the objects.
- To create a pre-signed URL, you must provide: your security credentials, bucket name, object key, the HTTP method (GET for download) and an expiration date and time.
- Useful to protect against ‘content scraping’ of web content such as media files stored in S3
Advanced Topics
- Multipart Upload
- To support uploading/copying large objects
- Allows to pause and resume. Has ability to upload objects where the size is initially unknown
- Object size > 100 MB - you should use multipart upload
- Object size > 5 GB - you must use multipart upload
- Using high-level APIs and high-level S3 command in CLI (
aws s3 cp,aws s3 mv,aws s3 sync), multipart upload is automatically performed for large objects - Using low-level APIs, you must break the file into parts and keep track of the parts.
- If a multipart upload is incomplete after specified number of days, you can set an object lifecycle policy on a bucket to abort to minimize the storage costs.
- Range GETs
- is used to download (GET) only a portion of an object in S3 or Glacier.
- Cross-Region Replication
- allows to asynchronously replicate all new objects from one region to another.
- Metadata and ACLs of the object also is replicated.
- Only new objects are replicated. Existing objects must be copied via a separate command.
- To enable Cross-Region Replication, versioning must be turned-on in both source and target buckets.
- An IAM policy must be used to give S3 permission to replicate objects on your behalf.
- Commonly used to reduce the latency to access objects by placing them closer to a set of users or store backup data at a certain distance from the original source data
- Logging
- Logging is off by default. While enabling, you must choose the bucket where the logs will be stored.
- Event Notifications
- Set up at bucket level to notify when an object is created, removed or lost in RRS
- Notification messages can be sent to Amazon SQS or SNS or AWS Lambda
Amazon Glacier
- Extremely low-cost storage service for data archiving and long-term backup. Optimized for infrequently accessed data where a retrieval time of several hours is suitable.
- To retrieve an object, issue a
restorecommand using S3 API; 3 to 5 hours later, it is copied to S3 RRS.Restoresimply creates a copy; the original data is retained in Glacier until explicitly deleted. - Archives
- Data is stored in archives
- Max 40 TB of data per archive
- Unlimited archives can be created
- Each archive is assigned a unique archive ID at the creation time
- Archives are automatically encrypted
- Archives are immutable
- Vaults
- Vaults are containers for archives.
- Max 1000 vaults per account
- Control access to vaults using IAM policies or vault access policies
- Vault lock policy: can specify controls such as Write Once Read Many (WORM) in a vault local policy to lock the policy from future edits.
- Retrieving up to 5% of stored data is free per month.
Amazon Elastic Block Store (EBS)
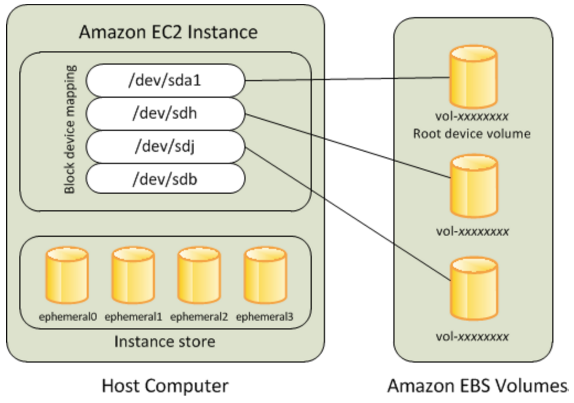
- Persistent block-level storage volumes for use with EC2 instances. Each EBS volume is automatically replicated within its Availability Zone to protect from component failure, offering HA and durability.
- Each EBS volume is automatically replicated within its Availability Zone
- Each EBS volume can be attached to a single EC2 instances
- A single EC2 instance can be attached to one or more EBS volumes
EBS Volume Types
| Magnetic Volume | General-Purpose SSD | Provisioned IOPS SSD | Throughput-Optimized HDD Volumes | Cold HDD Volumes | |
|---|---|---|---|---|---|
| Use Cases | Workloads where data is accessed infrequently, Sequential reads, Situations where low-cost storage is a requirement | System boot volumes, Virtual Desktops, small-to-medium size databases, Dev to Test environments | I/O intensive workloads, particularly large database workloads, Critical business apps that require sustained IOPS performance or more than 10,000 IOPS or 160 MB of throughput per volume |
Low-cost HDD volumes designed for frequent-access, throughput-intensive workloads such as big data, data warehouses, and log processing. | Designed for less frequently accessed workloads, such as colder data requiring fewer scans per day. |
| Volume Size | 1 GB to 1 TB | 1 GB to 16 TB | 4 GB to 16 TB | up to 16 TB | Max 16 TB |
| Max throughput | 40 - 90 MB | 160 MB | 320 MB | 500 MB/s | 250 MB/s |
| IOPS Performance | Average 100 IOPS with the ability to burst to 100s of IOPS | Baseline performance of 3 IOPS/GB (max 10,000 IOPS) with the ability to burst to 3000 IOPS for volumes under 1000 GB | Consistently performs at provisioned level, up to 20,000 IOPS max | max 500 | Max 250 |
| Cost | Cheapest | Based on the volume size provisioned (not space used) + number of IOPS provisioned, whether they are consumed or not | significantly less expensive than general-purpose SSD volumes. | significantly less expensive than Throughput-Optimized HDD volumes | |
| Misc | Lowest Performance | When you provision a Provisioned IOPS SSD volume, you should specify both the size and the desired number of IOPS You can stripe multiple volumes together in a RAID 0 configuration for larger size and greater performance |
EBS-Optimized Instances
- Uses an optimized configuration stack and provides additional, dedicated capacity for EBS I/O. This optimization provides the best performance for EBS volumes by minimizing contention between EBS I/O and other traffic from EC2 instance.
EBS Snapshots
- Backup EBS volume data by taking snapshots through AWS console, CLI, API or setting up a schedule for regular snapshots
- Snapshots are incremental backups, which means that only the blocks on the device that have changed since your most recent snapshot are saved.
- Snapshot data is stored in S3.
- The action of taking a snapshot is free. You pay only the storage costs for the snapshot data.
- When you request a snapshot, the point-in-time snapshot is created immediately and the volume may continue to be used, but the snapshot may remain in pending status until all the modified blocks have been transferred to S3.
- Snapshots are stored in AWS-controlled S3 storage; not in your account’s S3 buckets. This means you cannot manipulate them like other Amazon S3 objects. Rather, you must use the EBS snapshot features to manage them.
- Snapshots are constrained to the region in which they are created, meaning you can use them to create new volumes only in the same region. If you need to restore a snapshot in a different region, you can copy a snapshot to another region.
Creating a Volume from a Snapshot
- To use a snapshot, you create a new EBS volume from the snapshot. When you do this, the volume is created immediately but the data is loaded lazily. This means that the volume can be accessed upon creation, and if the data being requested has not yet been restored, it will be restored upon first request. Because of this, it is a best practice to initialize a volume created from a snapshot by accessing all the blocks in the volume.
- Snapshots can also be used to increase the size of an EBS volume. To increase the size of an EBS volume
- take a snapshot of the volume
- create a new volume of the desired size from the snapshot
- Replace the original volume with the new volume.
Recovering Volumes
- If an Amazon EBS-backed instance fails and there is data on the boot drive, it is relatively straightforward to detach the volume from the instance.
- Unless the
DeleteOnTerminationflag for the volume has been set to false, the volume should be detached before the instance is terminated. - The volume can then be attached as a data volume to another instance and the data read and recovered.
Encryption Options
- Amazon EBS offers native encryption on all volume types
- When you launch an encrypted EBS volume, Amazon uses the AWS KMS to handle key management. A new master key will be created unless you select a master key that you created separately in the service.
- Data and associated keys are encrypted using the industry-standard AES-256 algorithm.
- The encryption occurs on the servers that host EC2 instances, so the data is actually encrypted in transit between the host and the storage media and also on the media.
- Encryption is transparent, so all data access is the same as unencrypted volumes, and you can expect the same IOPS performance on encrypted volumes as you would with unencrypted volumes, with a minimal effect on latency.
- Snapshots that are taken from encrypted volumes are automatically encrypted, as are volumes that are created from encrypted snapshots.
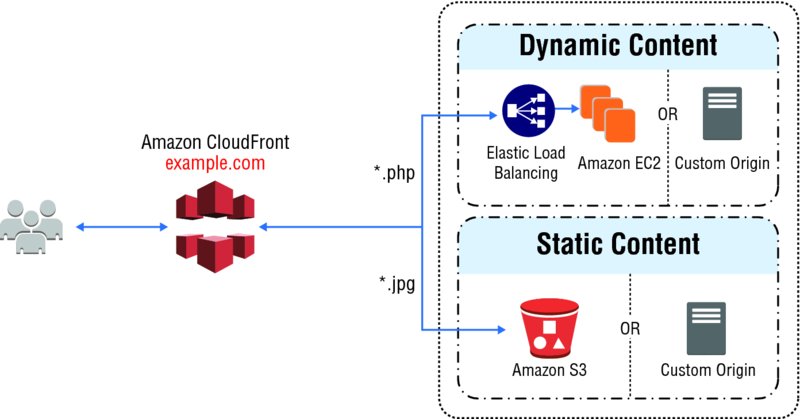
Amazon CloudFront
- is a global CDN service
- can be used to deliver websites including dynamic, static, streaming and interactive content, using a global network of edge locations. Request for content are automatically routed to the nearest edge location for best performance.
-
Edge caching refers to the use of caching servers to store content closer to end users. For instance, if you visit a popular Web site and download some static content that gets cached, each subsequent user will get served that content directly from the caching server until it expires.
- CDN Overview
- A CDN is a globally distributed network of caching servers that speed up the downloading of web pages and other content.
- CDNs use DNS geo-location to determine the geographic location of each request for a web page or other content, then they serve that content from edge caching servers closest to that location instead of the original web server.
- A CDN allows you to increase the scalability of a website or mobile application easily in response to peak traffic spikes.
- In most cases, using a CDN is completely transparent—end users simply experience better website performance, while the load on your original website is reduced.
- When a user requests content that you’re serving with CloudFront, the user is routed to the edge location that provides the lowest latency (time delay), so content is delivered with the best possible performance. If the content is already in the edge location with the lowest latency, CloudFront delivers it immediately. If the content is not currently in that edge location, CloudFront retrieves it from the origin server, such as an S3 bucket or a web server, which stores the original, definitive versions of your files.
- CloudFront is optimized to work with other AWS cloud services as the origin server, including S3 buckets, S3 static websites, EC2, and ELB.
- CloudFront also works seamlessly with any non-AWS origin server, such as an existing on-premises web server.
- CloudFront also integrates with Route 53.
- CloudFront supports all content that can be served over HTTP or HTTPS.
- CloudFront supports serving both static and dynamic web pages.
- CloudFront supports media streaming, using both HTTP and RTMP.
3 Core Concepts
- Distributions
- To use CloudFront, you start by creating a distribution, which is identified by a DNS domain name such as
d111111abcdef8.cloudfront.net. - To serve files from CloudFront, you simply use the distribution domain name in place of your website’s domain name; the rest of the file paths stay unchanged.
- You can use the CloudFront distribution domain name as-is, or you can create a user-friendly DNS name in your own domain by creating a CNAME record in Route 53 or another DNS service. The CNAME is automatically redirected to your CloudFront distribution domain name.
- To use CloudFront, you start by creating a distribution, which is identified by a DNS domain name such as
- Origins
- When you create a distribution, you must specify the DNS domain name of the origin—the S3 bucket or HTTP server—from which you want CloudFront to get the definitive version of your objects (web files)
- Cache Control
- Once requested and served from an edge location, objects stay in the cache until they expire or are evicted to make room for more frequently requested content.
- By default, objects expire from the cache after 24 hours.
- Once an object expires, the next request results in CloudFront forwarding the request to the origin to verify that the object is unchanged or to fetch a new version if it has changed.
- Optionally, control how long objects stay in an CloudFront cache before expiring.
- Cache-Control headers: set by your origin server, or
- TTL: set the minimum, maximum, and default Time to Live (TTL) for objects in your CloudFront distribution.
- Invalidation Feature
- can also remove copies of an object from all CloudFront edge locations at any time by calling the invalidation API.
- removes the object from every CloudFront edge location regardless of the expiration period you set for that object on your origin server.
- The invalidation feature is designed to be used in unexpected circumstances, such as to correct an error or to make an unanticipated update to a website, not as part of your everyday workflow.
- Versioning
- Instead of invalidating objects manually or programmatically, it is a best practice to use a version identifier as part of the object (file) path name. For example:
- Old file:
assets/v1/css/narrow.css - New file:
assets/v2/css/narrow.css
- Old file:
- When using versioning, users always see the latest content through CloudFront when you update your site without using invalidation.
- Old versions will expire from the cache automatically.
- Instead of invalidating objects manually or programmatically, it is a best practice to use a version identifier as part of the object (file) path name. For example:
Advanced Features
- Cache Behaviors
- Cache behaviors allows to
- To use more than one origin server
- control which requests are served by which origin
- how requests are cached
- A cache behavior lets you configure a variety of CloudFront functionalities for a given URL path pattern for files on your website.
- E.g., One cache behavior applies to all PHP files in a web server (dynamic content), using the path pattern
*.php, while another behavior applies to all JPEG images in another origin server (static content), using the path pattern*.jpg. - Each cache behavior includes the following:
- The path pattern
- Which origin to forward your requests to
- Whether to forward query strings to your origin
- Whether accessing the specified files requires signed URLs
- Whether to require HTTPS access
- The amount of time that those files stay in the CloudFront cache (regardless of the value of any
Cache-Controlheaders that your origin adds to the files)
- Cache behaviors are applied in order; if a request does not match the first path pattern, it drops down to the next path pattern. Normally the last path pattern specified is
*to match all files.
- Cache behaviors allows to
- Whole Website
- Using cache behaviors and multiple origins, you can easily use CloudFront to serve your whole website and to support different behaviors for different client devices.
- Private Content
- In many cases, you may want to restrict access to content in CloudFront to only selected requestors, such as paid subscribers or to applications or users in your company network.
- CloudFront provides several mechanisms to allow you to serve private content.
- Signed URLs: Use URLs that are valid only between certain times and optionally from certain IP addresses.
- Signed Cookies: Require authentication via public and private key pairs.
- Origin Access Identities (OAI): Restrict access to an S3 bucket only to a special CloudFront user associated with your distribution. This is the easiest way to ensure that content in a bucket is only accessed by CloudFront.
Use Cases
Good Use Cases
- Serving the Static Assets of Popular Websites
- Serving a Whole Website or Web Application
- Serving Content to Users Who Are Widely Distributed Geographically
- Distributing Software or Other Large Files
- Serving Streaming Media
Inappropriate Use Cases
- All or Most Requests Come From a Single Location: If all or most of your requests come from a single geographic location, such as a large corporate campus, you will not take advantage of multiple edge locations.
- All or Most Requests Come Through a Corporate VPN: Similarly, if your users connect via a corporate VPN, even if they are distributed, user requests appear to CloudFront to originate from one or a few locations.
AWS Storage Gateway
- AWS Storage Gateway is a service to provide seamless and secure integration between an organization’s on-premises IT environment and AWS storage infrastructure.
- supports industry-standard storage protocols that work with your existing applications.
- It provides low-latency performance by caching frequently accessed data on-premises while encrypting and storing all of your data in S3 or Glacier.
- AWS Storage Gateway’s software appliance is available for download as a VM image that you install on a host in your data center and then register with your AWS account through the AWS Management Console. The storage associated with the appliance is exposed as an iSCSI device that can be mounted by your on-premises applications.
 |
 |
3 configurations for AWS Storage Gateway
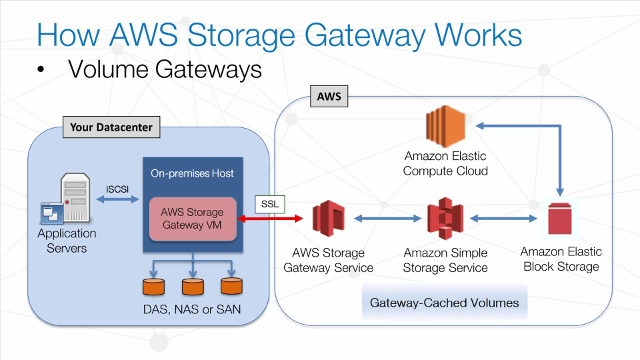
- Gateway-Cached Volumes
- allows to expand local storage capacity into S3.
- All data stored on a Gateway-Cached volume is moved to S3, while recently read data is retained in local storage to provide low-latency access.
- Max volume size = 32TB
- Max number volumes per gateway = 32 (max storage = 32TB * 32 = 1PB)
- Backup
- Point-in-time snapshots can be taken to back up your AWS Storage Gateway- snapshots are performed incrementally, and only the data that has changed since the last snapshot is stored.
- All volume data and snapshot data is transferred to S3 over encrypted SSL connections - encrypted at rest in S3 using SSE.
- Data cannot be directly accessed with the S3 API or other tools such as the S3 console; instead you must access it through the AWS Storage Gateway service.
- Gateway-Stored Volumes
- allows to store on-premises storage to S3 and asynchronously back up that data to S3.
- provides low-latency access to all data, while also providing off-site backups taking advantage of the durability of S3.
- While each volume is limited to a maximum size of 16TB, a single gateway can support up to 32 volumes for a maximum storage of 512TB.
- Max volume size = 16TB
- Max number of volumes per gateway = 32 (max storage = 16TB * 32 = 512TB)
- Backup
- The data is backed up in the form of EBS snapshots.
- Point-in-time snapshots can be taken to back up your AWS Storage Gateway.
- Gateway stores the snapshots in S3 as EBS snapshots. When a new snapshot is taken, only the data that has changed since last snapshot is stored.
- Snapshots can be initiated on a scheduled or one-time basis.
- Because these snapshots are stored as EBS snapshots, a new EBS volume can be created from a Gateway-Stored volume.
- All volume data and snapshot data is transferred to S3 over encrypted SSL connections - encrypted at rest in S3 using SSE.
- Data cannot be directly accessed with the S3 API or other tools such as the S3 console.
- If your on-premises appliance or even entire data center becomes unavailable, the data in AWS Storage Gateway can still be retrieved.
- If it’s only the appliance that is unavailable, a new appliance can be launched in the data center and attached to the existing AWS Storage Gateway.
- A new appliance can also be launched in another data center or even on an EC2 instance on the cloud.
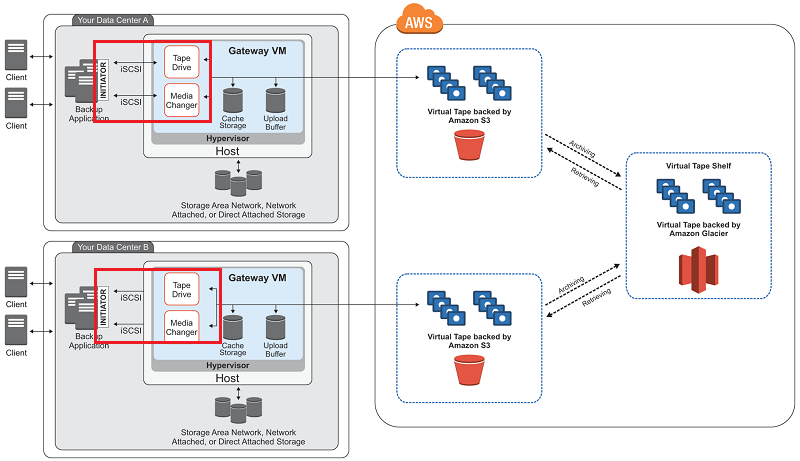
- Gateway Virtual Tape Libraries (VTL)
- Gateway-VTL offers a durable, cost-effective solution to archive your data on the AWS cloud.
- The VTL interface lets you leverage your existing tape-based backup application infrastructure to store data on virtual tape cartridges that you create on your Gateway-VTL.
- A virtual tape is analogous to a physical tape cartridge, except the data is stored on the AWS cloud.
- Tapes are created blank through the console or programmatically and then filled with backed up data.
- Virtual tapes appear in your gateway’s VTL, a virtualized version of a physical tape library. Virtual tapes are discovered by your backup application using its standard media inventory procedure.
- When your tape software ejects a tape, it is archived on a Virtual Tape Shelf (VTS) and stored in Glacier.
- Max number of tapes per gateway = 1,500 (max storage = 1 PB)
- Max VTS allowed per region = 1 VTS
- Multiple gateways in the same region can share a VTS.
Use Cases
- Gateway-Cached volumes enable you to expand local storage hardware to S3, allowing you to store much more data without drastically increasing your storage hardware or changing your storage processes.
- Gateway-Stored volumes provide seamless, asynchronous, and secure backup of your on-premises storage without new processes or hardware.
- Gateway-VTLs enable you to keep your current tape backup software and processes while storing your data more cost-effectively and simply on the cloud.
Compute and Network Services
EC2
Instance Types
- 2 key concepts to an instance:
- the amount of virtual hardware dedicated to the Instance
- the software loaded on the instance
- Instance types vary in following dimensions:
- Virtual CPUs (vCPUs)
- Memory
- Storage
- Network performance
- Instance types are grouped into families
- The ratio of vCPUs to memory is constant as the size scale linearly
- The hourly price for each size scales linearly. e.g.,
Cost(m4.xlarge) = 2 x Cost(m4.large) - Optimized Instance Type Family
m4family provides a balance of compute, memory and n/w resourcesc4compute optimized for workloads requiring significant processingr3memory optimized for memory-intensive workloadsi2storage optimized for workloads requiring high amounts of fast SSD storageg2GPU-based instances for graphics and general-purpose GPU compute workloads
- Network performance
- AWS publishes a relative measure of n/w performance: low, moderate, high
- Enhanced Networking:
- For workloads requiring greater n/w performance, use instance types supporting enhanced networking.
- It reduces the impact of virtualization on n/w performance enabling a capability called Single Root I/O Virtualization (SR-IOV)
- This results in more packets per second (PPS), lower latency and less jitter
Amazon Machine Image (AMI)
- defines the initial software that will be on an instance when it is launched: OS + initial state of patches + application/system software
- All AMIs are based on x86 OS (either Linux or Windows)
- 4 Sources of AMIs
- Published by AWS: you should apply patches upon launch
- AWS Marketplace
- Generated from Existing instances: published AMI + corporate standard software added
- Uploaded Virtual Servers: Using AWS VM Import/Export to create images from formats: VHD, VMDK, OVA
Addressing an Instance
There are several ways that an instance may be addressed over the web upon creation:
- Public DNS Name
- DNS name is generated automatically and cannot be specified by the customer.
- This DNS name persists only while the instance is running and cannot be transferred to another instance.
- Public IP
- This IP address is assigned from the addresses reserved by AWS and cannot be specified.
- This IP address is unique on the Internet, persists only while the instance is running, and cannot be transferred to another instance.
- Elastic IP
- An elastic IP address is an address unique on the Internet that you reserve independently and associate with an instance.
- This IP address persists until the customer releases it and is not tied to the lifetime or state of an individual instance.
- Because it can be transferred to a replacement instance in the event of an instance failure, it is a public address that can be shared externally without coupling clients to a particular instance.
Private IP addresses and Elastic Network Interfaces (ENIs) are additional methods of addressing instances that are available in the context of an VPC.
Securing an Instance
Initial Access
- EC2 uses public-key cryptography to encrypt and decrypt login information.
- Public-key cryptography uses a public key to encrypt a piece of data and an associated private key to decrypt the data. These two keys together are called a key pair.
- Key pairs can be created through the AWS Management Console, CLI, or API, or customers can upload their own key pairs.
- AWS stores the public key in
~/.ssh/authorized_keysfolder - Private keys are kept by the customer. The private key is essential to acquiring secure access to an instance for the first time.
- When launching a Windows instance, EC2 generates a random password for the local administrator account and encrypts the password using the public key. Initial access to the instance is obtained by decrypting the password with the private key, either in the console or through the API.
Virtual Firewall Protection
- AWS allows you to control traffic in and out of your instances through virtual firewalls called security groups.
- Security groups allow you to control traffic based on port, protocol, and source/destination.
- Security groups are applied at the instance level, as opposed to a traditional on-premises firewall that protects at the perimeter. To breach a single perimeter to access all instances, one has to breach the security groups repeatedly for each individual instances
- Security groups have different capabilities :
- EC2-Classic Security Groups - Control outgoing instance traffic
- VPC Security Groups - Control outgoing and incoming instance traffic
- Every instance must have at least one security group but can have more
- Changing Security Group
- If an instance is running in an VPC, you can change which security groups are associated with an instance while the instance is running.
- For instances outside of an VPC (called EC2-Classic), the association of the security groups cannot be changed after launch.
- A security group is default deny - it does not allow any traffic that is not explicitly allowed by a security group rule.
- A rule is defined by 3 attributes:
- Port
- Protocol. e.g., HTTP, RDP, etc.
- Source/Destination- can be defined in 2 ways:
- CIDR block
- Security group — Includes any instance that is associated with the given security group. This helps prevent coupling security group rules with specific IP addresses
- When an instance is associated with multiple security groups, the rules are aggregated and all traffic allowed by each of the individual groups is allowed. For example, if security group A allows RDP traffic from 72.58.0.0/16 and security group B allows HTTP and HTTPS traffic from 0.0.0.0/0 and your instance is associated with both groups, then both the RDP and HTTP/S traffic will be allowed in to your instance.
- A security group is a stateful firewall; that is, an outgoing message is remembered so that the response is allowed through the security group without an explicit inbound rule being required.
Lifecycle of Instances
Bootstrapping
- Ability to configure instances and install applications programmatically when an instance is launched. The process of providing code to be run on an instance at launch is called bootstrapping.
- When an instance is launched for the first time, a string-valued parameter
UserDatais passed to the OS to be executed as part of the launch process. On Linux, this can be a shell script, performing tasks like- Applying patches and updates to the OS
- Installing application software
- Copying a longer script or program from storage to be run on the instance
- Installing Chef or Puppet and assigning the instance a role so the configuration management software can configure the instance
UserDatais stored with the instance and is not encrypted. DO NOT include any secrets such as passwords or keys in it.
VM Import/Export
- Import VMs from your existing environment as an EC2 instance and export them back to your on-premises environment.
- You can only export previously imported EC2 instances. Instances launched within AWS from AMIs cannot be exported.
Instance Metadata
- Instance metadata is data about your instance that you can use to configure or manage the running instance. This is unique in that it is a mechanism to obtain AWS properties of the instance from within the OS without making a call to the AWS API.
- An HTTP call to http://169.254.169.254/latest/meta-data/ will return the top node of the instance metadata tree.
- Instance metadata includes:
- The associated security groups
- The instance ID
- The instance type
- The AMI used to launch the instance
Instance Tags
- Tags are key/value pairs you can associate with your instance or other service.
- Tags can be used to identify attributes of an instance like project, environment (dev, test, and so on), billable department, and so forth.
- Max 10 tags per instance.
Modifying Instance Type
- If the compute needs prove to be higher or lower than expected, the instances can be changed to a different size more appropriate to the workload.
- Stop instance -> Change instance type -> Restart instance
Termination Protection
- To prevent accidental termination, when Termination Protection is enabled, calls to terminate the instance will fail.
- It does not prevent termination triggered
- by an OS shutdown command,
- termination from an Auto Scaling group, or
- termination of a Spot Instance due to Spot price changes
Instance Pricing Options
- On-Demand Instances
- Least cost-effective due to the flexibility it allows customers to save by provisioning a variable level of compute for unpredictable workloads
- The price is per hour for each instance type
- No up-front commitment, and the customer has control over when the instance is launched and when it is terminated
- Reserved Instances
- 75% less cost compared to On-Demand hourly rate
- When purchasing a reservation, the customer specifies the instance type and Availability Zone
- Capacity in the data centers is reserved for that customer.
- 2 factors determining the cost:
- Term commitment - the duration of the reservation
- Payment option
- All Upfront —Pay for the entire reservation up front. There is no monthly charge for the customer during the term.
- Partial Upfront —Pay a portion of the reservation charge up front and the rest in monthly installments for the duration of the term.
- No Upfront —Pay the entire reservation charge in monthly installments for the duration of the term.
- Modifying Reservation: You can modify your whole reservation, or just a subset, in one or more of the following ways:
- Switch Availability Zones within the same region.
- Change between EC2-VPC and EC2-Classic.
- Change the instance type within the same instance family (Linux instances only).
- One may purchase two Reserved Instances to handle the average traffic, but depend on On-Demand Instances to fulfill compute needs during the peak times.
- Spot Instances
- offers the greatest discount
- For workloads that are not time critical and are tolerant of interruption
- With Spot Instances, when the customer’s bid price is above the current Spot price, the customer will receive the requested instance(s). These instances will operate like all other EC2 instances, and the customer will only pay the Spot price for the hours that instance(s) run.
- The instances will run until:
- The customer terminates them.
- The Spot price goes above the customer’s bid price.
- There is not enough unused capacity to meet the demand for Spot Instances.
- If EC2 needs to terminate a Spot Instance, the instance will receive a termination notice providing a two-minute warning prior to EC2 terminating the instance.
Tenancy options
- Shared Tenancy
- a single host machine may house instances from different customers
- Default model
- AWS does not use overprovisioning and fully isolates instances from other instances on the same host, this is a secure tenancy model.
- Dedicated Instance
- runs on hardware that’s dedicated to a single customer.
- Dedicated Host
- Dedicated Host is a physical server with EC2 instance capacity fully dedicated to a single customer’s use.
- The customer has complete control over which specific host runs an instance at launch. This differs from Dedicated Instances in that a Dedicated Instance can launch on any hardware that has been dedicated to the account.
- can help address licensing requirements and reduce costs by allowing to use existing server-bound software licenses.
- Placement Groups
- is a logical grouping of instances within a single Availability Zone.
- enable applications to participate in a low-latency, 10 Gbps network.
- recommended for applications that benefit from low network latency, high network throughput, or both. This represents network connectivity between instances.
- To fully use this network performance for your placement group, choose an instance type that supports enhanced networking and 10 Gbps network performance.
Instance Stores
- An instance store provides temporary block-level storage (ephemeral storage)
- Data in the instance store is lost when:
- the underlying disk drive fails
- the instance stops
- the instance terminates
AWS Lambda
- a zero-administration compute platform for back-end web developers that runs your code for you on the AWS cloud (for high availability)
Auto Scaling
-
allows to scale EC2 capacity up or down automatically according to conditions defined for the particular workload (for scaling in and out)
- Advantage of deploying applications to the cloud is the ability to launch and then release servers in response to variable workloads.
-
Provisioning servers on demand and then releasing when not needed can provide significant cost savings. E.g., an end-of-month data-input system, a retail shopping site supporting flash sales, etc.
- Embrace the Spike
- Many web applications have unplanned load increases based on events outside of your control.
- Setting up Auto Scaling in advance will allow to embrace and survive such fast increase in the number of requests. It will scale up your site to meet the increased demand and then scale down when the event subsides.
Auto Scaling Plans
- Maintain Current Instance Levels
- Configure your Auto Scaling group to maintain a minimum or specified number of running instances at all times.
- To maintain the current instance levels, Auto Scaling performs a periodic health check on running instances within an Auto Scaling group.
- When Auto Scaling finds an unhealthy instance, it terminates that instance and launches a new one.
- Steady state workloads that need a consistent number of EC2 instances at all times can use Auto Scaling to monitor and keep that specific number of EC2 instances running.
- Manual Scaling
- This is the most basic way to scale your resources. You just need to specify the change in the maximum, minimum, or desired capacity of your Auto Scaling group.
- Auto Scaling manages the process of creating or terminating instances to maintain the updated capacity.
- Manual scaling out can be very useful to increase resources for an infrequent event, such as movie release dates.
- For extremely large-scale events, even the ELB load balancers can be pre-warmed by working with your local solutions architect or AWS Support.
- Scheduled Scaling
- When you have a recurring schedule or a predictable schedule of when you will need to increase or decrease the number of instances in your group, e.g., end-of-month, or end-of-year processing, schedule scaling is useful.
- Scaling actions are performed automatically as a function of time and date.
- Dynamic Scaling
- Lets you define parameters that control the Auto Scaling process in a scaling policy. E.g., create a policy that adds more EC2 instances to the web tier when the network bandwidth, measured by CloudWatch, reaches a certain threshold.
Auto Scaling Components
Launch Configuration
- A launch configuration is the template used to create new instances, and it has the following:
- Name (e.g., myLC)
- AMI (e.g., ami-0535d66c)
- Instance type (e.g., m3.medium)
- Security groups (e.g., sg-f57cde9d)
- Instance key pair (e.g., myKeyPair)
- Each Auto Scaling group can have only one launch configuration at a time.
- Security groups for instances launched in EC2-Classic may be referenced by security group name or by security group IDs. Security group ID is recommended.
- Limits
- Default limit for launch configurations = 100 per region. If you exceed this limit, the call to create-launch-configuration will fail. To update this limit:
aws autoscaling describe-account-limits - Auto Scaling may cause you to reach limits of other services, such as the default number of EC2 instances you can currently launch = 20 per region.
- When you run a command using the CLI and it fails,
- check your syntax first. If that checks out,
- verify the limits for the command you are attempting, and check to see that you have not exceeded a limit.
- To raise the limits, in cases allowed, create a support case at the AWS Support Center online and then choose Service Limit Increase under Regarding.
- Default limit for launch configurations = 100 per region. If you exceed this limit, the call to create-launch-configuration will fail. To update this limit:
Auto Scaling Group
- An Auto Scaling group is a collection of EC2 instances managed by the Auto Scaling service.
- Each Auto Scaling group contains configuration options that control when Auto Scaling should launch new instances and terminate existing instances.
- An Auto Scaling group must contain
- a name
- a minimum and maximum number of instances that can be in the group.
- (optional) desired capacity, which is the number of instances that the group must have at all times. If not specified, the default desired capacity = the minimum number of instances.
1 2 3 4 5 6 7 | |
- An Auto Scaling group can use either On-Demand (default) or Spot instances, but not both.
- Spot Instances
- Bid price can be modified
- If instances are available at or below your bid price, they will be launched in your Auto Scaling group.
Spot On!
- Spot Instances can be useful when hosting sites to provide additional compute capacity but are price constrained. E.g., a “freemium” site model where some basic functionality to users are free and additional functionality is for premium users.
- It can be used for providing the basic functionality when available by referencing a maximum bid price in the launch configuration (
—spot-price "0.15") associated with the Auto Scaling group.
Scaling Policy
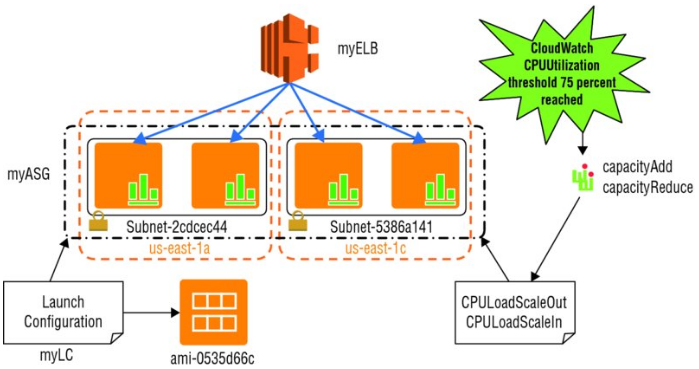
- CloudWatch alarms and scaling policies can be associated with an Auto Scaling group to adjust Auto Scaling dynamically.
- When a threshold is crossed, CloudWatch sends alarms to trigger changes (scaling in or out) to the number of EC2 instances currently receiving traffic behind a load balancer.
- After the CloudWatch alarm sends a message to the Auto Scaling group, Auto Scaling executes the associated policy to scale your group.
- The policy is a set of instructions that tells Auto Scaling whether to scale out, launching new EC2 instances referenced in the associated launch configuration, or to scale in and terminate instances.
- Various ways to configure a scaling policy:
- increase or decrease by a specific number of instances, or
- adjust based on a percentage.
- scale by steps and increase or decrease the current capacity of the group based on a set of scaling adjustments that vary based on the size of the alarm threshold trigger.
-
More than one scaling policy can be associated with an Auto Scaling group. E.g., One policy to scale out if CPU Load > 75% for 2 minutes. Another policy to scale in if CPU Load < 40% for 20 minutes.
- Best Practice
- Scale out quickly and scale in slowly so you can respond to bursts or spikes but avoid inadvertently terminating EC2 instances too quickly, only having to launch more EC2 instances if the burst is sustained.
- Auto Scaling also supports a cooldown period, which is a configurable setting that determines when to suspend scaling activities for a short time for an Auto Scaling group.
- If you start an EC2 instance, you will be billed for one full hour of running time. Partial instance hours consumed are billed as full hours. This means that if you have a permissive scaling policy that launches, terminates, and re-launches many instances an hour, you are billing a full hour for each and every instance you launch, even if you terminate some of those instances in less than hour.
- Bootstrapping new EC2 instances launched using Auto Scaling takes time to configure before the instance is healthy and capable of accepting traffic. Instances that start and are available for load faster can join the capacity pool more quickly.
- Stateless instances can enter and exit gracefully than a stateful instance in an Auto Scaling group.
- Rolling Out a Patch at Scale
- In large deployments of EC2 instances, Auto Scaling can be used to make rolling out a patch to your instances easy.
- The launch configuration associated with the Auto Scaling group may be modified to reference a new AMI and even a new EC2 instance if needed. Then you can deregister or terminate instances one at a time or in small groups, and the new EC2 instances will reference the new patched AMI.
Elastic Load Balancing (ELB)
-
automatically distributes incoming application traffic across multiple EC2 instances. (for fault-tolerance)
- ELB allows to distribute traffic across a group of EC2 instances in one or more Availability Zones, to achieve high availability in your applications.
- ELB supports routing and load balancing of HTTP, HTTPS, TCP, and SSL traffic to EC2 instances.
- ELB provides a stable, single Canonical Name record (CNAME) entry point for DNS configuration and supports both Internet-facing and internal application-facing load balancers.
- ELB supports health checks for EC2 instances to ensure traffic is not routed to unhealthy or failing instances. It can scale automatically based on collected metrics.
- Long-running applications will eventually need to be maintained and updated with a newer version of the application. When using EC2 instances running behind an ELB load balancer, you may deregister these long-running EC2 instances associated with a load balancer manually and then register newly launched EC2 instances that you have started with the new updates installed.
- Advantages of ELB
- Because ELB is a managed service, it scales in and out automatically to meet the demands of increased application traffic and is highly available within a region itself as a service.
- ELB helps you achieve high availability for your applications by distributing traffic across healthy instances in multiple Availability Zones.
- ELB seamlessly integrates with the Auto Scaling service to automatically scale the EC2 instances behind the load balancer.
- ELB is secure, working with VPC to route traffic internally between application tiers, allowing you to expose only Internet-facing public IP addresses.
- ELB also supports integrated certificate management and SSL termination.
Types of Load Balancers
Internet-Facing Load Balancers
- Takes requests from clients over the Internet and distributes them to EC2 instances that are registered with the load balancer.
- When you configure a load balancer, it receives a public DNS name that clients can use to send requests to your application. The DNS servers resolve the DNS name to your load balancer’s public IP address, which can be visible to client applications.
- Because ELB scales in and out to meet traffic demand, it is not recommended to bind an application to an IP address that may no longer be part of a load balancer’s pool of resources.
- Best practice: always refer a load balancer by its DNS name, instead of by the IP address, in order to provide a single, stable entry point.
- ELB in VPC supports IPv4 addresses only.
- ELB in EC2-Classic supports both IPv4 and IPv6 addresses.
Internal Load Balancers
- In a multi-tier application, it is often useful to load balance between the tiers of the application. For example, an Internet-facing load balancer might receive and balance external traffic to the presentation or web tier whose EC2 instances then send its requests to a load balancer sitting in front of the application tier.
- Internal load balancers can be used to route traffic to EC2 instances in VPCs with private subnets.
HTTPS Load Balancers
- Load balancer that uses the SSL/TLS protocol for encrypted connections (also known as SSL offload).
- This feature enables traffic encryption between your load balancer and the clients that initiate HTTPS sessions, and for connections between your load balancer and your back-end instances.
- Elastic Load Balancing provides security policies that have predefined SSL negotiation configurations to use to negotiate connections between clients and the load balancer. In order to use SSL, you must install an SSL certificate on the load balancer that it uses to terminate the connection and then decrypt requests from clients before sending requests to the back-end EC2 instances.
- You can optionally choose to enable authentication on your back-end instances.
- ELB does not support Server Name Indication (SNI) on your load balancer. This means that if you want to host multiple websites on a fleet of EC2 instances behind ELB with a single SSL certificate, you will need to add a Subject Alternative Name (SAN) for each website to the certificate to avoid site users seeing a warning message when the site is accessed.
Listeners
- A listener is a process that checks for connection requests—for example, a CNAME configured to the A record name of the load balancer.
- Every load balancer must have one or more listeners configured.
- Every listener is configured with
- a protocol and a port (client to load balancer) for a front-end connection
- a protocol and a port for the back-end (load balancer to EC2 instance) connection.
- ELB supports protocols operating at two different Open System Interconnection (OSI) layers.
- In the OSI model, Layer 4 is the transport layer that describes the TCP connection between the client and your back-end instance through the load balancer. Layer 4 is the lowest level that is configurable for your load balancer.
- Layer 7 is the application layer that describes the use of HTTP and HTTPS connections from clients to the load balancer and from the load balancer to your back-end instance.
ELB Configurations
Idle Connection Timeout
- For each request that a client makes through a load balancer, the load balancer maintains two connections.
- Connection 1: with the client
- Connection 2: to the back-end instance
- For each connection, the load balancer manages an idle timeout that is triggered when no data is sent over the connection for a specified time period. After the idle timeout period has elapsed, if no data has been sent or received, the load balancer closes the connection.
- Default idle timeout for both connections = 60 seconds. This can be modified.
- If an HTTP request doesn’t complete within the idle timeout period, the load balancer closes the connection, even if data is still being transferred.
- Keep-alive
- If you use HTTP and HTTPS listeners, we recommend that you enable the keep-alive option for your EC2 instances. You can enable keep-alive in your web server settings or in the kernel settings for your EC2 instances.
- Keep-alive, when enabled, allows the load balancer to reuse connections to your back-end instance, which reduces CPU utilization.
- To ensure that the load balancer is responsible for closing the connections to your back-end instance, make sure that the value you set for the keep-alive time is greater than the idle timeout setting on your load balancer.
Cross-Zone Load Balancing
- To ensure that request traffic is routed evenly across all back-end instances for your load balancer, regardless of the Availability Zone in which they are located, you should enable cross-zone load balancing on your load balancer.
- Cross-zone load balancing reduces the need to maintain equivalent numbers of back-end instances in each Availability Zone and improves your application’s ability to handle the loss of one or more back-end instances.
- However, it is still recommended that you maintain approximately equivalent numbers of instances in each Availability Zone for higher fault tolerance.
- For environments where clients cache DNS lookups, incoming requests might favor one of the Availability Zones. Using cross-zone load balancing, this imbalance in the request load is spread across all available back-end instances in the region, reducing the impact of misconfigured clients.
Connection Draining
- To ensure that the load balancer stops sending requests to instances that are deregistering or unhealthy, while keeping the existing connections open. This enables the load balancer to complete in-flight requests made to these instances.
- When you enable connection draining, you can specify a maximum time for the load balancer to keep connections alive before reporting the instance as deregistered.
- The maximum timeout value can be set between 1 and 3,600 seconds (the default is 300 seconds).
- When the maximum time limit is reached, the load balancer forcibly closes connections to the deregistering instance.
Proxy Protocol
- When you use TCP or SSL for both front-end and back-end connections, your load balancer forwards requests to the back-end instances without modifying the request headers.
- If you enable Proxy Protocol, a human-readable header is added to the request header with connection information such as the source IP address, destination IP address, and port numbers. The header is then sent to the back-end instance as part of the request.
- Before using Proxy Protocol, verify that your load balancer is not behind a proxy server with Proxy Protocol enabled. If Proxy Protocol is enabled on both the proxy server and the load balancer, the load balancer adds another header to the request, which already has a header from the proxy server. Depending on how your back-end instance is configured, this duplication might result in errors.
Sticky Sessions
- By default, a load balancer routes each request independently to the registered instance with the smallest load. However, you can use the sticky session feature (also known as session affinity), which enables the load balancer to bind a user’s session to a specific instance. This ensures that all requests from the user during the session are sent to the same instance.
- The key to managing sticky sessions is to determine how long your load balancer should consistently route the user’s request to the same instance. If your application has its own session cookie, you can configure ELB so that the session cookie follows the duration specified by the application’s session cookie.
- If your application does not have its own session cookie, you can configure ELB to create a session cookie by specifying your own stickiness duration.
- ELB creates a cookie named AWSELB that is used to map the session to the instance.
Health Checks
- ELB supports health checks to test the status of the EC2 instances behind an ELB load balancer.
- If healthy, status = InService, else OutOfService.
- The load balancer performs health checks on all registered instances to determine whether the instance is in a healthy state or an unhealthy state.
- A health check is a ping, a connection attempt, or a page that is checked periodically.
- You can set the time interval between health checks and also the amount of time to wait to respond in case the health check page includes a computational aspect.
- Finally, you can set a threshold for the number of consecutive health check failures before an instance is marked as unhealthy.
AWS Elastic Beanstalk
- AWS Elastic Beanstalk is the fastest and simplest way to get an application up and running on AWS.
- Developers can simply upload their application code, and the service automatically handles all the details, such as resource provisioning, load balancing, Auto scaling, and monitoring.
- With AWS Elastic Beanstalk, you can quickly deploy and manage applications on the AWS cloud without worrying about the infrastructure that runs those applications. * An AWS Elastic Beanstalk application is the logical collection of these AWS Elastic Beanstalk components, which includes environments, versions, and environment configurations.
- In AWS Elastic Beanstalk, an application is conceptually similar to a folder.
- Application Version
- An application version refers to a specific, labeled iteration of deployable code for a web application.
- An application version points to an S3 object that contains the deployable code.
- Applications can have many versions and each application version is unique.
- In a running environment, organizations can deploy any application version they already uploaded to the application, or they can upload and immediately deploy a new application version.
- Organizations might upload multiple application versions to test differences between one version of their web application and another.
- Environment
- An environment is an application version that is deployed onto AWS resources.
- Each environment runs only a single application version at a time; however, the same version or different versions can run in as many environments at the same time as needed.
- When an environment is created, AWS Elastic Beanstalk provisions the resources needed to run the application version that is specified.
- Environment Configuration
- An environment configuration identifies a collection of parameters and settings that define how an environment and its associated resources behave.
- When an environment’s configuration settings are updated, AWS Elastic Beanstalk automatically applies the changes to existing resources or deletes and deploys new resources depending on the type of change.
- When an AWS Elastic Beanstalk environment is launched, the environment tier, platform, and environment type are specified.
- Environment tier : that determines whether AWS Elastic Beanstalk provisions resources to support a web application that handles HTTP(S) requests (web server tier) or an application that handles background-processing tasks (worker tier).
- Elastic Beanstalk provides platform support for the programming languages Java, Node.js, PHP, Python, Ruby, and Go with support for the web containers Tomcat, Passenger, Puma, and Docker.
Use Cases
A company provides a website for prospective home buyers, sellers, and renters to browse home and apartment listings for more than 110 million homes. The website processes more than three million new images daily. It receives more than 17,000 image requests per second on its website during peak traffic from both desktop and mobile clients. The company was looking for ways to be more agile with deployments and empower its developers to focus more on writing code instead of spending time managing and configuring servers, databases, load balancers, firewalls, and networks. It began using AWS Elastic Beanstalk as the service for deploying and scaling the web applications and services. Developers were empowered to upload code to AWS Elastic Beanstalk, which then automatically handled the deployment, from capacity provisioning, load balancing, and Auto Scaling, to application health monitoring. Because the company ingests data in a haphazard way, running feeds that dump a ton of work into the image processing system all at once, it needs to scale up its image converter fleet to meet peak demand. The company determined that an AWS Elastic Beanstalk worker fleet to run a Python Imaging Library with custom code was the simplest way to meet the requirement. This eliminated the need to have a number of static instances or, worse, trying to write their own Auto Scaling configuration. By making the move to AWS Elastic Beanstalk, the company was able to reduce operating costs while increasing agility and scalability for its image processing and delivery system.
Key Features
- Additionally, developers retain full control over the AWS resources powering their application and can perform a variety of functions by simply adjusting the configuration settings such as:
- Selecting the EC2 instance type
- Choosing the database and storage options
- Enabling login access to EC2 instances
- Enhancing application security by enabling HTTPS protocol on the load balancer
- Adjusting application server settings (for example, JVM settings) and passing environment variables
- Adjust Auto Scaling settings to control the metrics and thresholds used to determine when to add or remove instances from an environment
AWS Virtual Private Cloud (VPC)
- VPC is a custom-defined virtual network within AWS cloud
- VPC is the networking layer for EC2
- 2 networking platforms in AWS
- EC2-Classic (old) - single, flat n/w shared with other customers
- EC2-VPC
- VPC consists of
- Subnets
- Route tables
- DHCP option sets
- Security groups
- Network ACLs
- Internet Gateways (optional)
- EIP addresses (optional)
- Elastic Network Interfaces ENIs (optional)
- Endpoints (optional)
- Peering (optional)
- NAT instances and NAT gateways (optional)
- Virtual Private Gateways (VPGs), Customer Gateways (CGWs), VPNs
- (optional)
- VPC allows to
- select your own IP address range
- create your own subnets
- configure your own route tables, n/w gateways and security settings
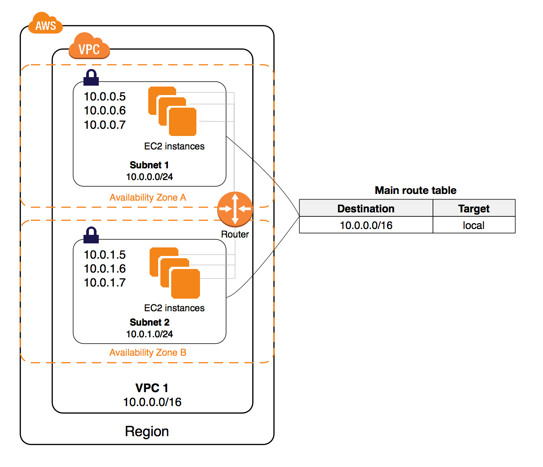
- Within a region, you can create multiple VPCs. Each VPC is logically isolated even if it shared its IP address space
- VPC can span across Availability Zones
- To create a VPC, choose CIDR block
- which cannot be changed after creation
- As large as /16 (65,636 addresses) or as small as /28 (16 addresses).
- Should not overlap
- Every account has a default VPC created in each region with a default subnet created in each Availability Zone.
- The assigned CIDR block of the VPC will be 172.31.0.0/16
- Default VPCs contain one public subnet in every Availability Zone with the region, with a netmask of /20
- Orgs can extend their corporate data center n/w to AWS by using h/w or s/w VPN connections or dedicated circuits by using AWS Direct Connect.
Subnets
- A subnet is a segment of VPC’s IP address range where you can launch EC2 instances, RDS databases, etc.
- CIDR blocks defines subnets
- Smallest subnet you can create is a /28 (16 addresses).
- AWS reserves the first 4 addresses and the last IP address of every subnet for internal networking purposes. So,
16-4-1 = 11IP addresses is the smallest subnet.
- AWS reserves the first 4 addresses and the last IP address of every subnet for internal networking purposes. So,
- Subnets reside within one Availability Zone. CANNOT span across zones or regions.
- One Availability Zone can have multiple subnets
- Internal IP address range of the subnet is always private
- Subnets can be classified as one of the below
- Public : route table directs the subnet’s traffic to VPC’s IGW
- Private: route table DOES NOT direct the traffic to VPC’s IGW
- VPN-only: route table DOES NOT direct the traffic to VPC’s IGW, but to the VPC’s VPG
Route Tables
- contains a set of rules called rules that are applied to subnets to determine where the network traffic is directed
- allows EC2 instances in different subnets within a VPC to communicate with each other
- Route tables can be used to specify
- which subnets are public (by directing Internet traffic to IGW)
- which subnets are private (by not having a route that directs to IGW)
- Each route table
- has a default route called the local route, which enables communication within the VPC. This route cannot be modified or removed.
- custom routes can be added to exit the VPC via IGW, VPG or the NAT instance
- Each VPC comes with a main router table that can be modified.
- Custom route tables can be added, and subsequent new subnets created will be automatically associated with this custom route table
- Each subnet must be associated with a route table
- Each route in a table specifies a destination CIDR.
IGW (Internet Gateways)

- IGW allows communication between instances in VPC and the Internet.
- IGW is horizontally scaled, redundant, and highly available VPC component
- To route traffic subnets to Internet, route tables must have a route targeting the IGW
- To enable an EC2 instance to send/receive traffic from the Internet, assign a public IP address or EIP address
- IGW maintains the 1-to-1 map of the EC2 instance’s private IP and public IP.
- EC2 instances within a VPC are only aware of their private IPs. When traffic is sent from the instance to the Internet, the IGW translates the reply address to the public IP address of the instance.
- To create a public subnet with Internet access
- Attach an IGW to your VPC
- Create a subnet route table
- rule to route all non-local traffic (0.0.0.0/0) to the IGW
- (optional) rule to route all destinations not explicitly defined in the route table to IGW
- Configure your n/w ACLs and security group rules to allow relevant traffic flow to and from your instance
DHCP
- DHCP - a standard for passing configuration information to hosts on a TCP/IP n/w
- Following options can be configured within a DHCP message:
- DNS servers - IP addresses of up to 4 DNS servers.
- Domain name - e.g., mycompany.com
- ntp-servers - IP addresses of up to 4 NTP (Network Time Protocol) servers
- netbios-name-servers - IP addresses of up to 4 NetBIOS name servers
- netbios-node-type - set this to 2
- Upon a VPC creation, AWS automatically associates a DHCP option set to it, and sets 2 options
- DNS servers (defaulted to AmazonProvidedDNS. This option enables DNS for instances that need to communicate over the VPC’s IGW)
- Domain name (defaulted to domain name of your region)
- To assign your own domain name to your instances, create a custom DHCP option set and assign it to your VPC
- Each VPC must have only one DHCP option set assigned to it.
EIPs (Elastic IP Addresses)
- An Elastic IP Addresses (EIP) is a static, public IP address in the pool for the region that you can allocate to your account (pull from the pool) and release (return to the pool).
- EIPs allow you to maintain a set of IP addresses that remain fixed while the underlying infrastructure may change over time.
- You must first allocate an EIP for use within a VPC and then assign it to an instance.
- EIPs are specific to a region (that is, an EIP in one region cannot be assigned to an instance within an VPC in a different region).
- There is a one-to-one relationship between network interfaces and EIPs.
- You can move EIPs from one instance to another, either in the same VPC or a different VPC within the same region.
- EIPs remain associated with your AWS account until you explicitly release them.
- There are charges for EIPs allocated to your account, even when they are not associated with a resource.
ENIs (Elastic Network Interfaces)
- An ENI is a virtual network interface that you can attach to an instance in an VPC.
- ENIs are only available within an VPC, and they are associated with a subnet upon creation.
- They can have 1 public IP address, 1 primary private IP and multiple non-primary private IPs.
- Assigning a second network interface to an instance via an ENI allows it to be dual-homed (have network presence in different subnets).
- An ENI created independently of a particular instance persists regardless of the lifetime of any instance to which it is attached; if an underlying instance fails, the IP address may be preserved by attaching the ENI to a replacement instance.
Endpoints
- An VPC endpoint enables you to create a private connection between your VPC and another AWS service without requiring access over the Internet or through a NAT instance, VPN connection, or AWS Direct Connect.
- Multiple endpoints can be created for a single service, and use different route tables to enforce different access policies from different subnets to the same service.
- To create an VPC endpoint:
- Specify the VPC.
- Specify the service. A service is identified by a prefix list of the form
com.amazonaws.<region>.<service>. - Specify the policy. You can allow full access or create a custom policy. This policy can be changed at any time.
- Specify the route tables. A route will be added to each specified route table, which will state the service as the destination and the endpoint as the target.
Below route table directs all Internet traffic (0.0.0.0/0) to an IGW. Any traffic destined to another service will also be sent to the IGW in order to reach that service.
| Destination | Target |
|---|---|
| 10.0.0.0/16 | Local |
| 0.0.0.0/0 | igw-1a2b3c4d |
Below route table adds the route to direct S3 traffic to the VPC Endpoint
| Destination | Target |
|---|---|
| 10.0.0.0/16 | Local |
| 0.0.0.0/0 | igw-1a2b3c4d |
| p1-1a2b3c4d | vpce-1a2b3c4d |
Peering
- An VPC peering connection is a networking connection between two VPCs that enables instances in either VPC to communicate with each other as if they are within the same network.
- Peering connection can be created
- between your own VPCs or
- with an VPC in another AWS account within a single region.
- A peering connection is neither a gateway nor an Amazon VPN connection and does not introduce a single point of failure for communication.
- Peering connections are created through a request/accept protocol. The owner of the requesting VPC sends a request to peer to the owner of the peer VPC.
- If the peer VPC is within the same account, it is identified by its VPC ID.
- If the peer VPC is within a different account, it is identified by Account ID and VPC ID.
- The owner of the peer VPC has one week to accept or reject the request before it expires.
- A VPC may have multiple peering connections, and peering is a one-to-one relationship between VPC.
- Peering connections DO NOT support transitive routing. In other words, if there are peering connections between VPC A & B, and VPC B & C, it does NOT mean VPC A & C can peer directly with each other.
- A peering connection CANNOT be created between VPCs that have matching or overlapping CIDR blocks.
- A peering connection CANNOT be created between VPCs in different regions.
- There CANNOT have more than one peering connection between the same two VPCs at the same time.
Security Groups
- A security group is a virtual stateful firewall that controls inbound and outbound network traffic to AWS resources and EC2 instances.
- All EC2 instances MUST be launched into a security group.
- Default Security Group
- If an SG is not specified at launch, then the instance will be launched into the default SG for the VPC.
- The default SG allows communication between all resources within the security group,
- allows all outbound traffic, and
- denies all other traffic.
- Default SG CANNOT be deleted.
- Rules in default SG can be changed.
- Up to 500 SGs can be created per VPC.
- Up to 50 inbound and 50 outbound rules can be added per SG.
- Up to 5 SGs can be associated per Network Interface.
- To apply more than 100 rules to an instance, associate multiple SGs.
- You can specify allow rules, but NOT deny rules. This is an important difference between SGs and ACLs.
- can specify separate rules for inbound and outbound traffic.
- By default, no inbound traffic is allowed until added.
- By default, new SGs have an outbound rule that allows all outbound traffic. You can remove the rule and add your custom rules.
- SGs are stateful. This means that responses to allowed inbound traffic are allowed to flow outbound regardless of outbound rules and vice versa. This is an important difference between security groups and network ACLs.
- Instances associated with the same security group CANNOT talk to each other unless you add rules allowing it (with the exception being the default security group).
- SGs associated with an instance can be changed after launch, and changes will take effect immediately.
Sample Security Group
Inbound
| Inbound | Source | Protocol | Port Range | Comments |
|---|---|---|---|---|
| sg-xxxxxxxx | All | All | Allow inbound traffic from instances within the same SG | |
| 0.0.0.0/0 | TCP | 8 | Allow inbound traffic from the Internet port 80 |
| Outbound | Destination | Protocol | Port Range | Comments |
|---|---|---|---|---|
| 0.0.0.0/0 | All | All | Allow all outbound traffic |
Network ACLs (Access Control Lists)
- ACL is a stateless firewall on a subnet level.
- This is another layer of security in addition to SGs.
- A network ACL is a numbered list of rules that AWS evaluates in order, starting with the lowest numbered rule, to determine whether traffic is allowed in or out of any subnet associated with the network ACL.
- VPCs are created with a modifiable default network ACL associated with every subnet that allows all inbound and outbound traffic.
- When you create a custom network ACL, its initial configuration will deny all inbound and outbound traffic
- You may set up network ACLs with rules similar to your security groups in order to add a layer of security to your VPC, or you may choose to use the default network ACL that does not filter traffic traversing the subnet boundary.
- Overall, every subnet must be associated with a network ACL.
| Security Group | Network ACL |
|---|---|
| Operates at the instance level (1st layer of defense) | Operates at the subnet level (2nd layer of defense) |
| Supports allow rules only | Supports both allow and deny rules |
| Stateful firewall: Return traffic automatically allowed | Stateless firewall: Return traffic must be explicitly allowed by rules |
| AWS evaluates all rules before deciding whether to allow traffic | AWS processes rules in number order when deciding whether to allow traffic |
| Applied selectively to individual instances | Automatically applied to all instances in the associated subnets; this is a backup layer of defense, so you don’t have to rely on someone specifying the security group |
NAT Instances (Network Address Translation)
- NAT instances and NAT gateways allow instances deployed in private subnets to gain Internet access.
- By default, any instance that you launch into a private subnet in an VPC is not able to communicate with the Internet through the IGW.
- NAT instance is an Amazon Linux AMI designed to accept traffic from instances within a private subnet, translate the source IP address to the public IP address of the NAT instance, and forward the traffic to the IGW.
- In addition, the NAT instance maintains the state of the forwarded traffic in order to return response traffic from the Internet to the proper instance in the private subnet.
- These instances have the string
amzn-ami-vpc-natin their names, which is searchable in the EC2 console. - To allow instances within a private subnet to access Internet resources through the IGW via a NAT instance, you must do the following:
- Create a security group for the NAT with outbound rules that specify the needed Internet resources by port, protocol, and IP address.
- Launch an Amazon Linux NAT AMI as an instance in a public subnet and associate it with the NAT security group.
- Disable the Source/Destination Check attribute of the NAT.
- Configure the route table associated with a private subnet to direct Internet-bound traffic to the NAT instance (for example, i-1a2b3c4d).
- Allocate an EIP and associate it with the NAT instance.
- This configuration allows instances in private subnets to send outbound Internet communication, but it prevents the instances from receiving inbound traffic initiated by someone on the Internet.
NAT Gateways
- A NAT gateway is an Amazon managed resource that is designed to operate just like a NAT instance, but it is simpler to manage, requires less administrative effort and highly available within an Availability Zone.
- For common use cases, use a NAT gateway instead of a NAT instance.
- To allow instances within a private subnet to access Internet resources through the IGW via a NAT gateway, you must do the following:
- Configure the route table associated with the private subnet to direct Internet-bound traffic to the NAT gateway (for example, nat-1a2b3c4d).
- Allocate an EIP and associate it with the NAT gateway.
- Like a NAT instance, this managed service allows outbound Internet communication and prevents the instances from receiving inbound traffic initiated by someone on the Internet.
- To create an Availability Zone-independent architecture, create a NAT gateway in each Availability Zone and configure your routing to ensure that resources use the NAT gateway in the same Availability Zone.
VPGs, CGWs and VPNs
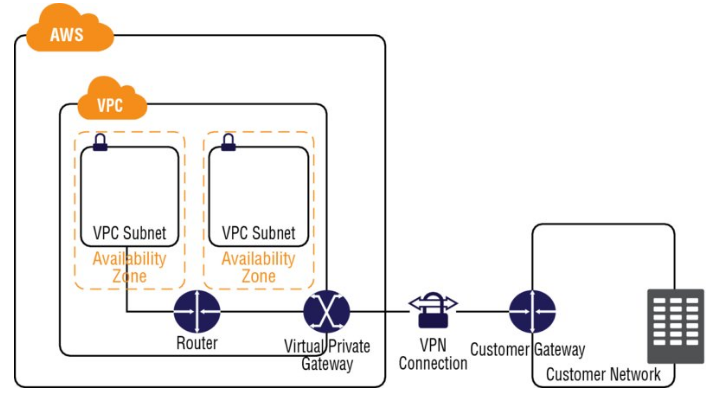
- VPC offers two ways to connect a corporate network to a VPC: VPG and CGW.
- VPG (Virtual Private Gateway)
- is the virtual private network (VPN) concentrator on the AWS side of the VPN connection between the two networks.
- The VPG is the AWS end of the VPN tunnel.
- VPGs support both dynamic routing with Border Gateway Protocol (BGP) and static routing.
- Customer gateway (CGW)
- The CGW is a hardware or software application on the customer’s side of the VPN tunnel.
- VPC will provide the information needed by the network administrator to configure the CGW and establish the VPN connection with the VPG.
- VPC also supports multiple CGWs, each having a VPN connection to a single VPG (many-to-one design). In order to support this topology, the CGW IP addresses must be unique within the region.
- Virtual Private Network (VPN)
- After these VPG and CGW are created, the last step is to create a VPN tunnel.
- VPN tunnel MUST be initiated from the CGW to the VPG.
- You must specify the type of routing that you plan to use when you create a VPN connection.
- If the CGW supports Border Gateway Protocol (BGP), then configure the VPN connection for dynamic routing.
- Otherwise, configure the connections for static routing. If you will be using static routing, you must enter the routes for your network that should be communicated to the VPG. Routes will be propagated to the VPC to allow your resources to route network traffic back to the corporate network through the VGW and across the VPN tunnel.
- The VPN connection consists of two Internet Protocol Security (IPSec) tunnels for higher availability to the VPC.
AWS Direct Connect
- allows organizations to establish a dedicated n/w connection from their data center to AWS.
Amazon Route 53
- is a highly available and scalable DNS web service. Also serves as domain registrar, allowing you to purchase and manage domains directly from AWS
- Amazon Route 53 performs 3 main functions. You can use none or any combination of these functions:
- Domain registration
- DNS service
- Health checking
- DNS uses port 53 to serve requests
- Domain Registration
- a registered website can be transfered to Route 53
- It isn’t required to use Route 53 as your DNS service or to configure health checking for your resources.
- Route 53 supports a wide variety of generic TLDs (for example, .com and .org) and geographic TLDs (for example, .be and .us).
- DNS Service
- Route 53 responds to DNS queries using a global network of authoritative DNS servers, which reduces latency.
- To comply with DNS standards, responses sent over UDP protocol are limited to 512 bytes in size.
- Responses exceeding 512 bytes are truncated, and the resolver must re-issue the request over TCP.
- If you register a new domain name with Route 53, then Route 53 will be automatically configured as the DNS service for the domain, and a hosted zone will be created for your domain.
- You add resource record sets to the hosted zone, which define how you want Route 53 to respond to DNS queries for your domain (for example, with the IP address for a web server, the IP address for the nearest CloudFront edge location, or the IP address for an Elastic Load Balancing load balancer).
- If you registered your domain with another domain registrar, that registrar is probably providing the DNS service for your domain. You can transfer DNS service to Route 53, with or without transferring registration for the domain.
- Health Check
- Route 53 sends automated requests over the Internet to your application to verify that it’s reachable, available, and functional.
- Route 53 health checks monitor the health of your resources such as web servers and email servers.
- You can configure CloudWatch alarms for your health checks so that you receive notification when a resource becomes unavailable.
- You can also configure Route 53 to route Internet traffic away from resources that are unavailable.
- High Availability and Resiliency
- Health checks and DNS failover are major tools in the Route 53 feature set that help make your application highly available and resilient to failures.
- If you deploy an application in multiple Availability Zones and multiple AWS regions, with Route 53 health checks attached to every endpoint, Route 53 can send back a list of healthy endpoints only.
- Health checks can automatically switch to a healthy endpoint with minimal disruption to your clients and without any configuration changes.
- You can use this automatic recovery scenario in active-active or active-passive setups, depending on whether your additional endpoints are always hit by live traffic or only after all primary endpoints have failed.
- Using health checks and automatic failovers, Route 53 improves your service uptime, especially when compared to the traditional monitor-alert-restart approach of addressing failures.
- Route 53 health checks are not triggered by DNS queries; they are run periodically by AWS, and results are published to all DNS servers. This way, name servers can be aware of an unhealthy endpoint and route differently within approximately 30 seconds of a problem (after three failed tests in a row), and new DNS results will be known to clients a minute later (assuming your TTL is 60 seconds), bringing complete recovery time to about a minute and a half in total in this scenario.
- Hosted Zones
- A hosted zone is a collection of resource record sets hosted by Route 53.
- Like a traditional DNS zone file, a hosted zone represents resource record sets that are managed together under a single domain name.
- Each hosted zone has its own metadata and configuration information.
- 2 types of hosted zones:
- Private hosted zone: is a container that holds information about how you want to route traffic for a domain and its subdomains within one or more VPCs.
- Public hosted zone: is a container that holds information about how you want to route traffic on the Internet for a domain (for example,
example.com) and its subdomains (for example,apex.example.comandacme.example.com).
- The resource record sets contained in a hosted zone must share the same suffix. e.g., the
example.comhosted zone can contain resource record sets for thewww.example.comandwww.aws.example.comsubdomains, but it cannot contain resource record sets for awww.example.casubdomain. - You can use S3 to host your static website at the hosted zone (for example,
domain.com) and redirect all requests to a subdomain (for example,www.domain.com). Then, in Route 53, you can create an alias resource record that sends requests for the root domain to the S3 bucket. - DO NOT use CNAME for your hosted zone. Use an alias record. CNAMEs are not allowed for hosted zones in Route 53.
- DO NOT use A records for subdomains (for example,
www.domain.com), as they refer to hardcoded IP addresses. Use Route 53 alias records or traditional CNAME records to always point to the right resource, wherever your site is hosted, even when the physical server has changed its IP address.
Supported Record Types
- Route 53 supports the following DNS resource record types:
AAAAACNAMEMXNSPTRSOASPFSRVTXT
- When you access Route 53 using the API, you will see examples of how to format the
Valueelement for each record type.
Routing Policies
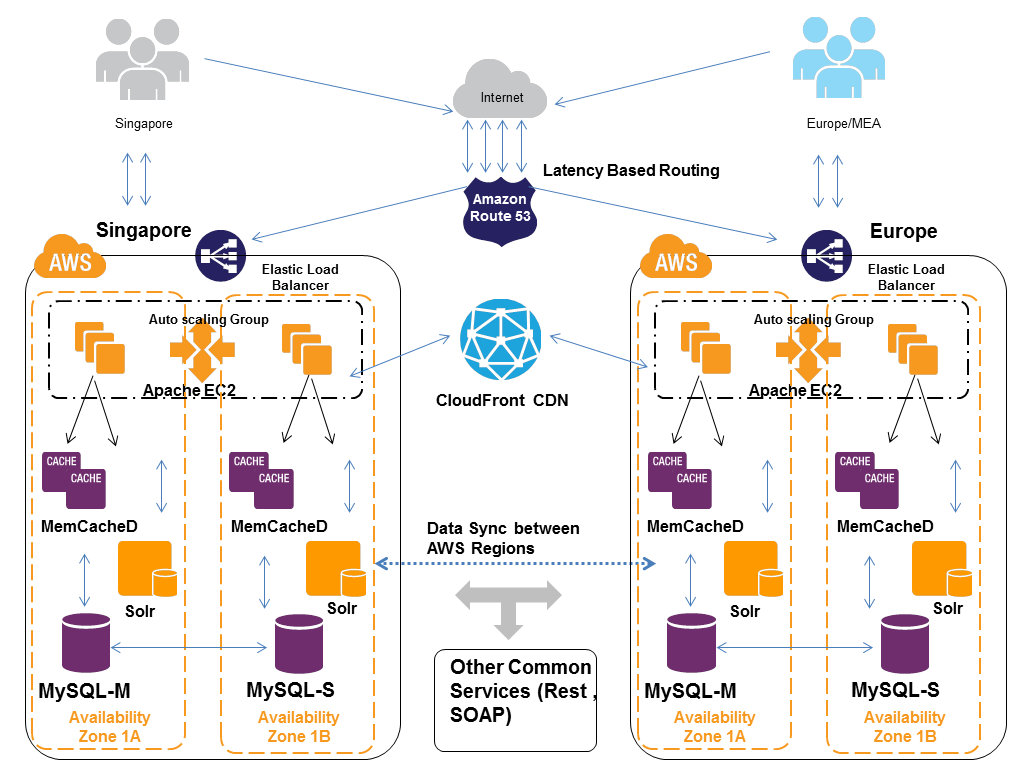
- When you create a resource record set, you choose a routing policy, which determines how Route 53 responds to queries.
- Routing policy options: simple, weighted, latency-based, failover, and geolocation.
- When specified, Route 53 evaluates a resource’s relative weight, the client’s network latency to the resource, or the client’s geographical location when deciding which resource to send back in a DNS response.
- Routing policies can be associated with health checks, so resource health status is considered before it even becomes a candidate in a conditional decision tree.
- Simple
- Default routing policy when a new resource is created.
- Use a simple routing policy when you have a single resource that performs a given function for your domain (for example, one web server that serves content for the
example.comwebsite). In this case, Route 53 responds to DNS queries based only on the values in the resource record set (for example, the IP address in an A record).
- Weighted
- With weighted DNS, you can associate multiple resources (such as EC2 instances or ELB load balancers) with a single DNS name.
- Use the weighted routing policy when you have multiple resources that perform the same function (such as web servers that serve the same website), and you want Route 53 to route traffic to those resources in proportions that you specify. For example, you may use this for load balancing between different AWS regions or to test new versions of your website (you can send 10 percent of traffic to the test environment and 90 percent of traffic to the older version of your website).
- To create a group of weighted resource record sets, you need to create two or more resource record sets that have the same DNS name and type. You then assign each resource record set a unique identifier and a relative weight.
- When processing a DNS query, Route 53 searches for a resource record set or a group of resource record sets that have the same name and DNS record type (such as an A record). Route 53 then selects one record from the group.
- The probability of any resource record set being selected is governed by the following formula:
Weight for a given resource record set / Sum of the weights for the resource record sets in the group
- Latency-Based
- Latency-based routing allows you to route your traffic based on the lowest network latency for your end user (for example, using the AWS region that will give them the fastest response time).
- Use the latency routing policy when you have resources that perform the same function in multiple AWS Availability Zones or regions and you want Route 53 to respond to DNS queries using the resources that provide the best latency. For example, suppose you have ELB load balancers in the U.S. East region and in the Asia Pacific region, and you created a latency resource record set in Route 53 for each load balancer.
- A user in London enters the name of your domain in a browser, and DNS routes the request to an Route 53 name server. Route 53 refers to its data on latency between London and the Singapore region and between London and the Oregon region. If latency is lower between London and the Oregon region, Route 53 responds to the user’s request with the IP address of your load balancer in Oregon. If latency is lower between London and the Singapore region, Route 53 responds with the IP address of your load balancer in Singapore.
- Failover
- Use a failover routing policy to configure active-passive failover, in which one resource takes all the traffic when it’s available and the other resource takes all the traffic when the first resource isn’t available.
- Note: you can’t create failover resource record sets for private hosted zones.
- For example, you might want your primary resource record set to be in U.S. West (N. California) and your secondary, Disaster Recovery (DR) resource(s) to be in U.S. East (N. Virginia). Route 53 will monitor the health of your primary resource endpoints using a health check.
- A health check tells Route 53 how to send requests to the endpoint whose health you want to check: which protocol to use (HTTP, HTTPS, or TCP), which IP address and port to use, and, for HTTP/HTTPS health checks, a domain name and path.
- After you have configured a health check, Amazon will monitor the health of your selected DNS endpoint. If your health check fails, then failover routing policies will be applied and your DNS will fail over to your DR site.
- Geolocation
- Geolocation routing lets you choose where Route 53 will send your traffic based on the geographic location of your users (the location from which DNS queries originate). For example, you might want all queries from Europe to be routed to a fleet of EC2 instances that are specifically configured for your European customers, with local languages and pricing in Euros.
- can also use geolocation routing to restrict distribution of content to only the locations in which you have distribution rights. Another possible use is for balancing load across endpoints in a predictable, easy-to-manage way so that each user location is consistently routed to the same endpoint.
- can specify geographic locations by continent, by country, or even by state in the United States.
- You can also create separate resource record sets for overlapping geographic regions, and priority goes to the smallest geographic region. For example, you might have one resource record set for Europe and one for the UK. This allows you to route some queries for selected countries (in this example, the United Kingdom) to one resource and to route queries for the rest of the continent (in this example, Europe) to a different resource.
- Geolocation works by mapping IP addresses to locations. You should be cautious, however, as some IP addresses aren’t mapped to geographic locations. Even if you create geolocation resource record sets that cover all seven continents, Route 53 will receive some DNS queries from locations that it can’t identify. In this case, you can create a default resource record set that handles both queries from IP addresses that aren’t mapped to any location and queries that come from locations for which you haven’t created geolocation resource record sets.
- If you don’t create a default resource record set, Route 53 returns a “no answer” response for queries from those locations.
- You cannot create two geolocation resource record sets that specify the same geographic location.
- You also cannot create geolocation resource record sets that have the same values for “Name” and “Type” as the “Name” and “Type” of non-geolocation resource record sets.
Route 53 Enables Resiliency
When pulling these concepts together to build an application that is highly available and resilient to failures, consider these building blocks:
- In every AWS region, an ELB load balancer is set up with cross-zone load balancing and connection draining. This distributes the load evenly across all instances in all Availability Zones, and it ensures requests in flight are fully served before an EC2 instance is disconnected from an ELB load balancer for any reason.
- Each ELB load balancer delegates requests to EC2 instances running in multiple Availability Zones in an auto-scaling group. This protects the application from Availability Zone outages, ensures that a minimal amount of instances is always running, and responds to changes in load by properly scaling each group’s EC2 instances.
- Each ELB load balancer has health checks defined to ensure that it delegates requests only to healthy instances.
- Each ELB load balancer also has an Route 53 health check associated with it to ensure that requests are routed only to load balancers that have healthy EC2 instances.
- The application’s production environment (for example,
prod.domain.com) has Route 53 alias records that point to ELB load balancers. The production environment also uses a latency-based routing policy that is associated with ELB health checks. This ensures that requests are routed to a healthy load balancer, thereby providing minimal latency to a client. - The application’s failover environment (for example,
fail.domain.com) has an Route 53 alias record that points to a CloudFront distribution of an S3 bucket hosting a static version of the application. - The application’s subdomain (for example,
www.domain.com) has an Route 53 alias record that points toprod.domain.com(as primary target) andfail.domain.com(as secondary target) using a failover routing policy. This ensureswww.domain.comroutes to the production load balancers if at least one of them is healthy or the “fail whale” if all of them appear to be unhealthy. - The application’s hosted zone (for example, domain.com) has an Route 53 alias record that redirects requests to www.domain.com using an S3 bucket of the same name.
- Application content (both static and dynamic) can be served using CloudFront. This ensures that the content is delivered to clients from CloudFront edge locations spread all over the world to provide minimal latency. Serving dynamic content from a CDN, where it is cached for short periods of time (that is, several seconds), takes the load off of the application and further improves its latency and responsiveness.
- The application is deployed in multiple AWS regions, protecting it from a regional outage.
Database service
- Data Warehouses
- A data warehouse is a central repository for data that can come from one or more sources.
- RDS - used for OLTP, but can be used for OLAP
- Redshift is a high-performance data warehouse designed specifically for OLAP.
- It is also common to combine RDS with Redshift in the same application and periodically extract recent transactions and load them into a reporting database.
- NoSQL databases
- Traditional relational databases are difficult to scale beyond a single server without significant engineering and cost, but a NoSQL architecture allows for horizontal scalability on commodity hardware.
- NoSQL database can be installed and run on EC2 instances, or choose a managed service like Amazon DynamoDB to deal with the heavy lifting involved with building a distributed cluster spanning multiple data centers.
Amazon Relational Database Service (RDS)
- RDS is a service that simplifies the setup, operations, and scaling of a relational database on AWS.
- RDS offloads common tasks like backups, patching, scaling, and replication from user.
- RDS helps you to streamline the installation of the database software and also the provisioning of infrastructure capacity.
- After the initial launch, RDS simplifies ongoing maintenance by automating common administrative tasks on a recurring basis.
- With RDS, you can accelerate your development timelines and establish a consistent operating model for managing relational databases. For example, RDS makes it easy to replicate your data to increase availability, improve durability, or scale up or beyond a single database instance for read-heavy database workloads.
- RDS exposes a database endpoint to connect and execute SQL.
- RDS does not provide shell access to DB Instances, and restricts access to certain system procedures and tables that require advanced privileges.
Database Instances
- The RDS service itself provides an API that lets you create and manage one or more DB Instances.
- A DB Instance is an isolated database environment deployed in your private network segments in the cloud.
- Each DB Instance runs and manages a popular commercial or open source database engine on your behalf.
- To launch a new DB Instance: use AWS console or call
CreateDBInstanceAPI - To change or resize existing DB Instances:
ModifyDBInstanceAPI. - A DB Instance can contain multiple different databases, all of which you create and manage within the DB Instance itself by executing SQL commands with the RDS endpoint.
- DB Instance Class
- The compute and memory resources of a DB Instance are determined by its DB Instance class.
- The range of DB Instance classes extends from a
db.t2.microwith 1 virtual CPU (vCPU) and 1 GB of memory, up to adb.r3.8xlargewith 32 vCPUs and 244 GB of memory. - Instance class can changed, and RDS will migrate data to a larger or smaller instance class.
- Size and performance characteristics of the storage used can be controlled independent from the DB Instance class selected.
- Many features and common configuration settings are exposed and managed using DB parameter groups and DB option groups.
- DB parameter group
- A DB parameter group acts as a container for engine configuration values that can be applied to one or more DB Instances.
- Change the DB parameter group for an existing instance requires a reboot.
- DB option group
- A DB option group acts as a container for engine features, which is empty by default.
- To enable specific features of a DB engine (for example, Oracle Statspack, Microsoft SQL Server Mirroring), create a new DB option group and configure the settings accordingly.
- Data migration
- Existing databases can be migrated to RDS using native tools and techniques that vary depending on the engine. For example with MySQL, you can export a backup using mysqldump and import the file into RDS MySQL.
- AWS Database Migration Service gives you a graphical interface that simplifies the migration of both schema and data between databases.
- AWS Database Migration Service helps convert databases from one database engine to another.
Operational Benefits
- RDS increases the operational reliability of your databases by applying a very consistent deployment and operational model.
- This level of consistency is achieved in part by limiting the types of changes that can be made to the underlying infrastructure and through the extensive use of automation.
- For example with RDS, you cannot use Secure Shell (SSH) to log in to the host instance and install a custom piece of software. You can, however, connect using SQL administrator tools or use DB option groups and DB parameter groups to change the behavior or feature configuration for a DB Instance.
- If you want full control of the OS or require elevated permissions to run, then consider installing your database on EC2 instead of RDS.
- RDS is designed to simplify the common tasks required to operate a relational database in a reliable manner.
Comparison of Operational Responsibilities
| Responsibility | Database On-Premise | Database on EC2 | Database on RDS |
|---|---|---|---|
| App Optimization | You | You | You |
| Scaling | You | You | AWS |
| High Availability | You | You | AWS |
| Backups | You | You | AWS |
| DB Engine Patches | You | You | AWS |
| Software Installation | You | You | AWS |
| OS Patches | You | You | AWS |
| OS Installation | You | AWS | AWS |
| Server Maintenance | You | AWS | AWS |
| Rack and Stack | You | AWS | AWS |
| Power and Cooling | You | AWS | AWS |
Database Engines
- RDS supports six database engines: MySQL, PostgreSQL, MariaDB, Oracle, SQL Server, and Amazon Aurora. Features and capabilities vary slightly depending on the engine that you select.
- MySQL
- RDS for MySQL currently supports MySQL 5.7, 5.6, 5.5, and 5.1.
- The engine is running the open source Community Edition with InnoDB as the default and recommended database storage engine.
- RDS MySQL allows you to connect using standard MySQL tools such as MySQL Workbench or SQL Workbench/J.
- RDS MySQL supports Multi-AZ deployments for high availability and read replicas for horizontal scaling.
- PostgreSQL
- RDS supports PostgreSQL 9.5.x, 9.4.x, and 9.3.x.
- RDS PostgreSQL can be managed using standard tools like
pgAdminand supports standard JDBC/ODBC drivers. - supports Multi-AZ deployment for high availability and read replicas for horizontal scaling.
- MariaDB
- MariaDB is an open source database engine built by the creators of MySQL and enhanced with enterprise tools and functionality.
- MariaDB adds features that enhance the performance, availability, and scalability of MySQL.
- AWS supports MariaDB 10.0.17.
- RDS fully supports the
XtraDBstorage engine for MariaDB DB Instances and, like RDS MySQL and PostgreSQL, has support for Multi-AZ deployment and read replicas.
- Oracle
- RDS supports DB Instances running several editions of Oracle 11g and Oracle 12c.
- RDS supports access to schemas on a DB Instance using any standard SQL client application, such as Oracle SQL Plus.
- RDS Oracle supports 3 different editions of the popular database engine: Standard Edition One, Standard Edition, and Enterprise Edition.
RDS Oracle Editions Compared
| Edition | Performance | Multi-AZ | Encryption |
|---|---|---|---|
| Standard One | ++++ | Yes | KMS |
| Standard | ++++++++ | Yes | KMS |
| Enterprise | ++++++++ | Yes | KMS and TDE |
- Microsoft SQL Server
- RDS allows DBAs to connect to their SQL Server DB Instance in the cloud using native tools like SQL Server Management Studio.
- Versions supported: SQL Server 2008 R2, SQL Server 2012, and SQL Server 2014.
- Editions supported: Express Edition, Web Edition, Standard Edition, and Enterprise Edition.
RDS SQL Server Editions Compared
| Edition | Performance | Multi-AZ | Encryption |
|---|---|---|---|
| Express | + | No | KMS |
| Web | ++++ | No | KMS |
| Standard | ++++ | Yes | KMS |
| Enterprise | ++++++++ | Yes | KMS and TDE |
- Licensing
- RDS Oracle and Microsoft SQL Server are commercial software products that require appropriate licenses to operate in the cloud.
- AWS offers two licensing models: License Included and Bring Your Own License (BYOL).
- License Included Model:
- In this model, the license is held by AWS and is included in the RDS instance price.
- For Oracle, this provides licensing for Standard Edition One.
- For SQL Server, License Included provides licensing for SQL Server Express Edition, Web Edition, and Standard Edition.
- Bring Your Own License (BYOL)
- In this model, you provide your own license.
- For Oracle, you must have the appropriate Oracle Database license for the DB Instance class and Oracle Database edition you want to run. You can bring over Standard Edition One, Standard Edition, and Enterprise Edition.
- For SQL Server, you provide your own license under the Microsoft License Mobility program. You can bring over Microsoft SQL Standard Edition and also Enterprise Edition. You are responsible for tracking and managing how licenses are allocated.
- Amazon Aurora
- Aurora offers enterprise-grade commercial database technology while offering the simplicity and cost effectiveness of an open source database.
- This is achieved by redesigning the internal components of MySQL to take a more service-oriented approach.
- Like other RDS engines, Aurora is a fully managed service, is MySQL-compatible out of the box, and provides for increased reliability and performance over standard MySQL deployments.
- Aurora can deliver up to 5x performance of MySQL without requiring changes to most of your existing web applications. You can use the same code, tools, and applications that you use with your existing MySQL databases with Aurora.
- DB Cluster
- When you first create an Amazon Aurora instance, you create a DB cluster.
- A DB cluster has one or more instances and includes a cluster volume that manages the data for those instances.
- An Aurora cluster volume is a virtual database storage volume that spans multiple Availability Zones, with each Availability Zone having a copy of the cluster data.
- An Aurora DB cluster consists of 2 different types of instances: Primary Instance and Aurora Replicate instance
- Primary Instance:
- This is the main instance, which supports both read and write workloads.
- When you modify your data, you are modifying the primary instance.
- Each Aurora DB cluster has one primary instance.
- Aurora Replica:
- This is a secondary instance that supports only read operations.
- Each DB cluster can have up to 15 Aurora Replicas in addition to the primary instance.
- By using multiple Aurora Replicas, you can distribute the read workload among various instances, increasing performance.
- You can also locate your Aurora Replicas in multiple Availability Zones to increase your database availability.
Storage Options
- RDS is built using EBS and allows you to select the right storage option based on your performance and cost requirements.
- Depending on the database engine and workload, you can scale up to 4 to 6TB in provisioned storage and up to 30,000 IOPS.
- RDS supports 3 storage types:
- Magnetic Magnetic storage: also called standard storage, offers cost-effective storage that is ideal for applications with light I/O requirements.
- General Purpose (SSD): also called gp2, can provide faster access than magnetic storage. This storage type can provide burst performance to meet spikes and is excellent for small- to medium-sized databases.
- Provisioned IOPS (SSD): is designed to meet the needs of I/O-intensive workloads, particularly database workloads, that are sensitive to storage performance and consistency in random access I/O throughput.
- For most applications, General Purpose (SSD) is the best option and provides a good mix of lower-cost and higher-performance characteristics.
RDS Storage Types
| Magnetic | General Purpose (SSD) | Provisioned IOPS (SSD) | |
|---|---|---|---|
| Size | +++ | +++++ | +++++ |
| Performance | + | +++ | +++++ |
| Cost | ++ | +++ | +++++ |
Backup and Recovery
- RDS provides a consistent operational model for backup and recovery procedures across the different database engines.
- RDS provides two mechanisms for backing up the database: automated backups and manual snapshots.
- By using a combination of both techniques, you can design a backup recovery model to protect your application data.
- Recovery Point Objective (RPO) and Recovery Time Objective (RTO)
- RPO
- is defined as the maximum period of data loss that is acceptable in the event of a failure or incident.
- For example, many systems back up transaction logs every 15 minutes to allow them to minimize data loss in the event of an accidental deletion or hardware failure.
- RTO
- is defined as the maximum amount of downtime that is permitted to recover from backup and to resume processing.
- For large databases in particular, it can take hours to restore from a full backup.
- In the event of a hardware failure, you can reduce your RTO to minutes by failing over to a secondary node.
- You should create a recovery plan that, at a minimum, lets you recover from a recent backup.
- Each organization typically will define a RPO and RTO for important applications based on the criticality of the application and the expectations of the users.
- It’s common for enterprise systems to have an RPO measured in minutes and an RTO measured in hours or even days, while some critical applications may have much lower tolerances.
- RPO
- Backup Mechanisms
- Automated Backups
- continuously tracks changes and backs up database.
- RDS creates a storage volume snapshot of the DB Instance, backing up the entire DB Instance and not just individual databases.
- Backup retention period can be set up while creating a DB Instance.
- Default backup retention period = 1 day. Max retention = 35 days.
- When a DB Instance is deleted, all automated backup snapshots are deleted and cannot be recovered. Manual snapshots, however, are not deleted.
- Automated backups will occur daily during a configurable 30-minute maintenance window called the backup window.
- DB Instance can be restored to any specific time during the retention period, creating a new DB Instance.
- Manual DB Snapshots
- In addition to automated backups, manual DB snapshots can be performed at any time.
- A DB snapshot is initiated by you and can be created as frequently as you want.
- You can then restore the DB Instance to the specific state in the DB snapshot at any time.
- DB snapshots can be created with the RDS console or the
CreateDBSnapshotaction. - Unlike automated snapshots that are deleted after the retention period, manual DB snapshots are kept until you explicitly delete them with the RDS console or the
DeleteDBSnapshotaction. - For busy databases, use Multi-AZ to minimize the performance impact of a snapshot. During the backup window, storage I/O may be suspended while your data is being backed up, and you may experience elevated latency. This I/O suspension typically lasts for the duration of the snapshot. This period of I/O suspension is shorter for Multi-AZ DB deployments because the backup is taken from the standby, but latency can occur during the backup process.
- Automated Backups
- Recovery
- RDS allows you to recover your database quickly whether you are performing automated backups or manual DB snapshots.
- You cannot restore from a DB snapshot to an existing DB Instance; a new DB Instance is created when you restore.
- When you restore a DB Instance, only the default DB parameter and security groups are associated with the restored instance. As soon as the restore is complete, you should associate any custom DB parameter or security groups used by the instance from which you restored.
- When using automated backups, RDS combines the daily backups performed during your predefined maintenance window in conjunction with transaction logs to enable you to restore your DB Instance to any point during your retention period, typically up to the last 5 minutes.

- High Availability with Multi-AZ
- RDS Multi-AZ deployments allows you to create a database cluster across multiple Availability Zones.
- Setting up a relational database to run in a highly available and fault-tolerant fashion is a challenging task.
- With a single option, RDS can increase the availability of your database using replication.
- Multi-AZ lets you meet the most demanding RPO and RTO targets by using synchronous replication to minimize RPO and fast failover to minimize RTO to minutes.
- Multi-AZ allows you to place a secondary copy of your database in another Availability Zone for disaster recovery purposes.
- Multi-AZ deployments are available for all types of RDS database engines.
- When you create a Multi-AZ DB Instance, a primary instance is created in one Availability Zone and a secondary instance is created in another Availability Zone. You are assigned a database instance endpoint such as :
my_app_db.ch6fe7ykq1zd.us-west-2.rds.amazonaws.com. This endpoint is a DNS name that AWS takes responsibility for resolving to a specific IP address. You use this DNS name when creating the connection to your database. - RDS automatically replicates the data from the master database or primary instance to the slave database or secondary instance using synchronous replication.
- Each Availability Zone runs on its own physically distinct, independent infrastructure and is engineered to be highly reliable.
- RDS detects and automatically recovers from the most common failure scenarios for Multi-AZ deployments so that you can resume database operations as quickly as possible without administrative intervention.
- Multi-AZ deployments are for disaster recovery only; they are not meant to enhance database performance. The standby DB Instance is not available to offline queries from the primary master DB Instance. To improve database performance using multiple DB Instances, use read replicas or other DB caching technologies such as ElastiCache.
- _Automatic Failover__
- RDS will automatically fail over to the standby instance without user intervention.
- The DNS name remains the same, but the RDS service changes the CNAME to point to the standby.
- The primary DB Instance switches over automatically to the standby replica if there was an Availability Zone service disruption, if the primary DB Instance fails, or if the instance type is changed.
- RDS automatically performs a failover in the event of any of the following:
- Loss of availability in primary Availability Zone
- Loss of network connectivity to primary database
- Compute unit failure on primary database
- Storage failure on primary database
- Manual Failover: You can also perform a manual failover of the DB Instance. Failover between the primary and the secondary instance is fast, and the time automatic failover takes to complete is typically one to two minutes.
Scaling Up and Out
- RDS allows you to scale compute and storage vertically, and for some DB engines, you can scale horizontally.
- Vertical Scalability
- RDS makes it easy to scale up or down your database tier to meet the demands of your application.
- Changes can be scheduled to occur during the next maintenance window or to begin immediately using the
ModifyDBInstanceaction. - To change the amount of compute and memory, you can select a different DB Instance class of the database.
- After you select a larger or smaller DB Instance class, RDS automates the migration process to a new class with only a short disruption and minimal effort.
- Storage Expansion
- You can also increase the amount of storage, the storage class, and the storage performance for an RDS Instance.
- Each database instance can scale from 5GB up to 6TB in provisioned storage depending on the storage type and engine.
- Storage for RDS can be increased over time as needs grow with minimal impact to the running database.
- Storage expansion is supported for all of the database engines except for SQL Server.
- Horizontal Scalability with Partitioning
- Partitioning a large relational database into multiple instances or shards is a common technique for handling more requests beyond the capabilities of a single instance.
- Partitioning, or sharding, allows you to scale horizontally to handle more users and requests but requires additional logic in the application layer.
- The application needs to decide how to route database requests to the correct shard and becomes limited in the types of queries that can be performed across server boundaries.
- Horizontal Scalability with Read Replicas
- Another important scaling technique is to use read replicas to offload read transactions from the primary database and increase the overall number of transactions. RDS supports read replicas that allow you to scale out elastically beyond the capacity constraints of a single DB Instance for read-heavy database workloads.
- Use cases where deploying one or more read replica DB Instances is helpful:
- for read-heavy workloads e.g., blog sites
- Handle read traffic while the source DB Instance is unavailable for backups or scheduled maintenance
- Offload reporting or data warehousing scenarios
- Read replicas are currently supported in RDS for MySQL, PostgreSQL, MariaDB, and Aurora.
- RDS uses the MySQL, MariaDB, and PostgreSQL DB engines’ built-in replication functionality to create a special type of DB Instance, called a read replica, from a source DB Instance. Updates made to the source DB Instance are asynchronously copied to the read replica.
- You can create one or more replicas of a database within a single AWS Region or across multiple AWS Regions.
- To enhance your disaster recovery capabilities or reduce global latencies, you can use cross-region read replicas
Security
- Securing your RDS DB Instances and relational databases requires a comprehensive plan that addresses the many layers commonly found in database-driven systems. This includes the infrastructure resources, the database, and the network.
- Infrastructure level: Protect access to infrastructure resources using IAM policies limiting the actions to perform. e.g.,
CreateDBInstanceandDeleteDBInstanceactions to administrators only. - Network level
- VPC: deploy RDS DB Instances into a private subnet within a VPC limiting network access to the DB Instance. Before deploying into a VPC, first create a DB subnet group that predefines which subnets are available for RDS deployments.
- Security Groups & ACL: Along with VPC, restrict network access using network ACLs and security groups to limit inbound traffic to a short list of source IP addresses.
- Database level
- create users and grant them permissions to read and write to your databases.
- create users with strong passwords that you rotate frequently.
- Data level:
- protect the confidentiality of your data in transit and at rest with multiple encryption capabilities provided with RDS.
- Security features vary slightly from one engine to another, but all engines support some form of in-transit encryption and also at-rest encryption.
- Use SSL to protect data in transit.
- Encryption at rest is possible for all engines using the Amazon Key Management Service (KMS) or Transparent Data Encryption (TDE).
- All logs, backups, and snapshots are encrypted for an encrypted RDS instance.
Amazon Redshift
- Redshift is a fast, powerful, fully managed, petabyte-scale data warehouse service in the cloud.
- Redshift is a relational database designed for OLAP scenarios and optimized for high-performance analysis and reporting of very large datasets.
- Traditional data warehouses are difficult and expensive to manage, especially for large datasets. Redshift lowers the cost of a data warehouse and also makes it easy to analyze large amounts of data very quickly.
- Redshift gives you fast querying capabilities over structured data using standard SQL commands to support interactive querying over large datasets.
- With connectivity via ODBC or JDBC, Redshift integrates well with various data loading, reporting, data mining, and analytics tools.
- Redshift is based on industry-standard PostgreSQL
- Redshift manages the work needed to set up, operate, and scale a data warehouse, from provisioning the infrastructure capacity to automating ongoing administrative tasks such as backups and patching. Redshift automatically monitors your nodes and drives to help you recover from failures.
Clusters and Nodes
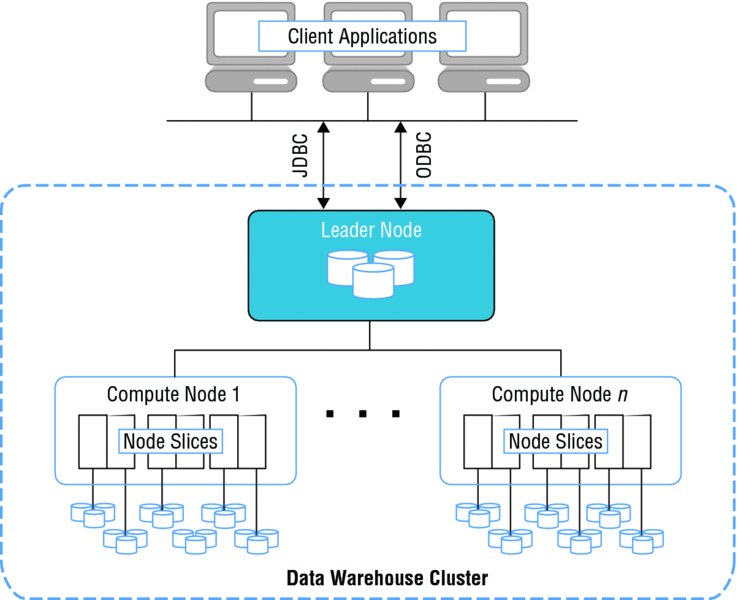
- A cluster is composed of a leader node and one or more compute nodes.
- The client application interacts directly only with the leader node, and the compute nodes are transparent to external applications.
- Redshift currently has support for 6 different node types and each has a different mix of CPU, memory, and storage. The 6 node types are grouped into two categories:
- Dense Compute node types support clusters up to 326TB using fast SSDs
- Dense Storage nodes support clusters up to 2PB using large magnetic disks
- Each cluster contains one or more databases.
- User data for each table is distributed across the compute nodes. Your application or SQL client communicates with Redshift using standard JDBC or ODBC connections with the leader node, which in turn coordinates query execution with the compute nodes. Your application does not interact directly with the compute nodes.
- Slices
- The disk storage for a compute node is divided into a number of slices.
- The number of slices per node depends on the node size of the cluster and typically varies between 2 and 16.
- The nodes all participate in parallel query execution, working on data that is distributed as evenly as possible across the slices.
- You can increase query performance by adding multiple nodes to a cluster. When you submit a query, Redshift distributes and executes the query in parallel across all of a cluster’s compute nodes. Redshift also spreads your table data across all compute nodes in a cluster based on a distribution strategy that you specify. This partitioning of data across multiple compute resources allows you to achieve high levels of performance.
- Redshift allows
- to resize a cluster to add storage and compute capacity
- change the node type of a cluster and keep the overall size the same.
- During resize, Redshift will create a new cluster and migrate data from the old cluster to the new one. During a resize operation, the database will become read-only until the operation is finished.
Table Design
- Redshift CREATE TABLE command supports specifying compression encodings, distribution strategy, and sort keys.
- Additional columns can be added to a table using the ALTER TABLE command; however, existing columns cannot be modified.
- Compression Encoding
- One of the key performance optimizations used by Redshift is data compression.
- When loading data for the first time into an empty table, Redshift will automatically sample your data and select the best compression scheme for each column.
- Alternatively, you can specify compression encoding on a per-column basis as part of the CREATE TABLE command.
- Distribution Strategy
- One of the primary decisions when creating a table in Redshift is how to distribute the records across the nodes and slices in a cluster. You can configure the distribution style of a table to give Redshift hints as to how the data should be partitioned to best meet your query patterns. When you run a query, the optimizer shifts the rows to the compute nodes as needed to perform any joins and aggregates.
- The goal in selecting a table distribution style is to minimize the impact of the redistribution step by putting the data where it needs to be before the query is performed.
- The data distribution style that you select for your database has a big impact on query performance, storage requirements, data loading, and maintenance. By choosing the best distribution strategy for each table, you can balance your data distribution and significantly improve overall system performance.
- Distribution styles
- EVEN distribution: Default option. Results in the data being distributed across the slices in a uniform fashion regardless of the data.
- KEY distribution: the rows are distributed according to the values in one column. The leader node will store matching values close together and increase query performance for joins.
- ALL distribution: a full copy of the entire table is distributed to every node. This is useful for lookup tables and other large tables that are not updated frequently.
- Sort Keys
- While creating a table, specify one or more columns as sort keys.
- Sorting enables efficient handling of range-restricted predicates. If a query uses a range-restricted predicate, the query processor can rapidly skip over large numbers of blocks during table scans.
- The sort keys for a table can be either
- A compound sort key is more efficient when query predicates use a prefix, which is a subset of the sort key columns in order.
- An interleaved sort key gives equal weight to each column in the sort key, so query predicates can use any subset of the columns that make up the sort key, in any order.
- Loading Data
- supports INSERT and UPDATE
- Bulk data upload
- use
COPYcommand - supports multiple types of input data sources
- fastest way to load data from flat files stored in an S3 bucket or from an DynamoDB table
- can read from multiple files from S3 at the same time - can distribute the workload to the nodes and perform the load process in parallel
- After each bulk data load
- run
VACUUMcommand to reorganize the data and reclaim space after deletes. - recommended to run
ANALYZEcommand to update table statistics.
- run
- use
- Data Export: use
UNLOADcommand - can be used to generate delimited text files and store them in S3.
- Querying Data
- supports standard SQL
- For complex queries, query plan can be analyzed to better optimize the access pattern.
- Performance of the cluster and specific queries can be monitored using CloudWatch and the Redshift web console.
- Workload Management (WLM)
- WLM is used queue and prioritize queries for large clusters supporting many users
- WLM allows you define multiple queues and set the concurrency level for each queue.
- For example, you might want to have one queue set up for long-running queries and limit the concurrency and another queue for short-running queries and allow higher levels of concurrency.
- Snapshots
- Similar to RDS, you can create point-in-time snapshots of the cluster.
- A snapshot can then be used to restore a copy or create a clone of your original cluster.
- Snapshots are durably stored internally in S3 by Redshift.
- Redshift supports both automated snapshots and manual snapshots.
- automated snapshots periodically takes snapshots of your cluster and keeps a copy for a configurable retention period.
- manual snapshots can be shared across regions or even with other AWS accounts - retained until you explicitly delete them.
- Security
- Security plan should include controls to protect the infrastructure resources, the database schema, the records in the table, and network access.
- Infrastructure level: using IAM policies that limit the actions AWS administrators can perform. e.g., permission to create and manage the lifecycle of a cluster, including scaling, backup, and recovery operations.
- Network level: clusters can be deployed within the private IP address space of your VPC to restrict overall network connectivity. Fine-grained network access can be further restricted using security groups and network ACLs at the subnet level.
- Database level:
- When initially creating a Redshift cluster, create a master user account and password.
- The master account can be used to log in to the Redshift database and to create more users and groups. Each database user can be granted permission to schemas, tables, and other database objects. These permissions are independent from the IAM policies used to control access to the infrastructure resources and the Redshift cluster configuration.
- Data level:
- Encryption of data in transit using SSL-encrypted connections, and also encryption of data at rest using multiple techniques.
- To encrypt data at rest, Redshift integrates with KMS and AWS CloudHSM for encryption key management services.
- Encryption at rest and in transit assists in meeting compliance requirements, and provides additional protections for your data.
Amazon DynamoDB
- fully managed NoSQL database service - provides fast and low-latency performance that scales with ease.
- Developers can create a table and write an unlimited number of items with consistent latency.
- can provide consistent performance levels by automatically distributing the data and traffic for a table over multiple partitions.
- After you configure a certain read or write capacity, DynamoDB will automatically add enough infrastructure capacity to support the requested throughput levels.
- Read or write capacity can be adjusted as per demand after a table has been created, and DynamoDB will add or remove infrastructure and adjust the internal partitioning accordingly.
- To help maintain consistent, fast performance levels, all table data is stored on high-performance SSD disk drives. Performance metrics, including transactions rates, can be monitored using CloudWatch.
- provides automatic high-availability and durability protections by replicating data across multiple Availability Zones within an AWS Region.
- Applications can connect to the DynamoDB service endpoint and submit requests over HTTP/S to read and write items to a table or even to create and delete tables.
- provides a web service API that accepts requests in JSON format.
Data Model
- Basic components of the DynamoDB data model include tables, items, and attributes.
- a table is a collection of items and each item is a collection of one or more attributes.
- Each item has a primary key that uniquely identifies the item.
- No limit in number of attributes in an item. However, max item size = 400KB
1 2 3 4 5 6 7 8 9 10 11 | |
Data Types
- DynamoDB only requires a primary key attribute.
- When you create a table or a secondary index, you must specify the names and data types of each primary key attribute (partition key and sort key).
- Data types fall into three major categories:
- Scalar: represents exactly one value.
- String: Text and variable length characters up to 400KB. Supports Unicode with UTF8 encoding
- Number: Positive or negative number with up to 38 digits of precision
- Binary: Binary data, images, compressed objects up to 400KB in size
- Boolean: Binary flag representing a true or false value
- Null: Represents a blank, empty, or unknown state. String, Number, Binary, Boolean cannot be empty.
- Set: represent a unique list of one or more scalar values. Each value must be the same data type. Sets do not guarantee order.
- String Set
- Number Set
- Binary Set
- Document: represents multiple nested attributes, similar to the structure of a JSON file - supports 2 document types: List and Map. Multiple Lists and Maps can be combined and nested to create complex structures.
- List: Each List can be used to store an ordered list of attributes of different data types.
- Map: Each Map can be used to store an unordered list of key/value pairs.
- Scalar: represents exactly one value.
Primary Key
- DynamoDB supports 2 types of primary keys, and this configuration cannot be changed after a table has been created:
- Primary key must be type string, number, or binary.
- Partition Key
- The primary key is made of one attribute, a partition (or hash) key.
- DynamoDB builds an unordered hash index on this primary key attribute.
- partition key is used to distribute the request to the right partition.
- Partition and Sort Key
- The primary key is made of 2 attributes: partition key + sort (or range) key.
- Each item in the table is uniquely identified by the combination of its partition and sort key values. It is possible for two items to have the same partition key value, but those two items must have different sort key values.
Provisioned Capacity
- When you create an DynamoDB table, you are required to provision a certain amount of read and write capacity to handle your expected workloads.
- Based on your configuration settings, DynamoDB will then provision the right amount of infrastructure capacity to meet your requirements with sustained, low-latency response times.
- Overall capacity is measured in read and write capacity units. These values can later be scaled up or down by using an
UpdateTableaction. - Each operation against a DynamoDB table will consume some of the provisioned capacity units.
- The specific amount of capacity units consumed depends largely on the size of the item, but also on other factors.
- Read Operations
- For read operations, the amount of capacity consumed also depends on the read consistency selected in the request. E.g., given a table without a local secondary index, you will consume 1 capacity unit if you read an item that is 4KB or smaller.
- To read a 110KB item 110KB, 28 capacity units are consumed. (
110 / 4 = 27.5rounded up to 28). - For strongly consistent read operations, twice the number of capacity units are consumed. 56 in the above example.
- Write Operations
- For write operations, 1 capacity is consumed to write an item 1KB or smaller.
- CloudWatch metrics
- use CloudWatch to monitor the capacity and make scaling decisions. e.g.,
ConsumedReadCapacityUnitsandConsumedWriteCapacityUnits. - If you do exceed your provisioned capacity for a period of time, requests will be throttled and can be retried later. You can monitor and alert on the
ThrottledRequestsmetric using CloudWatch to notify you of changing usage patterns.
- use CloudWatch to monitor the capacity and make scaling decisions. e.g.,
Secondary Indexes
- A secondary index lets you query the data in the table using an alternate key, in addition to queries against the primary key.
- allow you to search a large table efficiently and avoid an expensive scan operation to find items with specific attributes
- When an item is modified in a table, each secondary index is updated which also consumes write capacity units.
- DynamoDB supports 2 different kinds of indexes:
- Global Secondary Index:
- is an index with a partition and sort key that can be different from those on the table.
- can create or delete a global secondary index on a table at any time.
- item updates maintain their own provisioned throughput settings separate from the table
- Local Secondary Index:
- is an index that has the same partition key attribute as the primary key of the table, but a different sort key.
- can only create a local secondary index when you create a table.
- item updates will consume write capacity units from the main table
- Global Secondary Index:
Writing and Reading Data
Writing Items
- DynamoDB provides 3 primary API actions to create, update, and delete items
PutItemaction- create a new item with one or more attributes.
- if the primary key already exists, updates an existing item .
- only requires a table name and a primary key; any additional attributes are optional.
UpdateItemaction- finds existing items based on the primary key and replace the attributes.
- useful to only update a single attribute and leave the other attributes unchanged.
- can also be used to create items if they don’t already exist.
- also provides support for atomic counters which allows to increment and decrement a value and are guaranteed to be consistent across multiple concurrent requests. E.g., a counter attribute used to track the overall score of a mobile game can be updated by many clients at the same time.
DeleteItemaction- remove an item from a table by specifying a primary key.
- All 3 actions also support conditional expressions that allow you to perform validation before an action is applied. This can be useful to prevent accidental overwrites or to enforce some type of business logic checks.
Reading Items
- Retrieved data through a direct lookup using
GetItemaction or through a search using theQueryorScanaction. GetItemGetItemallows you to retrieve an item based on its primary key.- All (default) or some of the item’s attributes can be queried
- If a PK is composed of a partition key, the entire partition key is needed to retrieve the item.
- If the PK is a composite of a partition key and a sort key, then both the partition and sort key is needed.
- Each call consumes read capacity units based on the size of the item and the consistency option selected.
- By default,
GetItemreads are eventually consistent. - Strongly consistent reads can be requested optionally; this will consume additional read capacity units, but it will return the most up-to-date version of the item.
Eventual Consistency
- By default,
GetItemreads are eventually consistent. - Strongly consistent reads
- can be requested optionally;
- will consume additional read capacity units, but it will return the most up-to-date version of the item.
- A strongly consistent read might be less available in the case of a network delay or outage.
Batch Operations
BatchGetItemBatchWriteItem- up to 25 item creates or updates with a single operation - allows you to minimize the overhead of each individual call when processing large numbers of items.
Searching Items
QueryandScanactions used to search a table or an index.Queryoperation- is the primary search operation to find items in a table or a secondary index using only primary key attribute values.
- Each Query requires a partition key attribute name and a distinct value to search.
- can optionally provide a sort key value and use a comparison operator to refine the search results.
- Results are automatically sorted by the primary key and are limited to 1MB.
Scanoperation- will read every item in a table or a secondary index, then it filters out values to provide the desired result
- By default, a Scan operation returns all of the data attributes for every item in the table or index.
- Each request can return up to 1MB of data.
- Items can be filtered out using expressions, but this can be a resource-intensive operation.
- If the result set for a
Queryor aScanexceeds 1MB, you can page through the results in 1MB increments.
Scaling and Partitioning
- DynamoDB tables can scale horizontally through the use of partitions
- Each individual partition represents a unit of compute and storage capacity.
- DynamoDB stores items for a single table across multiple partitions.
- DynamoDB decides which partition to store the item in based on the partition key. The partition key is used to distribute the new item among all of the available partitions, and items with the same partition key will be stored on the same partition.
- As the number of items in a table grows, additional partitions can be added by splitting an existing partition.
- The provisioned throughput configured for a table is also divided evenly among the partitions.
- Provisioned throughput allocated to a partition is entirely dedicated to that partition, and there is no sharing of provisioned throughput across partitions.
- When a table is created, DynamoDB configures the table’s partitions based on the desired read and write capacity.
- Limits
- 1 single partition = max 10GB of data
- Max 3,000 read capacity units or 1,000 write capacity units
- For partitions that are not fully using their provisioned capacity, DynamoDB provides some burst capacity to handle spikes in traffic.
- A portion of your unused capacity will be reserved to handle bursts for short periods.
- As storage or capacity requirements change, DynamoDB can split a partition to accommodate more data or higher provisioned request rates.
- After a partition is split, however, it cannot be merged back together. Keep this in mind when planning to increase provisioned capacity temporarily and then lower it again.
- With each additional partition added, its share of the provisioned capacity is reduced.
- To achieve the full amount of request throughput provisioned for a table, keep your workload spread evenly across the partition key values.
- Distributing requests across partition key values distributes the requests across partitions. For example, if a table has 10,000 read capacity units configured but all of the traffic is hitting one partition key, you will not be able to get more than the 3,000 maximum read capacity units that one partition can support.
- To maximize DynamoDB throughput, create tables with a partition key that has a large number of distinct values and ensure that the values are requested fairly uniformly. Adding a random element that can be calculated or hashed is one common technique to improve partition distribution.
Security
- DynamoDB integrates with the IAM service to provide strong control over permissions using policies.
- can create one or more policies that allow or deny specific operations on specific tables.
- can also use conditions to restrict access to individual items or attributes.
- All operations must first be authenticated as a valid user or user session.
- Applications that need to read and write from DynamoDB need to obtain a set of temporary or permanent access control keys. While these keys could be stored in a configuration file, a best practice is for applications running on AWS to use IAM EC2 instance profiles to manage credentials. IAM EC2 instance profiles or roles allow you to avoid storing sensitive keys in configuration files that must then be secured.
- For mobile applications, a best practice is to use a combination of web identity federation with the AWS Security Token Service (AWS STS) to issue temporary keys that expire after a short period.
- DynamoDB also provides support for fine-grained access control that can restrict access to specific items within a table or even specific attributes within an item. For example, you may want to limit a user to only access his or her items within a table and prevent access to items associated with a different user. Using conditions in an IAM policy allows you to restrict which actions a user can perform, on which tables, and to which attributes a user can read or write.
DynamoDB Streams
- A common requirement for many applications is to keep track of recent changes and then perform some kind of processing on the changed records. DynamoDB Streams makes it easy to get a list of item modifications for the last 24-hour period. For example, you might need to calculate metrics on a rolling basis and update a dashboard, or maybe synchronize two tables or log activity and changes to an audit trail. With DynamoDB Streams, these types of applications become easier to build.
- DynamoDB Streams allows you to extend application functionality without modifying the original application.
- By reading the log of activity changes from the stream, you can build new integrations or support new reporting requirements that weren’t part of the original design.
- Each item change is buffered in a time-ordered sequence or stream that can be read by other applications.
- Changes are logged to the stream in near real-time and allow you to respond quickly or chain together a sequence of events based on a modification.
- Streams can be enabled or disabled for an DynamoDB table using the AWS Management Console, CLI, or SDK.
- Stream
- A stream consists of stream records.
- Each stream record represents a single data modification in the DynamoDB table to which the stream belongs.
- Each stream record is assigned a sequence number, reflecting the order in which the record was published to the stream.
- Shards
- Stream records are organized into groups, also referred to as shards.
- Each shard acts as a container for multiple stream records and contains information on accessing and iterating through the records.
- Shards live for a maximum of 24 hours and, with fluctuating load levels, could be split one or more times before they are eventually closed.
- To build an application that reads from a shard, it is recommended to use the DynamoDB Streams Kinesis Adapter. The Kinesis Client Library (KCL) simplifies the application logic required to process reading records from streams and shards.
Amazon ElasticCache
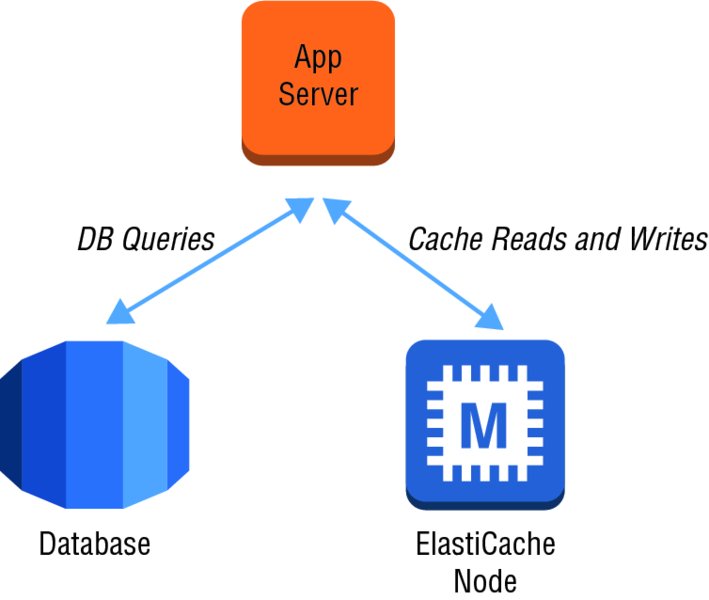
- a web service that simplifies scaling of an in-memory cache in the cloud
- Using ElastiCache,
- switching between Memcached or Redis engines is just a configuration change (since ElastiCache is protocol-compliant)
- you can implement any number of caching patterns. Most common pattern is the cache-aside pattern. In this scenario, the app server checks the cache first to see if it contains the data it needs. If the data does not exist in the cache node, it will query the database and serialize and write the query results to the cache. The next user request will then be able to read the data directly from the cache instead of querying the database.
-
It is certainly possible to build and manage a cache cluster yourself on EC2, however the underlying EC2 instances can become impaired occasionally. ElastiCache can automatically detect and recover from the failure of a cache node. With the Redis engine, ElastiCache makes it easy to set up read replicas and fail over from the primary to a replica in the event of a problem.
- Data Access Patterns
- Retrieving a flat key from an in-memory cache will always be faster than the most optimized database query.
- should always evaluate the access pattern of the data before you decide to store it in cache. e.g., list of products in a catalog
- Data items that should not be cached: if you generate a unique page every request, you probably should not cache the page results.
- Cache Engines
- ElastiCache allows you to quickly deploy clusters of two different types of popular cache engines: Memcached and Redis.
- At a high level, Memcached and Redis may seem similar, but they support a variety of different use cases and provide different functionality.
- Memcached
- is a simple-to-use in-memory key/value store that can be used to store arbitrary types of data.
- With ElastiCache, you can elastically grow and shrink a cluster of Memcached nodes to meet your demands.
- You can partition your cluster into shards and support parallelized operations for very high performance throughput.
- Memcached deals with objects as blobs that can be retrieved using a unique key. Value object can be of any type; from strings to binary data.
- Memcached versions supported: 1.4.24, 1.4.5.
- When a new version of Memcached is released, you just have to spin up a new cluster with the latest version.
- Redis
- is a flexible in-memory data structure store that can be used as a cache, database, or even as a message broker.
- Redis versions supported: 2.8.24, and also a number of older versions.
- Beyond the object support provided in Memcached, Redis supports a rich set of data types likes strings, lists, and sets.
- Unlike Memcached, Redis supports the ability to persist the in-memory data onto disk. This allows you to create snapshots that back up your data and then recover or replicate from the backups.
- Redis clusters also can support up to 5 read replicas to offload read requests. In the event of failure of the primary node, a read replica can be promoted and become the new master using Multi-AZ replication groups.
- Redis also has advanced features that make it easy to sort and rank data. Some common use cases include building a leaderboard for a mobile application or serving as a high-speed message broker in a distributed system.
- With a Redis cluster, you can leverage a pub-subs messaging abstraction that allows you to decouple the components of your applications.
- Nodes and Clusters
- Each deployment of ElastiCache consists of one or more nodes in a cluster.
- A single Memcached cluster can contain up to 20 nodes.
- Redis clusters are always made up of a single node; however, multiple clusters can be grouped into a Redis replication group.
- Node Types
- The individual node types are derived from a subset of the EC2 instance type families, like
t2,m3, andr3. - Node types range from a
t2.micronode type with 555MB of memory up to anr3.8xlargewith 237GB of memory, with many choices in between. - The
t2cache node family is ideal for development and low-volume applications with occasional bursts, but certain features may not be available. - The
m3family is a good blend of compute and memory, while ther3family is optimized for memory-intensive workloads.
- The individual node types are derived from a subset of the EC2 instance type families, like
- Each node type comes with a preconfigured amount of memory, with a small amount of the memory allocated to the caching engine and operating system itself.
- Design for Failure
- For Memcached clusters,
- you can decrease the impact of the failure of a cache node by using a larger number of nodes with a smaller capacity, instead of a few large nodes.
- In the event that ElastiCache detects the failure of a node, it will provision a replacement and add it back to the cluster. During this time, your database will experience increased load, because any requests that would have been cached will now need to be read from the database.
- For Redis clusters,
- ElastiCache will detect failure and replace the primary node.
- If a Multi-AZ replication group is enabled, a read replica can be automatically promoted to primary.
- For Memcached clusters,
- Memcached Auto Discovery
- For Memcached clusters partitioned across multiple nodes, ElastiCache supports Auto Discovery with the provided client library.
- Auto Discovery abstracts the infrastructure topology of the cache cluster from the application layer.
- The Auto Discovery client gives your applications the ability to identify automatically all of the nodes in a cache cluster and to initiate and maintain connections to all of these nodes. The Auto Discovery client is available for .NET, Java, and PHP platforms.
- Scaling
- Adding additional cache nodes allows you to easily expand horizontally and meet higher levels of read or write performance.
- can also select different classes of cache nodes to scale vertically.
- Horizontal Scaling:
- With Memcached, you can partition your data and scale horizontally to 20 nodes or more. With Auto Discovery, your application can discover Memcached nodes that are added or removed from a cluster.
- A Redis cluster consists of a single cache node that is handling read and write transactions. Additional clusters can be created and grouped into a Redis replication group. While you can only have one node handling write commands, you can have up to 5 read replicas handling read-only requests.
- Vertical Scaling:
- Support for vertical scaling is more limited with ElastiCache.
- If you like to change the cache node type and scale the compute resources vertically, the service does not directly allow you to resize your cluster in this manner. You can, however, quickly spin up a new cluster with the desired cache node types and start redirecting traffic to the new cluster.
- Note: a new Memcached cluster always starts empty, while a Redis cluster can be initialized from a backup.
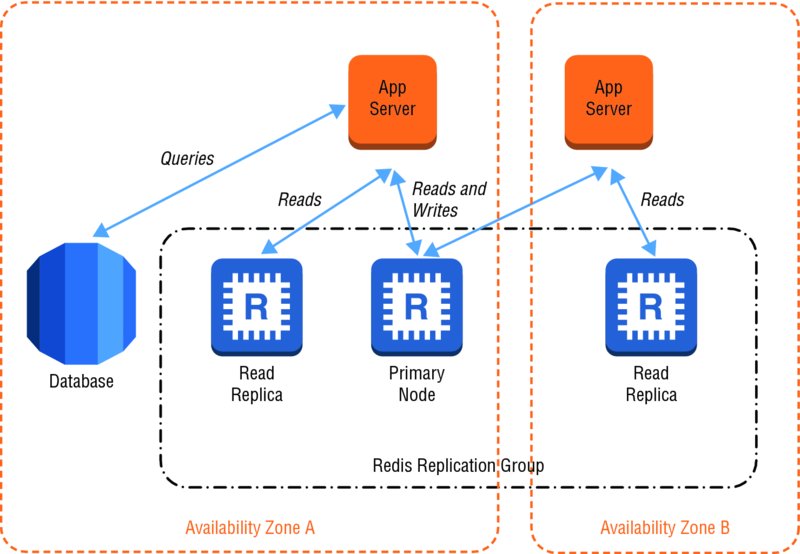
- Replication and Multi-AZ
- Replication is a useful technique
- to provide rapid recovery in the event of a node failure
- to serve up very high volumes of read queries beyond the capabilities of a single node.
- ElastiCache clusters running Redis support both of these design requirements. Unlike Redis, cache clusters running Memcached are standalone in-memory services without any redundant data protection services.
- replication between the clusters is performed asynchronously and there will be a small delay before data is available on all cluster nodes.
- Replication Groups
- Cache clusters running Redis support the concept of replication groups.
- A replication group consists of up to 6 clusters, with 5 of them designated as read replicas.
- This allows you to scale horizontally by writing code in your application to offload reads to one of the 5 clones.
- Multi-AZ Replication Groups
- can also create a Multi-AZ replication group that allows you to increase availability and minimize the loss of data.
- Multi-AZ simplifies the process of dealing with a failure by automating the replacement and failover from the primary node.
- In the event the primary node fails or can’t be reached, Multi-AZ will select and promote a read replica to become the new primary, and a new node will be provisioned to replace the failed one. ElastiCache will then update the DNS entry of the new primary node to allow your application to continue processing without any configuration change and with only a short disruption.
- Replication is a useful technique
- Backup and Recovery
- ElastiCache clusters running Redis allow you to persist your data from in-memory to disk and create a snapshot.
- Each snapshot is a full clone of the data that can be used to recover to a specific point in time or to create a copy for other purposes.
- Snapshots cannot be created for clusters using the Memcached engine because it is a purely in-memory key/value store and always starts empty.
- ElastiCache uses the native backup capabilities of Redis and will generate a standard Redis database backup file that gets stored in S3.
- Snapshots require compute and memory resources to perform and can potentially have a performance impact on heavily used clusters.
- ElastiCache will try different backup techniques depending on the amount of memory currently available.
- Best practice: set up a replication group and perform a snapshot against one of the read replicas instead of the primary node.
- In addition to manually initiated snapshots, snapshots can be created automatically based on a schedule. You can also configure a window for the snapshot operation to be completed and specify how many days of backups you want to store.
- Manual snapshots are stored indefinitely until you delete them.
- Whether the snapshot was created automatically or manually, the snapshot can then be used to create a new cluster at any time.
- By default, the new cluster will have the same configuration as the source cluster, but you can override these settings.
- You can also restore from an RDB file generated from any other compatible Redis cluster.
- Access Control
- Access to your ElastiCache cluster is controlled primarily by restricting inbound network access to your cluster through the use of security groups.
- Each security group defines one or more inbound rules that restrict the source traffic.
- When deployed inside of a VPC, each node will be issued a private IP address within one or more subnets that you select.
- Individual nodes can never be accessed from the Internet or from EC2 instances outside the VPC.
- You can further restrict network ingress at the subnet level by modifying the network ACLs.
- Access to manage the configuration and infrastructure of the cluster is controlled separately from access to the actual Memcached or Redis service endpoint.
- Using the IAM service, you can define policies that control which AWS users can manage the ElastiCache infrastructure.
- Some of the key actions an administrator can perform include
CreateCacheCluster,ModifyCacheCluster, orDeleteCacheCluster. - Redis clusters also support
CreateReplicationGroupandCreateSnapshotactions, among others.
DevOps & Management Tools
Amazon CloudWatch
- monitoring service for AWS cloud resources and the applications running on AWS
- CloudWatch is a service that you can use to monitor your AWS resources and your applications in real time.
- With CloudWatch, you can collect and track metrics, create alarms that send notifications, and make changes to the resources being monitored based on rules you define.
- For example, you might choose to monitor CPU utilization to decide when to add or remove EC2 instances in an application tier. Or, if a particular application-specific metric that is not visible to AWS is the best indicator for assessing your scaling needs, you can perform a PUT request to push that metric into CloudWatch.
- You can then use this custom metric to manage capacity.
- You can specify parameters for a metric over a time period and configure alarms and automated actions when a threshold is reached. CloudWatch supports multiple types of actions such as sending a notification to an SNS topic or executing an Auto Scaling policy.
-
CloudWatch offers either basic or detailed monitoring for supported AWS products. Basic monitoring sends data points to CloudWatch every five minutes for a limited number of preselected metrics at no charge.
-
Detailed monitoring sends data points to CloudWatch every minute and allows data aggregation for an additional charge. If you want to use detailed monitoring, you must enable it—basic is the default.
- Read Alert
- You may have an application that leverages DynamoDB, and you want to know when read requests reach a certain threshold and alert yourself with an email. You can do this by using
ProvisionedReadCapacityUnitsfor the DynamoDB table for which you want to set an alarm. You simply set a threshold value during a number of consecutive periods and then specify email as the notification type. Now, when the threshold is sustained over the number of periods, your specified email will alert you to the read activity.
- You may have an application that leverages DynamoDB, and you want to know when read requests reach a certain threshold and alert yourself with an email. You can do this by using
- CloudWatch metrics can be retrieved by performing a GET request. When you use detailed monitoring, you can also aggregate metrics across a length of time you specify. CloudWatch does not aggregate data across regions but can aggregate across Availability Zones within a region.
- AWS provides a rich set of metrics included with each service, but you can also define custom metrics to monitor resources and events AWS does not have visibility into—for example, EC2 instance memory consumption and disk metrics that are visible to the operating system of the EC2 instance but not visible to AWS or application-specific thresholds running on instances that are not known to AWS. CloudWatch supports an API that allows programs and scripts to PUT metrics into CloudWatch as name-value pairs that can then be used to create events and trigger alarms in the same manner as the default CloudWatch metrics.
- CloudWatch Logs can be used to monitor, store, and access log files from EC2 instances, CloudTrail, and other sources. You can then retrieve the log data and monitor in real time for events—for example, you can track the number of errors in your application logs and send a notification if an error rate exceeds a threshold. CloudWatch Logs can also be used to store your logs in S3 or Glacier. Logs can be retained indefinitely or according to an aging policy that will delete older logs as no longer needed.
- A CloudWatch Logs agent is available that provides an automated way to send log data to CloudWatch Logs for EC2 instances running Amazon Linux or Ubuntu. You can use the CloudWatch Logs agent installer on an existing EC2 instance to install and configure the CloudWatch Logs agent. After installation is complete, the agent confirms that it has started and it stays running until you disable it.
- CloudWatch has some limits that you should keep in mind when using the service. Each AWS account is limited to 5,000 alarms per AWS account, and metrics data is retained for two weeks by default (at the time of this writing). If you want to keep the data longer, you will need to move the logs to a persistent store like S3 or Glacier. You should familiarize yourself with the limits for CloudWatch in the CloudWatch Developer Guide.
AWS OpsWorks
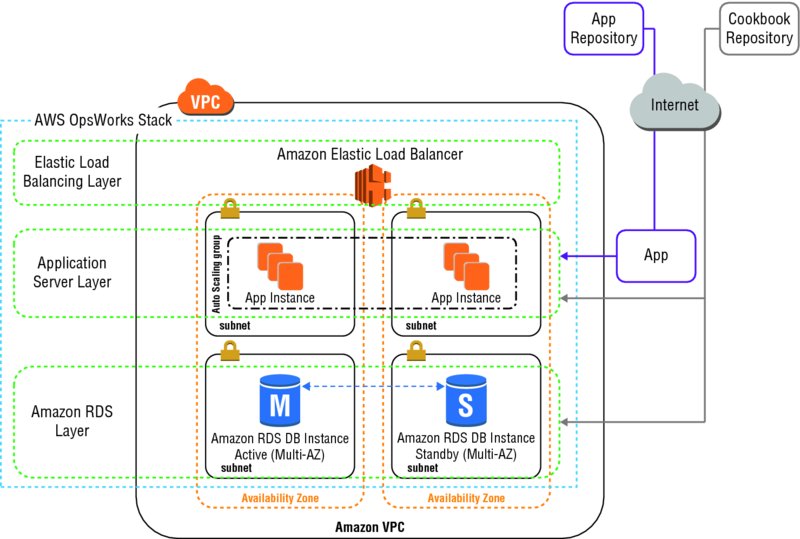
- AWS OpsWorks is a configuration management service that helps you configure and operate applications using Chef.
- AWS OpsWorks will work with applications of any level of complexity and is independent of any particular architectural pattern.
- You can define an application’s architecture and the specification of each component, including package installation, software configuration, and resources such as storage.
- AWS OpsWorks supports both Linux or Windows servers, including existing EC2 instances or servers running in your own data center.
- This allows organizations to use a single configuration management service to deploy and operate applications across hybrid architectures.
-
can use AWS OpsWorks or IAM to manage user permissions. The 2 options are not mutually exclusive; it is sometimes desirable to use both.
- Stack
- Stack is a container for AWS resources—EC2 instances, RDS database instances, and so on—that are created and managed collectively for a common purpose. For example, these architectures typically require application servers, database servers, load balancers, and so on.
- In addition to creating the instances and installing the necessary packages, you need a way to distribute applications to the application servers, monitor the stack’s performance, manage security and permissions, and so on.
- The stack helps you manage these resources as a group and defines some default configuration settings, such as the EC2 instances’ operating system and AWS region.
- If you want to isolate some stack components from direct user interaction, you can run the stack in a VPC.
- Each stack lets you grant users permission to access the stack and specify what actions they can take.
- Using AWS OpsWorks, you can create and manage stacks and applications.
- Layer
- can define the elements of a stack by adding one or more layers.
- A layer represents a set of resources that serve a particular purpose, such as load balancing, web applications, or hosting a database server.
- can customize or extend layers by modifying the default configurations or adding Chef recipes to perform tasks such as installing additional packages.
- Layers give you complete control over which packages are installed, how they are configured, how applications are deployed, and more.
- Layers depend on Chef recipes to handle tasks such as installing packages on instances, deploying applications, and running scripts.
- AWS OpsWorks features has a set of lifecycle events that automatically run a specified set of recipes at the appropriate time on each instance.
- Instance
- An instance represents a single computing resource, such as an EC2 instance.
- It defines the resource’s basic configuration, such as operating system and size.
- Other configuration settings, such as Elastic IP addresses or EBS volumes, are defined by the instance’s layers.
- The layer’s recipes complete the configuration by performing tasks, such as installing and configuring packages and deploying applications.
- store applications and related files in a repository, such as an S3 bucket or Git repo.
- Each application is represented by an app, which specifies the application type and contains the information that is needed to deploy the application from the repository to your instances, such as the repository URL and password.
- When you deploy an app, AWS OpsWorks triggers a Deploy event, which runs the Deploy recipes on the stack’s instances.
- Using the concepts of stacks, layers, and apps, you can model and visualize your application and resources in an organized fashion.
- AWS OpsWorks sends all of your resource metrics to Amazon CloudWatch, making it easy to view graphs and set alarms to help you troubleshoot and take automated action based on the state of your resources.
- AWS OpsWorks provides many custom metrics, such as CPU idle, memory total, average load for one minute, and more.
- Each instance in the stack has detailed monitoring to provide insights into your workload.
Use Cases
- Host Multi-Tier Web Applications: AWS OpsWorks lets you model and visualize your application with layers that define how to configure a set of resources that are managed together. Because AWS OpsWorks uses the Chef framework, you can bring your own recipes or leverage hundreds of community-built configurations.
- Support Continuous Integration: AWS OpsWorks supports DevOps principles, such as continuous integration. Everything in your environment can be automated.
AWS CloudFormation
- defines a JSON-based templating language that can be used to describe all the AWS resources needed for a workload.
- When templates are submitted to the AWS CloudFormation, it will take care of provisioning and configuring those resources in appropriate order
- AWS CloudFormation allows organizations to deploy, modify, and update resources in a controlled and predictable way, in effect applying version control to AWS infrastructure the same way one would do with software.
- AWS CloudFormation gives developers and systems administrators an easy way to create and manage a collection of related AWS resources, provisioning and updating them in an orderly and predictable fashion.
- When you use AWS CloudFormation, you work with templates and stacks.
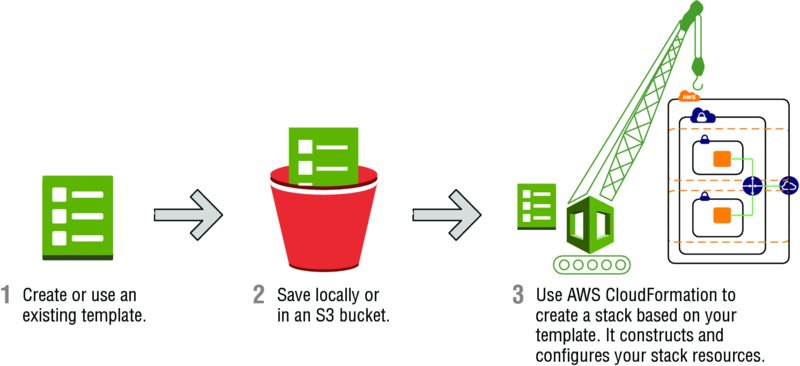
- Template
- A template is a JSON file to define your AWS resources and their properties
- Templates are used as blueprints for building your AWS resources.
- can reuse template to set up resources consistently and repeatedly. Describe the resources once, and then provision the same resources over and over in multiple regions.
- Stack
- Multiple related resources are managed as a single unit called a stack.
- create, update, and delete a collection of resources by creating, updating, and deleting stacks.
- All of the resources in a stack are defined by the stack’s template.
- Suppose you created a template that includes an Auto Scaling group, ELB load balancer, and an RDS instance. To create those resources, you create a stack by submitting your template that defines those resources, and AWS CloudFormation handles all of the provisioning for you. After all of the resources have been created, AWS CloudFormation reports that your stack has been created. You can then start using the resources in your stack. If stack creation fails, AWS CloudFormation rolls back your changes by deleting the resources that it created.
- Template Parameters
- can use parameters to customize template at runtime, when the stack is built. e.g.,
- RDS database size,
- EC2 instance types,
- database, and web server port numbers
- By leveraging template parameters, a single template is reused for many infrastructure deployments with different configuration values. e.g.,
- EC2 instance types,
- CloudWatch alarm thresholds,
- RDS read-replica settings
- template parameters can be used to tune the settings and thresholds in each region separately and still be sure that the application is deployed consistently across the regions.
- can use parameters to customize template at runtime, when the stack is built. e.g.,
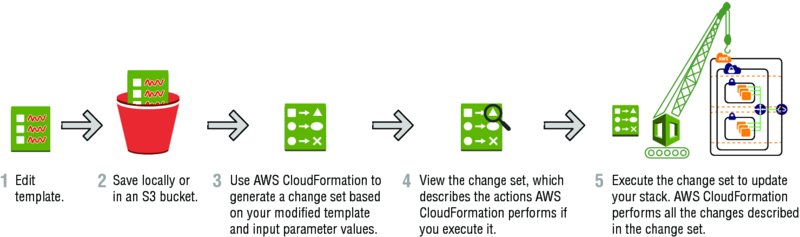
- Change Set
- Because environments are dynamic in nature, you inevitably will need to update your stack’s resources from time to time.
- There is no need to create a new stack and delete the old one; you can simply modify the existing stack’s template.
- To update a stack, create a change set by submitting a modified version of the original stack template, different input parameter values, or both.
- AWS CloudFormation compares the modified template with the original template and generates a change set.
- The change set lists the proposed changes. After reviewing the changes, you can execute the change set to update your stack.
- Delete Stack
- can delete the stack and all of the resources in that stack.
- If you want to delete a stack but still retain some resources in that stack, you can use a deletion policy to retain those resources.
- If a resource has no deletion policy, AWS CloudFormation deletes the resource by default.
- After all of the resources have been deleted, AWS CloudFormation signals that your stack has been successfully deleted.
- If AWS CloudFormation cannot delete a resource, the stack will not be deleted. Any resources that haven’t been deleted will remain until you can successfully delete the stack.
Use Case
- Quickly Launch New Test Environments
- Reliably Replicate Configuration Between Environments
AWS CloudTrail
-
a web service that records AWS API calls for an account and delivers log files for audit and review.
- provides visibility into user activity by recording API calls made on your account.
- records important information about each API call, including the name of the API, the identity of the caller, the time of the API call, the request parameters, and the response elements returned by the AWS service.
- makes it easier to ensure compliance with internal policies and regulatory standards.
- captures AWS API calls and related events made by or on behalf of an AWS account and delivers log files to an S3 bucket specified.
- Optionally, CloudTrail can be configured to deliver events to a log group monitored by CloudWatch Logs.
- can also choose to receive SNS notifications each time a log file is delivered to your bucket.
- can create a trail with the CloudTrail console, the AWS CLI, or the CloudTrail API.
- A trail is a configuration that enables logging of the AWS API activity and related events in your account.
- 2 Types of Trails:
- A Trail That Applies to All Regions
- When you create a trail that applies to all AWS regions, CloudTrail creates the same trail in each region, records the log files in each region, and delivers the log files to the single S3 bucket (and optionally to the CloudWatch Logs log group) that you specify.
- This is the default option when you create a trail using the CloudTrail console.
- If you choose to receive SNS notifications for log file deliveries, one SNS topic will suffice for all regions.
- If you choose to have CloudTrail send events from a trail that applies to all regions to an CloudWatch Logs log group, events from all regions will be sent to the single log group.
- A Trail That Applies to One Region
- You specify a bucket that receives events only from that region. The bucket can be in any region that you specify.
- If you create additional individual trails that apply to specific regions, you can have those trails deliver event logs to a single S3 bucket.
- A Trail That Applies to All Regions
- By default, log files are encrypted using S3 SSE. You can store your log files in your bucket for as long as you want, but you can also define S3 lifecycle rules to archive or delete log files automatically.
- CloudTrail typically delivers log files within 15 minutes of an API call.
- the service publishes new log files multiple times an hour, usually about every 5 minutes. These log files contain API calls from all of the account’s services that support CloudTrail.
- Enable CloudTrail on all of your AWS accounts. Instead of configuring a trail for one region, you should enable trails for all regions.
Use Cases
- External Compliance Audits
- Events from CloudTrail can be used to show the degree to which you are compliant with the regulations.
- Unauthorized Access to Your AWS Account
- CloudTrail records all sign-on attempts to your AWS account, including AWS Management Console login attempts, AWS SDK API calls, and AWS CLI API calls. Routine examination of CloudTrail events will provide the needed information to determine if your AWS account is being targeted for unauthorized access.
AWS Trusted Advisor
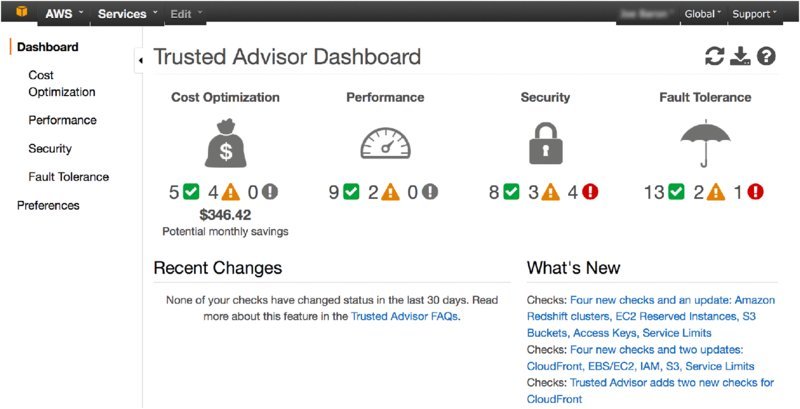
- AWS Trusted Advisor inspects your AWS environment and makes recommendations when opportunities exist to save money, improve system availability and performance, or help close security gaps.
- You can view the overall status of your AWS resources and savings estimations on the AWS Trusted Advisor dashboard.
- Accessed via AWS console and programmatic access with the AWS Support API.
- 4 categories of best practices:
- cost optimization,
- security,
- fault tolerance, and
- performance improvement.
- The color coding reflects the following information:
- Red: Action recommended
- Yellow: Investigation recommended
- Green: No problem detected
- For each check, you can review a detailed description of the recommended best practice, a set of alert criteria, guidelines for action, and a list of useful resources on the topic.
- All AWS customers have access to the below 4 standard AWS Trusted Advisor checks at no cost:
- Service Limits: Checks for usage that is more than 80% of the service limit. These values are based on a snapshot, so current usage might differ and can take up to 24 hours to reflect changes.
- Security Groups-Specific Ports Unrestricted Checks: security groups for rules that allow unrestricted access (
0.0.0.0/0) to specific ports - IAM Use Checks for your use of AWS IAM
- MFA on Root Account Checks the root account and warns if MFA is not enabled
- Customers with a Business or Enterprise AWS Support plan can view all AWS Trusted Advisor checks—over 50 checks.
- You have the ability to exclude items from a check and optionally restore them later at any time.
AWS Config
- AWS Config is a fully managed service that provides you with an AWS resource inventory, configuration history, and configuration change notifications to enable security and governance. * With AWS Config,
- one can discover existing and deleted AWS resources,
- determine the overall compliance against rules,
- detailed view of the configuration details of a resource at any point in time.
- how the resources are related and how the configurations and relationships changed over time
- enable compliance auditing, security analysis, resource change tracking, and troubleshooting.
- AWS Config defines a resource as an entity you can work with in AWS, such as an EC2 instance, an EBS volume, a security group, or an Amazon VPC.
- When you turn on AWS Config, it first discovers the supported AWS resources that exist in your account and generates a configuration item for each resource.
- Configuration Item
- A configuration item represents a point-in-time view of the various attributes of a supported AWS resource that exists in your account.
- Configuration item components
- metadata,
- attributes,
- relationships,
- current configuration,
- and related events.
- AWS Config will generate configuration items when the configuration of a resource changes, and it maintains historical records of the configuration items of your resources from the time you start the configuration recorder.
- Configuration Recorder
- The configuration recorder stores the configurations of the supported resources in your account as configuration items.
- By default, AWS Config creates configuration items for every supported resource in the region.
- If you don’t want AWS Config to create configuration items for all supported resources, you can specify the resource types that you want it to track.
- helps assess the overall compliance and risk status from a configuration perspective, view compliance trends over time, and pinpoint which configuration change caused a resource to drift out of compliance.
- Config Rule
- An AWS Config Rule represents desired configuration settings for specific AWS resources or for an entire AWS account.
- While AWS Config continuously tracks your resource configuration changes, it checks whether these changes violate any of the conditions in your rules.
- If a resource violates a rule, AWS Config flags the resource and the rule as noncompliant and notifies you through Amazon SNS.
- AWS Config makes it easy to track resource configuration without the need for up-front investments and while avoiding the complexity of installing and updating agents for data collection or maintaining large databases.
- Once AWS Config is enabled, organizations can view continuously updated details of all configuration attributes associated with AWS resources.
- Features
- Change Management
- Organizations needed to poll resource APIs and maintain their own external database for change management. AWS Config resolves this previous need and automatically records resource configuration information and will evaluate any rules that are triggered by a change.
- The configuration of the resource and its overall compliance against rules are presented in a dashboard.
- Integration with AWS CloudTrail
- If the configuration change of a resource was the result of an API call, AWS Config also records the AWS CloudTrail event ID that corresponds to the API call that changed the resource’s configuration.
- Organizations can then leverage the AWS CloudTrail logs to obtain details of the API call that was made—including who made the API call, at what time, and from which IP address—to use for troubleshooting purposes.
- Change Notification
- When a configuration change is made to a resource or when the compliance of an AWS Config rule changes, a notification message is delivered that contains the updated configuration of the resource or compliance state of the rule and key information such as the old and new values for each changed attribute.
- AWS Config sends notifications when a Configuration History file is delivered to S3 and when the customer initiates a Configuration Snapshot. These messages are all streamed to a specified SNS topic.
- AWS Config will also automatically deliver a history file to the Amazon S3 bucket you specify every six hours that contains all changes to your resource configurations.
- Configuration History: Organizations can use the AWS Management Console, API, or AWS CLI to obtain details of what a resource’s configuration looked like at any point in the past.
- Change Management
Use Cases
- Discovery.
- Change Management
- Continuous Audit and Compliance
- Troubleshooting
- Security and Incident Analysis
Security and Identity
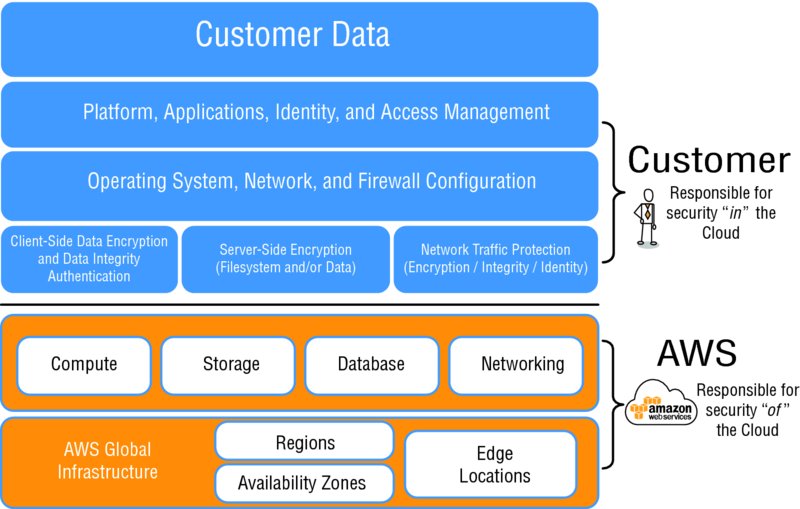
- Shared Responsibility Model - AWS is responsible for security of the cloud, and customers are responsible for security in the cloud.
AWS Identity and Access Manager (IAM)
-
enables organizations to create and manage AWS users and groups and use permissions to allow and deny their access to AWS resources.
- IAM uses traditional identity concepts such as users, groups, and access control policies to control who can use, what services/resources, and how.
- Provides granular control to limit a single user to the ability to perform
- a single action
- on a specific resource
- from a specific IP address
- during a specific time window.
-
Access can be granted whether they are running on-premises or in the cloud.
- IAM is not an identity store/authorization system
- Permissions are to manipulate AWS infrastructure, not for your application.
- This is not a replacement to your on-premises application authentication/authorization.
- If your application identities are based on Active Directory, your on-premises Active Directory can be extended into the cloud.
- AWS Directory Service is an Active Directory-compatible directory service that can work on its own or integrate with on-premises Active Directory.
- For mobile app, consider Amazon Cognito for identity management
- IAM is not operating system identity management
- Under the shared responsibility model, you are in control of your operating system console and configuration. Whatever mechanism you currently use to control access to your server infrastructure will continue to work on EC2 instances, whether that is managing individual machine login accounts or a directory service such as Active Directory or LDAP.
- You can run an Active Directory or LDAP server on EC2, or you can extend your on-premises system into the cloud.
- AWS Directory Service will also work well to provide Active Directory functionality in the cloud as a service, whether standalone or integrated with your existing Active Directory.
- Authentication Technologies
- For OS Access - use Active Directory LDAP Machine-specific accounts
- For Application Access - use User Repositories
- For Mobile apps - Amazon Cognito
- For AWS Resources - use IAM
- IAM is controlled through AWS Console, CLI and via AWS SDKs. In addition, the AWS Partner Network (APN) includes a rich ecosystem of tools to manage and extend IAM.
Principals
- A principal is an IAM entity that is allowed to interact with AWS resources.
- A principal can be permanent or temporary, and it can represent a human or an application.
-
3 types of principals: root users, IAM users, and roles/temporary security tokens.
- 1. Root User
- Root user is automatically created when creating a new AWS account.
- With single sign-in principal, root user has complete access to all AWS Cloud services and resources in the account.
- Root user persists as long as the account is open
- Root user can be used for both console and programmatic access to AWS resources.
- Best practice: DO NOT use the root user for everyday tasks, even the administrative ones. Instead, use it only to create the first IAM user and then securely lock away the root user credentials.
- 2. IAM Users
- Users are persistent identities set up through the IAM service to represent individual people or applications.
- IAM users can be created by principals with IAM administrative privileges.
- Users are permanent entities until an IAM admin deletes them - no expiration period
- Users are an excellent way to enforce the principle of least privilege; i.e., the concept of allowing a person or process interacting with AWS resources to perform exactly the tasks they need but nothing else.
- Users can be associated with very granular policies that define permissions.
- 3. Roles/Temporary Security Tokens
- Roles are used to grant specific privileges to specific actors for a set duration of time.
- Actors can be authenticated by AWS or some trusted external system.
- When one of the actors assumes a role, AWS provides the actor with a temporary security token from the AWS Security Token Service (STS) that the actor can use to access AWS Cloud services.
- Requesting a temporary security token requires specifying how long the token will exist before it expires. The range of a temporary security token lifetime is 15 minutes to 36 hours.
- Roles and temporary security tokens enable a number of use cases:
- 3a. Amazon EC2 Roles
- Grant permissions to applications running on EC2 instance.
- Granting permissions to an application is always tricky, as it usually requires configuring the application with some sort of credential upon installation. This leads to issues around securely storing the credential prior to use, how to access it safely during installation, and how to secure it in the configuration.
- Suppose that an application running on an EC2 instance needs to access an S3 bucket.
- A policy granting permission to read and write that bucket can be created and assigned to an IAM user, and the application can use the access key for that IAM user to access the S3 bucket.
- The problem with this approach is that the access key for the user must be accessible to the application, probably by storing it in some sort of configuration file.
- The process for obtaining the access key and storing it encrypted in the configuration is usually complicated and a hindrance to agile development.
- Additionally, the access key is at risk when being passed around. Finally, when the time comes to rotate the access key, the rotation involves performing that whole process again.
- Using IAM roles for Amazon EC2 removes the need to store AWS credentials in a configuration file.
- Alternative solution
- Create an IAM role that grants the required access to the S3 bucket.
- When the Amazon EC2 instance is launched, the role is assigned to the instance.
- When the application running on the instance uses the API to access the S3 bucket, it assumes the role assigned to the instance and obtains a temporary token that it sends to the API.
- The process of obtaining the temporary token and passing it to the API is handled automatically by most of the AWS SDKs, allowing the application to make a call to access the S3 bucket without worrying about authentication.
- This removes any need to store an access key in a configuration file.
- Also, because the API access uses a temporary token, there is no fixed access key that must be rotated.
- 3b. Cross-Account Access
- Grant permissions to users from other AWS accounts, whether you control those accounts or not.
- Common use case for IAM roles is to grant access to AWS resources to IAM users in other AWS accounts. These accounts may be other AWS accounts controlled by your company or outside agents like customers or suppliers.
- Set up an IAM role with the permissions you want to grant to users in the other account, then users in the other account can assume that role to access your resources.
- This is highly recommended as a best practice, as opposed to distributing access keys outside your organization.
- 3c. Federation
- Grant permissions to users authenticated by a trusted external system.
- Many organizations already have an identity repository outside of AWS and would rather leverage that repository than create a new and largely duplicate repository of IAM users.
- Similarly, web-based applications may want to leverage web-based identities such as Facebook, Google, or Login with Amazon.
- IAM Identity Providers provide the ability to federate these outside identities with IAM and assign privileges to those users authenticated outside of IAM.
- Identity Providers (IdP) IAM can integrate with 2 different types of outside Identity providers .
- OpenID Connect (OIDC)
- For federating web identities such as Facebook, Google, or Login with Amazon, IAM supports integration via OIDC.
- This allows IAM to grant privileges to users authenticated with some of the major web-based IdPs.
- SAML 2.0 (Security Assertion Markup Language)
- For federating internal identities, such as Active Directory or LDAP, IAM supports integration via SAML.
- A SAML-compliant IdP such as Active Directory Federation Services (ADFS) is used to federate the internal directory to IAM.
- Federation works by returning a temporary token associated with a role to the IdP for the authenticated identity to use for calls to the AWS API.
- The actual role returned is determined via information received from the IdP, either attributes of the user in the on-premises identity store or the user name and authenticating service of the web identity store.
- OpenID Connect (OIDC)
Authentication
3 ways that IAM authenticates a principal:
- User Name/Password
- When a principal represents a human interacting with the console, the human will provide a user name/password pair to verify their identity.
- IAM allows you to create a password policy enforcing password complexity and expiration.
- Access Key
Access Key = Access Key ID (20 chars) + Access Secret Key (40 chars)- When a program is manipulating the AWS infrastructure via the API, it will use these values to sign the underlying REST calls to the services.
- The AWS SDKs and tools handle all the intricacies of signing the REST calls, so using an access key will almost always be a matter of providing the values to the SDK or tool.
- Access Key/Session Token
- When a process operates under an assumed role, the temporary security token provides an access key for authentication.
- In addition to the access key, the token also includes a session token. Calls to AWS must include both the two-part access key and the session token to authenticate.
- It is important to note that when an IAM user is created, it has neither an access key nor a password, and the IAM administrator can set up either or both. This adds an extra layer of security in that console users cannot use their credentials to run a program that accesses your AWS infrastructure.
Authorization
- The process of specifying exactly what actions a principal can and cannot perform is called authorization.
-
Authorization is handled in IAM by defining specific privileges in policies and associating those policies with principals.
- Policies
- A policy is a JSON document that fully defines a set of permissions to access and manipulate AWS resources.
- Policy documents contain one or more permissions, with each permission defining:
- Effect: A single word: Allow or Deny.
- Service: For what service does this permission apply? Most AWS Cloud services support granting access through IAM, including IAM itself.
- Resource:
- The resource value specifies the specific AWS infrastructure for which this permission applies. This is specified as an Amazon Resource Name (ARN).
- The format for an ARN varies slightly between services, but the basic format is:
arn:aws:service:region:account-id:[resourcetype:]resource - For some services, wildcard values are allowed; for instance, an S3 ARN could have a resource of
foldername\*to indicate all objects in the specified folder. - Sample ARN
- Amazon S3 Bucket:
arn:aws:s3:us-east-1:123456789012:my_corporate_bucket/* - IAM User:
arn:aws:iam:us-east-1:123456789012:user/David - Amazon DynamoDB Table:
arn:aws:dynamodb:us-east-1:123456789012:table/tablename
- Amazon S3 Bucket:
- Action:
- The action value specifies the subset of actions within a service that the permission allows or denies. For instance, a permission may grant access to any read-based action for S3.
- A set of actions can be specified with an enumerated list or by using wildcards (Read*).
- Condition:
- The condition value optionally defines one or more additional restrictions that limit the actions allowed by the permission.
- For instance, the permission might contain a condition that limits the ability to access a resource to calls that come from a specific IP address range.
- Another condition could restrict the permission only to apply during a specific time interval.
- A sample policy is shown in the following listing. This policy allows a principal to list the objects in a specific bucket and to retrieve those objects, but only if the call comes from a specific IP address.
1 2 3 4 5 6 7 8 9 10 11 12 13 14 15 16 17 18 | |
Associating Policies with Principals
- A policy can be associated directly with an IAM user in one of two ways:
- User Policy:
- These policies exist only in the context of the user to which they are attached.
- In the console, a user policy is entered into the user interface on the IAM user page.
- Managed Policies:
- Policies are created in the ‘Policies’ tab on the IAM page and exist independently of any individual user.
- Same policy can be associated with many users or groups of users.
- There are a large number of predefined managed policies on the Policies tab of the IAM page in the AWS Console.
- You can write your own policies specific to your use cases.
-
- Using predefined managed policies ensures that when new permissions are added for new features, your users will still have the correct access.
- User Policy:
IAM Groups
- Common method for associating policies with users is with the IAM groups feature.
- Groups simplify managing permissions for large numbers of users.
- After a policy is assigned to a group, any user who is a member of that group assumes those permissions.
- This is a much simpler management process than having to review what policies a new IAM user for the operations team should receive and manually adding those policies to the user.
- 2 ways a policy can be associated with an IAM group:
- Group Policy
- These policies exist only in the context of the group to which they are attached.
- In the AWS Console, a group policy is entered into the user interface on the IAM Group page.
- Managed Policies
- can be associated with IAM users and IAM groups.
- A good first step is to use the root user to create a new IAM group called “IAM Administrators” and assign the managed policy, “IAMFullAccess.”
- Then create a new IAM user called “Administrator,” assign a password, and add it to the IAM Administrators group. At this point, you can log off as the root user and perform all further administration with the IAM user account.
- Group Policy
Assuming a role
The final way an actor can be associated with a policy is by assuming a role. In this case, the actor can be:
- An authenticated IAM user (person or process). In this case, the IAM user must have the rights to assume the role.
- A person or process authenticated by a trusted service outside of AWS, such as an on-premises LDAP directory or a web authentication service. In this situation, an AWS Cloud service will assume the role on the actor’s behalf and return a token to the actor.
After an actor has assumed a role, it is provided with a temporary security token associated with the policies of that role. The token contains all the information required to authenticate API calls. This information includes a standard access key plus an additional session token required for authenticating calls under an assumed role.
Other Key Features
Beyond the critical concepts of principals, authentication, and authorization, there are several other features of the IAM service that are important to understand to realize the full benefits of IAM.
Multi-Factor Authentication (MFA)
- MFA adds an extra layer of security to your infrastructure by adding a second method of authentication beyond just a password or access key.
- With MFA, authentication also requires entering a One-Time Password (OTP) from a small device. The MFA device can be either a small hardware device you carry with you or a virtual device via an app on your smart phone (for example, the AWS Virtual MFA app).
- MFA requires you to verify your identity with both something you know and something you have.
- MFA can be assigned to any IAM user account, whether the account represents a person or application.
- When a person using an IAM user configured with MFA attempts to access the AWS Console, after providing their password they will be prompted to enter the current code displayed on their MFA device before being granted access. An application using an IAM user configured with MFA must query the application user to provide the current code, which the application will then pass to the API.
Rotating Keys
- It is a security best practice to rotate access keys associated with your IAM users.
- IAM facilitates this process by allowing two active access keys at a time.
- The process to rotate keys can be conducted via the console, CLI, or SDKs:
- Create a new access key for the user.
- Reconfigure all applications to use the new access key.
- Disable the original access key (disabling instead of deleting at this stage is critical, as it allows rollback to the original key if there are issues with the rotation).
- Verify the operation of all applications.
- Delete the original access key.
- Access keys should be rotated on a regular schedule.
Resolving Multiple Permissions
Occasionally, multiple permissions will be applicable when determining whether a principal has the privilege to perform some action. These permissions may come from multiple policies associated with a principal or resource policies attached to the AWS resource in question. It is important to know how conflicts between these permissions are resolved:
- Initially the request is denied by default.
- All the appropriate policies are evaluated; if there is an explicit “deny” found in any policy, the request is denied and evaluation stops.
- If no explicit “deny” is found and an explicit “allow” is found in any policy, the request is allowed.
- If there are no explicit “allow” or “deny” permissions found, then the default “deny” is maintained and the request is denied.
The only exception to this rule is if an AssumeRole call includes a role and a policy, the policy cannot expand the privileges of the role (for example, the policy cannot override any permission that is denied by default in the role).
AWS Directory Service
- AWS Directory Service is a managed service offering that provides directories that contain information about your organization, including users, groups, computers, and other resources.
- allows organizations to set up and run Microsoft Active Directory on the AWS cloud or connect their AWS resources with an existing on-premises Microsoft Active Directory.
- designed to reduce identity management tasks.
- each directory is deployed across multiple Availability Zones, and monitoring automatically detects and replaces domain controllers that fail.
- data replication and automated daily snapshots are configured.
- no software to install, and AWS handles all of the patching and software updates.
3 types of directory types
- AWS Directory Service for Microsoft Active Directory (Enterprise Edition)_
- AWS Directory Service for Microsoft Active Directory (Enterprise Edition), also referred to as Microsoft AD
- is a managed Microsoft Active Directory hosted on the AWS cloud.
- It provides much of the functionality offered by Microsoft Active Directory plus integration with AWS applications.
- With the additional Active Directory functionality, you can, for example, easily set up trust relationships with your existing Active Directory domains to extend those directories to AWS cloud services.
- Simple AD
- is a Microsoft Active Directory-compatible directory from AWS Directory Service that is powered by Samba 4.
- supports commonly used Active Directory features such as
- user accounts,
- group memberships,
- domain-joining EC2 instances running Linux and Microsoft Windows,
- Kerberos-based Single Sign-On (SSO),
- and group policies.
- makes it even easier to manage EC2 instances running Linux and Windows and deploy Windows applications on the AWS cloud.
- User accounts in Simple AD
- can also access AWS applications, such as Amazon WorkSpaces, Amazon WorkDocs, or Amazon WorkMail.
- can also use AWS IAM roles to access the AWS Management Console and manage AWS resources.
- provides daily automated snapshots to enable point-in-time recovery.
- Note: you
- Features NOT support
- cannot set up trust relationships between Simple AD and other Active Directory domains.
- DNS dynamic update,
- schema extensions,
- Multi-Factor Authentication (MFA),
- communication over LDAP,
- PowerShell AD cmdlets,
- and the transfer of Flexible Single-Master Operations (FSMO) roles.
- AD Connector
- is a proxy service for connecting your on-premises Microsoft Active Directory to the AWS cloud without requiring complex directory synchronization or the cost and complexity of hosting a federation infrastructure.
- AD Connector forwards sign-in requests to your Active Directory domain controllers for authentication and provides the ability for applications to query the directory for data.
- After setup, users can use their existing corporate credentials to log on to AWS applications, such as Amazon WorkSpaces, Amazon WorkDocs, or Amazon WorkMail.
- With the proper IAM permissions, users can also access the AWS Management Console and manage AWS resources such as EC2 instances or S3 buckets.
- AD Connector can also be used to enable MFA by integrating it with your existing Remote Authentication Dial-Up Service (RADIUS)-based MFA infrastructure to provide an additional layer of security when users access AWS applications.
- With AD Connector, you continue to manage your Active Directory as usual. For example, adding new users, adding new groups, or updating passwords are all accomplished using standard directory administration tools with your on-premises directory. Thus, in addition to providing a streamlined experience for your users, AD Connector enables consistent enforcement of your existing security policies, such as password expiration, password history, and account lockouts, whether users are accessing resources on-premises or on the AWS cloud.
Use Cases
- Microsoft AD is your best choice if you have more than 5,000 users and need a trust relationship set up between an AWS-hosted directory and your on-premises directories.
- Simple AD is the least expensive option and your best choice if you have 5,000 or fewer users and don’t need the more advanced Microsoft Active Directory features.
- AD Connector is your best choice when you want to use your existing on-premises directory with AWS cloud services.
AWS Key Management Service (KMS)
- Key management is the management of cryptographic keys within a cryptosystem. This includes dealing with the generation, exchange, storage, use, and replacement of keys.
- AWS offers 2 services to manage your own symmetric or asymmetric cryptographic keys:
- AWS KMS
- AWS CloudHSM
- KMS is a service enabling you to generate, store, enable/disable, and delete symmetric keys
- KMS makes it easy to create and control the encryption keys used to encrypt your data.
- can create keys that can never be exported from the service and can be used to encrypt and decrypt data based on policies defined.
- KMS enables you to maintain control over who can use your keys and gain access to your encrypted data.
- Customer Managed Keys
- KMS uses a type of key called a Customer Master Key (CMK) to encrypt and decrypt data.
- CMKs are the fundamental resources that KMS manages.
- CMKs can be used inside of KMS to encrypt or decrypt up to 4 KB of data directly.
- CMKs can also be used to encrypt generated data keys that are then used to encrypt or decrypt larger amounts of data outside of the service.
- CMKs can never leave KMS unencrypted, but data keys can leave the service unencrypted.
- Data Keys
- used to encrypt large data objects within your own application outside KMS.
- When you call
GenerateDataKey, KMS returns a plaintext version of the key and ciphertext that contains the key encrypted under the specified CMK. - KMS tracks which CMK was used to encrypt the data key.
- Use the plaintext data key in your application to encrypt data, and you typically store the encrypted key alongside your encrypted data
- Security best practices suggest that you should remove the plaintext key from memory as soon as is practical after use.
- To decrypt data in your application, pass the encrypted data key to the
Decryptfunction. - KMS uses the associated CMK to decrypt and retrieve your plaintext data key.
- Use the plaintext key to decrypt your data, and then remove the key from memory.
- Envelope Encryption
- KMS uses envelope encryption to protect data.
- KMS creates a data key, encrypts it under a CMK, and returns plaintext and encrypted versions of the data key to you. You use the plaintext key to encrypt data and store the encrypted key alongside the encrypted data. The key should be removed from memory as soon as is practical after use. You can retrieve a plaintext data key only if you have the encrypted data key and you have permission to use the corresponding master key.
- Encryption Context
- All KMS cryptographic operations accept an optional key/value map of additional contextual information called an encryption context.
- The specified context must be the same for both the encrypt and decrypt operations or decryption will not succeed.
- The encryption context is logged, can be used for additional auditing, and is available as context in the AWS policy language for fine-grained policy-based authorization.
AWS CloudHSM
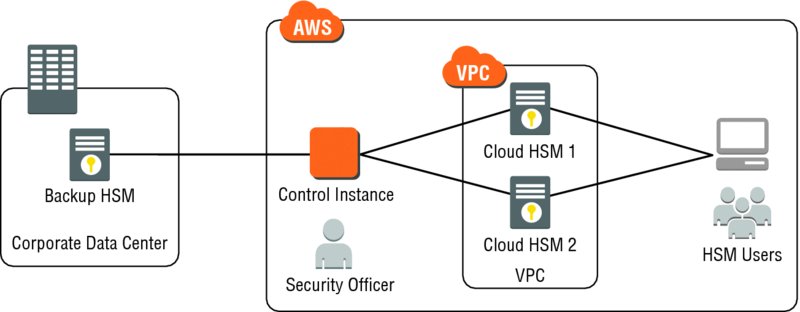
- A service providing you with secure cryptographic key storage by making Hardware Security Modules (HSMs) available on the AWS cloud
- AWS CloudHSM helps you meet corporate, contractual, and regulatory compliance requirements for data security by using dedicated HSM appliances within the AWS cloud.
- An HSM is a hardware appliance that provides secure key storage and cryptographic operations within a tamper-resistant hardware module.
- HSMs are designed to securely store cryptographic key material and use the key material without exposing it outside the cryptographic boundary of the appliance.
- The recommended configuration for using AWS CloudHSM is to use two HSMs configured in a high-availability configuration, as illustrated in the picture above
- AWS CloudHSM allows you to protect your encryption keys within HSMs that are designed and validated to government standards for secure key management.
- You can securely generate, store, and manage the cryptographic keys used for data encryption in a way that ensures that only you have access to the keys.
- AWS CloudHSM helps you comply with strict key management requirements within the AWS cloud without sacrificing application performance.
Use Cases
- Scalable Symmetric Key Distribution
- Symmetric encryption algorithms require that the same key be used for both encrypting and decrypting the data. This is problematic because transferring the key from the sender to the receiver must be done either through a known secure channel or some “out of band” process.
- Government-Validated Cryptography
- Certain types of data (for example, Payment Card Industry—PCI—or health information records) must be protected with cryptography that has been validated by an outside party as conforming to the algorithm(s) asserted by the claiming party.
AWS Certificate Manager
- is a service that lets organizations easily provision, manage and deploy SSL/TLS certificates for use with AWS cloud services. It removes the time-consuming manual process of purchasing, uploading and renewing certificates - enables to quickly request a certificate, deploy it on AWS and let AWS Certificate Manager handle certificate renewals
AWS Web Application Firewall (WAF)
- helps protect web apps from common attacks
AWS Compliance Program
The IT infrastructure that AWS provides is designed and managed in alignment with security best practices and a variety of IT security standards, including (at the time of this writing):
- Service Organization Control (SOC) 1/Statement on Standards for Attestation Engagements (SSAE)16/International Standards for Assurance Engagements No. 3402 (ISAE) 3402 (formerly Statement on Auditing Standards [SAS] 70)
- SOC 2
- SOC 3
- Federal Information Security Management Act (FISMA), Department of Defense (DoD) Information Assurance Certification and Accreditation Process (DIACAP), and Federal Risk and Authorization Management Program (FedRAMP)
- DoD Cloud Computing Security Requirements Guide (SRG) Levels 2 and 4
- Payment Card Industry Data Security Standard (PCI DSS) Level 1
- International Organization for Standardization (ISO) 9001 and ISO 27001
- International Traffic in Arms Regulations (ITAR)
- Federal Information Processing Standard (FIPS) 140-2
In addition, the flexibility and control that the AWS platform provides allows customers to deploy solutions that meet several industry-specific standards, including:
- Criminal Justice Information Services (CJIS)
- Cloud Security Alliance (CSA)
- Family Educational Rights and Privacy Act (FERPA)
- Health Insurance Portability and Accountability Act (HIPAA)
- Motion Picture Association of America (MPAA)
AWS provides a wide range of information regarding its IT control environment to customers through whitepapers, reports, certifications, accreditations, and other third-party attestations.
AWS Global Infrastructure Security
Physical and Environmental Security
- AWS data centers are state of the art, using innovative architectural and engineering approaches.
- AWS data centers are housed in nondescript facilities.
- Physical access is strictly controlled both at the perimeter and at building ingress points by professional security staff using video surveillance, intrusion detection systems, and other electronic means.
- Authorized staff must pass two-factor authentication a minimum of two times to access data center floors.
- All visitors and contractors are required to present identification and are signed in and continually escorted by authorized staff.
- AWS only provides data center access and information to employees and contractors who have a legitimate business need for such privileges.
- When an employee no longer has a business need for these privileges, his or her access is immediately revoked, even if they continue to be an employee of Amazon or AWS.
-
All physical access to data centers by AWS employees is logged and audited routinely.
- Fire Detection and Suppression
- AWS data centers have automatic fire detection and suppression equipment to reduce risk.
- The fire detection system uses smoke detection sensors in all data center environments, mechanical and electrical infrastructure spaces, chiller rooms and generator equipment rooms.
- These areas are protected by wet-pipe, double-interlocked pre-action, or gaseous sprinkler systems.
- Power
- AWS data center electrical power systems are designed to be fully redundant and maintainable without impact to operations, 24 hours a day, and 7 days a week.
- UPS units provide backup power in the event of an electrical failure for critical and essential loads in the facility.
- AWS data centers use generators to provide backup power for the entire facility.
- Climate and Temperature
- Climate control is required to maintain a constant operating temperature for servers and other hardware, which prevents overheating and reduces the possibility of service outages.
- AWS data centers are built to maintain atmospheric conditions at optimal levels.
- Personnel and systems monitor and control temperature and humidity at appropriate levels.
- Management
- AWS monitors electrical, mechanical, and life support systems and equipment so that any issues are immediately identified.
- AWS staff performs preventative maintenance to maintain the continued operability of equipment.
- Storage Device Decommissioning
- When a storage device has reached the end of its useful life, AWS procedures include a decommissioning process that is designed to prevent customer data from being exposed to unauthorized individuals.
Business Continuity Management
- Amazon’s infrastructure has a high level of availability and provides customers with the features to deploy a resilient IT architecture.
- AWS has designed its systems to tolerate system or hardware failures with minimal customer impact.
- Data center Business Continuity Management at AWS is under the direction of the Amazon Infrastructure Group.
- Availability
- Data centers are built in clusters in various global regions.
- All data centers are online and serving customers; no data center is “cold.” In case of failure, automated processes move data traffic away from the affected area.
- Core applications are deployed in an
N+1configuration, so that in the event of a data center failure, there is sufficient capacity to enable traffic to be load-balanced to the remaining sites. - AWS provides its customers with the flexibility to place instances and store data within multiple geographic regions and also across multiple Availability Zones within each region.
- Each Availability Zone is designed as an independent failure zone. This means that Availability Zones are physically separated within a typical metropolitan region and are located in lower risk flood plains (specific flood zone categorization varies by region).
- In addition to having discrete UPS and on-site backup generation facilities, they are each fed via different grids from independent utilities to further reduce single points of failure.
- Availability Zones are all redundantly connected to multiple tier-1 transit providers.
- Incident Response
- The Amazon Incident Management team employs industry-standard diagnostic procedures to drive resolution during business-impacting events.
- Staff operators provide 24 × 7 × 365 coverage to detect incidents and to manage the impact and resolution.
- Communication
- AWS has implemented various methods of internal communication at a global level to help employees understand their individual roles and responsibilities and to communicate significant events in a timely manner. These methods include orientation and training programs for newly hired employees, regular management meetings for updates on business performance and other matters, and electronics means such as video conferencing, electronic mail messages, and the posting of information via the Amazon intranet.
- AWS has also implemented various methods of external communication to support its customer base and the community.
- Mechanisms are in place to allow the customer support team to be notified of operational issues that impact the customer experience.
- A Service Health Dashboard is available and maintained by the customer support team to alert customers to any issues that may be of broad impact.
- The AWS Security Center is available to provide you with security and compliance details about AWS.
- Customers can also subscribe to AWS Support offerings that include direct communication with the customer support team and proactive alerts to any customer-impacting issues.
Network Security
- Secure Network Architecture
- Network devices, including firewall and other boundary devices, are in place to monitor and control communications at the external boundary of the network and at key internal boundaries within the network.
- These boundary devices employ rule sets, access control lists (ACLs), and configurations to enforce the flow of information to specific information system services.
- ACLs, or traffic flow policies, are established on each managed interface, which manage and enforce the flow of traffic.
- ACL policies are approved by Amazon Information Security.
- These policies are automatically pushed to ensure these managed interfaces enforce the most up-to-date ACLs.
- Secure Access Points
- AWS has strategically placed a limited number of access points to the cloud to allow for a more comprehensive monitoring of inbound and outbound communications and network traffic.
- These customer access points are called API endpoints, and they permit secure HTTP access (HTTPS), which allows you to establish a secure communication session with your storage or compute instances within AWS.
- To support customers with Federal Information Processing Standard (FIPS) cryptographic requirements, the SSL-terminating load balancers in AWS GovCloud (US) are FIPS 140-2 compliant.
- In addition, AWS has implemented network devices that are dedicated to managing interfacing communications with ISPs.
- AWS employs a redundant connection to more than one communication service at each Internet-facing edge of the AWS network. These connections each have dedicated network devices.
- Transmission Protection
- You can connect to an AWS access point via HTTP or HTTPS using SSL, a cryptographic protocol that is designed to protect against eavesdropping, tampering, and message forgery.
- For customers who require additional layers of network security, AWS offers the Amazon VPC, which provides a private subnet within the AWS Cloud and the ability to use an IPsec VPN device to provide an encrypted tunnel between the Amazon VPC and your data center.
Network Monitoring and Protection
The AWS network provides significant protection against traditional network security issues, and you can implement further protection. The following are a few examples:
- Distributed Denial of Service (DDoS) Attacks
- AWS API endpoints are hosted on a large, Internet-scale, world-class infrastructure that benefits from the same engineering expertise that has built Amazon into the world’s largest online retailer.
- Proprietary DDoS mitigation techniques are used.
- AWS networks are multi-homed across a number of providers to achieve Internet access diversity.
- Man in the Middle (MITM) Attacks
- All of the AWS APIs are available via SSL-protected endpoints that provide server authentication.
- Amazon EC2 AMIs automatically generate new SSH host certificates on first boot and log them to the instance’s console. You can then use the secure APIs to call the console and access the host certificates before logging into the instance for the first time.
- AWS encourages you to use SSL for all of your interactions.
- IP Spoofing
- Amazon EC2 instances cannot send spoofed network traffic. The AWS-controlled, host-based firewall infrastructure will not permit an instance to send traffic with a source IP or Machine Access Control (MAC) address other than its own.
- Port Scanning
- Unauthorized port scans by Amazon EC2 customers are a violation of the AWS Acceptable Use Policy.
- Violations of the AWS Acceptable Use Policy are taken seriously, and every reported violation is investigated.
- Customers can report suspected abuse via the contacts available on the AWS website.
- When unauthorized port scanning is detected by AWS, it is stopped and blocked.
- Port scans of Amazon EC2 instances are generally ineffective because, by default, all inbound ports on Amazon EC2 instances are closed and are only opened by the customer.
- Strict management of security groups can further mitigate the threat of port scans. If you configure the security group to allow traffic from any source to a specific port, that specific port will be vulnerable to a port scan. In these cases, you must use appropriate security measures to protect listening services that may be essential to their application from being discovered by an unauthorized port scan. For example, a web server must clearly have port 80 (HTTP) open to the world, and the administrator of this server is responsible for the security of the HTTP server software, such as Apache.
- You may request permission to conduct vulnerability scans as required to meet your specific compliance requirements. These scans must be limited to your own instances and must not violate the AWS Acceptable Use Policy. Advanced approval for these types of scans can be initiated by submitting a request via the AWS website.
- Packet Sniffing by Other Tenants
- While you can place your interfaces into promiscuous mode, the hypervisor will not deliver any traffic to them that is not addressed to them.
- It is not possible for a virtual instance running in promiscuous mode to receive or “sniff” traffic that is intended for a different virtual instance.
- Even two virtual instances that are owned by the same customer located on the same physical host cannot listen to each other’s traffic.
- While Amazon EC2 does provide ample protection against one customer inadvertently or maliciously attempting to view another customer’s data, as a standard practice you should encrypt sensitive traffic.
- Attacks such as Address Resolution Protocol (ARP) cache poisoning do not work within Amazon EC2 and Amazon VPC.
AWS Account Security Features
AWS Credentials
To help ensure that only authorized users and processes access your AWS account and resources, AWS uses several types of credentials for authentication. These include passwords, cryptographic keys, digital signatures, and certificates. AWS also provides the option of requiring Multi-Factor Authentication (MFA) to log in to your AWS Account or IAM user accounts. Table 12.1 highlights the various AWS credentials and their uses. TABLE 12.1 AWS Credentials Credential Type Use Description Passwords AWS root account or IAM user account login to the AWS Management Console A string of characters used to log in to your AWS account or IAM account. AWS passwords must be a minimum of 6 characters and may be up to 128 characters. Multi-Factor Authentication (MFA) AWS root account or IAM user account login to the AWS Management Console A six-digit, single-use code that is required in addition to your password to log in to your AWS account or IAM user account. Access Keys Digitally-signed requests to AWS APIs (using the AWS Software Development Kit [SDK], Command Line Interface [CLI], or REST/Query APIs) Includes an access key ID and a secret access key. You use access keys to sign programmatic requests digitally that you make to AWS. Key Pairs SSH login to Amazon EC2 instances Amazon CloudFront-signed URLs A key pair is required to connect to an Amazon EC2 instance launched from a public AMI. The keys that Amazon EC2 uses are 1024-bit SSH-2 RSA keys. You can have a key pair generated automatically for you when you launch the instance, or you can upload your own. X.509 Certificates Digitally signed SOAP requests to AWS APIs SSL server certificates for HTTPS X.509 certificates are only used to sign SOAP-based requests (currently used only with Amazon Simple Storage Service [Amazon S3]). You can have AWS create an X.509 certificate and private key that you can download, or you can upload your own certificate by using the Security Credentials page. For security reasons, if your credentials have been lost or forgotten, you cannot recover them or re-download them. However, you can create new credentials and then disable or delete the old set of credentials. In fact, AWS recommends that you change (rotate) your access keys and certificates on a regular basis. To help you do this without potential impact to your application’s availability, AWS supports multiple concurrent access keys and certificates. With this feature, you can rotate keys and certificates into and out of operation on a regular basis without any downtime to your application. This can help to mitigate risk from lost or compromised access keys or certificates. The AWS IAM API enables you to rotate the access keys of your AWS account and also for IAM user accounts. Passwords
Passwords are required to access your AWS Account, individual IAM user accounts, AWS Discussion Forums, and the AWS Support Center. You specify the password when you first create the account, and you can change it at any time by going to the Security Credentials page. AWS passwords can be up to 128 characters long and contain special characters, giving you the ability to create very strong passwords. You can set a password policy for your IAM user accounts to ensure that strong passwords are used and that they are changed often. A password policy is a set of rules that define the type of password an IAM user can set. AWS Multi-Factor Authentication (AWS MFA)
AWS MFA is an additional layer of security for accessing AWS Cloud services. When you enable this optional feature, you will need to provide a six-digit, single-use code in addition to your standard user name and password credentials before access is granted to your AWS account settings or AWS Cloud services and resources. You get this single-use code from an authentication device that you keep in your physical possession. This is MFA because more than one authentication factor is checked before access is granted: a password (something you know) and the precise code from your authentication device (something you have). You can enable MFA devices for your AWS account and for the users you have created under your AWS account with AWS IAM. In addition, you can add MFA protection for access across AWS accounts, for when you want to allow a user you’ve created under one AWS account to use an IAM role to access resources under another AWS account. You can require the user to use MFA before assuming the role as an additional layer of security. AWS MFA supports the use of both hardware tokens and virtual MFA devices. Virtual MFA devices use the same protocols as the physical MFA devices, but can run on any mobile hardware device, including a smart phone. A virtual MFA device uses a software application that generates six-digit authentication codes that are compatible with the Time-Based One-Time Password (TOTP) standard, as described in RFC 6238. Most virtual MFA applications allow you to host more than one virtual MFA device, which makes them more convenient than hardware MFA devices. However, you should be aware that because a virtual MFA may be run on a less secure device such as a smart phone, a virtual MFA might not provide the same level of security as a hardware MFA device. You can also enforce MFA authentication for AWS Cloud service APIs in order to provide an extra layer of protection over powerful or privileged actions such as terminating Amazon EC2 instances or reading sensitive data stored in Amazon S3. You do this by adding an MFA requirement to an IAM access policy. You can attach these access policies to IAM users, IAM groups, or resources that support ACLs like Amazon S3 buckets, Amazon Simple Queue Service (Amazon SQS) queues, and Amazon Simple Notification Service (Amazon SNS) topics. Access Keys
Access keys are created by AWS IAM and delivered as a pair: the Access Key ID (AKI) and the Secret Access Key (SAK). AWS requires that all API requests be signed by the SAK; that is, they must include a digital signature that AWS can use to verify the identity of the requestor. You calculate the digital signature using a cryptographic hash function. If you use any of the AWS SDKs to generate requests, the digital signature calculation is done for you. Not only does the signing process help protect message integrity by preventing tampering with the request while it is in transit, but it also helps protect against potential replay attacks. A request must reach AWS within 15 minutes of the timestamp in the request. Otherwise, AWS denies the request. The most recent version of the digital signature calculation process at the time of this writing is Signature Version 4, which calculates the signature using the Hashed Message Authentication Mode (HMAC)-Secure Hash Algorithm (SHA)-256 protocol. Version 4 provides an additional measure of protection over previous versions by requiring that you sign the message using a key that is derived from your SAK instead of using the SAK itself. In addition, you derive the signing key based on credential scope, which facilitates cryptographic isolation of the signing key. inline Because access keys can be misused if they fall into the wrong hands, AWS encourages you to save them in a safe place and to not embed them in your code. For customers with large fleets of elastically scaling Amazon EC2 instances, the use of IAM roles can be a more secure and convenient way to manage the distribution of access keys. IAM roles provide temporary credentials, which not only get automatically loaded to the target instance, but are also automatically rotated multiple times a day. Amazon EC2 uses an Instance Profile as a container for an IAM role. When you create an IAM role using the AWS Management Console, the console creates an instance profile automatically and gives it the same name as the role to which it corresponds. If you use the AWS CLI, API, or an AWS SDK to create a role, you create the role and instance profile as separate actions, and you might give them different names. To launch an instance with an IAM role, you specify the name of its instance profile. When you launch an instance using the Amazon EC2 console, you can select a role to associate with the instance; however, the list that’s displayed is actually a list of instance profile names. Key pairs
Amazon EC2 supports RSA 2048 SSH keys for gaining first access to an Amazon EC2 instance. On a Linux instance, access is granted through showing possession of the SSH private key. On a Windows instance, access is granted by showing possession of the SSH private key in order to decrypt the administrator password. The public key is embedded in your instance, and you use the private key to sign in securely without a password. After you create your own AMIs, you can choose other mechanisms to log in to your new instances securely. You can have a key pair generated automatically for you when you launch the instance or you can upload your own. Save the private key in a safe place on your system and record the location where you saved it. For Amazon CloudFront, you use key pairs to create signed URLs for private content, such as when you want to distribute restricted content that someone paid for. You create Amazon CloudFront key pairs by using the Security Credentials page. Amazon CloudFront key pairs can be created only by the root account and cannot be created by IAM users. X.509 Certificates
X.509 certificates are used to sign SOAP-based requests. X.509 certificates contain a public key that is associated with a private key. When you create a request, you create a digital signature with your private key and then include that signature in the request, along with your certificate. AWS verifies that you’re the sender by decrypting the signature with the public key that is in your certificate. AWS also verifies that the certificate that you sent matches the certificate that you uploaded to AWS. For your AWS account, you can have AWS create an X.509 certificate and private key that you can download, or you can upload your own certificate by using the Security Credentials page. For IAM users, you must create the X.509 certificate (signing certificate) by using third-party software. In contrast to root account credentials, AWS cannot create an X.509 certificate for IAM users. After you create the certificate, you attach it to an IAM user by using IAM. In addition to SOAP requests, X.509 certificates are used as SSL/Transport Layer Security (TLS) server certificates for customers who want to use HTTPS to encrypt their transmissions. To use them for HTTPS, you can use an open-source tool like OpenSSL to create a unique private key. You’ll need the private key to create the Certificate Signing Request (CSR) that you submit to a Certificate Authority (CA) to obtain the server certificate. You’ll then use the AWS CLI to upload the certificate, private key, and certificate chain to IAM. You will also need an X.509 certificate to create a customized Linux AMI for Amazon EC2 instances. The certificate is only required to create an instance-backed AMI (as opposed to an Amazon Elastic Block Store [Amazon EBS]-backed AMI). You can have AWS create an X.509 certificate and private key that you can download, or you can upload your own certificate by using the Security Credentials page. AWS CloudTrail
AWS CloudTrail is a web service that records API calls made on your account and delivers log files to your Amazon S3 bucket. AWS CloudTrail’s benefit is visibility into account activity by recording API calls made on your account. AWS CloudTrail records the following information about each API call: The name of the API The identity of the caller The time of the API call The request parameters The response elements returned by the AWS Cloud service This information helps you to track changes made to your AWS resources and to troubleshoot operational issues. AWS CloudTrail makes it easier to ensure compliance with internal policies and regulatory standards. AWS CloudTrail supports log file integrity, which means you can prove to third parties (for example, auditors) that the log file sent by AWS CloudTrail has not been altered. Validated log files are invaluable in security and forensic investigations. This feature is built using industry standard algorithms: SHA-256 for hashing and SHA-256 with RSA for digital signing. This makes it computationally unfeasible to modify, delete, or forge AWS CloudTrail log files without detection.
Application Services
Amazon API Gateway
- a fully managed service that makes it easy to create, publish, maintain, monitor and secure APIs at any scale - handles all the tasks involved in accepting and processing up to hundreds of thousands of concurrent API calls, including traffic management, monitoring, authorization and access control, API version management.
Amazon Elastic Transcoder
- media transcoder that converts media files from their source formats into versions that will play back on specific devices
Amazon Simple Notification Service (SNS)
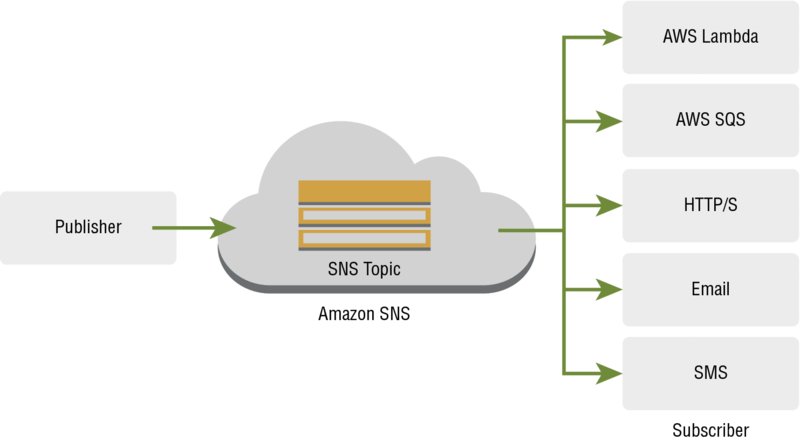
- is a web service for mobile and enterprise messaging that enables you to set up, operate, and send notifications.
- Designed to make web-scale computing easier for developers.
- follows the pub-sub messaging paradigm- no need to poll periodically. e.g., you can send notifications to Apple, Android, Fire OS, and Windows devices.
- In China, you can send messages to Android devices with Baidu Cloud Push.
- can send SMS messages to mobile device users in the United States or to email recipients worldwide.
- messages are delivered to subscribers using different methods, such as Amazon SQS, HTTP, HTTPS, email, SMS, and AWS Lambda.
- When using SNS, you (as the owner) create a topic and control access to it by defining policies that determine which publishers and subscribers can communicate with the topic and via which technologies.
- Publishers send messages to topics that they created or that they have permission to publish to.
- Once published, messages cannot be recalled.
- Topic names should typically be available for reuse approximately 30–60 seconds after the previous topic with the same name has been deleted. The exact time will depend on the number ofsubscriptions active on the topic; topics with a few subscribers will be available instantly for reuse, while topics with larger subscriber lists may take longer.
Common Scenarios
- SNS can support a wide variety of needs, including monitoring applications, workflow systems, time-sensitive information updates, mobile applications, and any other application that generates or consumes notifications.
- SNS can be used to relay events in workflow systems among distributed computer applications, move data between data stores, or update records in business systems.
- Event updates and notifications concerning validation, approval, inventory changes, and shipment status are immediately delivered to relevant system components and end users.
- Another example use for SNS is to relay time-critical events to mobile applications and devices.
- SNS is both highly reliable and scalable, and provides significant advantages to developers who build applications that rely on real-time events.

- Fanout
- A fanout scenario is when an SNS message is sent to a topic and then replicated and pushed to multiple SQS queues, HTTP endpoints, or email addresses. This allows for parallel asynchronous processing.
- e.g., you can develop an application that sends an SNS message to a topic whenever an order is placed for a product. Then the SQS queues that are subscribed to that topic will receive identical notifications for the new order. An EC2 instance attached to one of the queues handles the processing or fulfillment of the order, while an Amazon EC2 instance attached to a parallel queue sends order data to a data warehouse application/service for analysis.
- Another way to use fanout is to replicate data sent to your production environment and integrate it with your development environment. You can subscribe yet another queue to the same topic for new incoming orders to flow into your development environment to improve and test your application using data received from your production environment.
- Application and System Alerts
- Application and system alerts are SMS and/or email notifications that are triggered by predefined thresholds. For example, because many AWS Cloud services use SNS, you can receive immediate notification when an event occurs, such as a specific change to your Auto Scaling group in AWS.
- Push Email and Text Messaging
- Push email and text messaging are two ways to transmit messages to individuals or groups via email and/or SMS.
- Mobile Push Notifications
- Mobile push notifications enable you to send messages directly to mobile applications.
Amazon Simple Email Service (SES)
Amazon Simple Workflow Service (SWF)
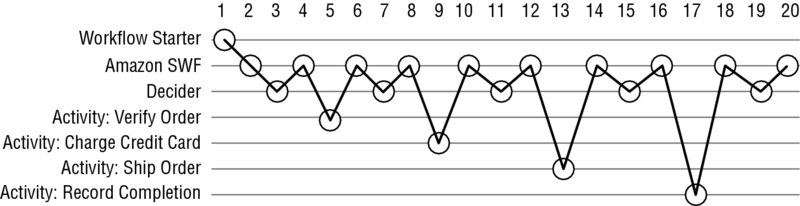
- helps build, run and scale background jobs that have parallel or sequential steps - has fully managed state tracker and task coordinator on the cloud - provides ability to recover or retry if a task fails.
- SWF makes it easy to build applications that coordinate work across distributed components.
- In SWF, a task represents a logical unit of work that is performed by a component of your application. Coordinating tasks across the application involves managing inter-task dependencies, scheduling, and concurrency in accordance with the logical flow of the application.
- SWF gives you full control over implementing and coordinating tasks without worrying about underlying complexities such as tracking their progress and maintaining their state.
- When using SWF, you implement workers to perform tasks. These workers can run either on cloud infrastructure, such as EC2, or on your own premises.
- You can create long-running tasks that might fail, time out, or require restarts, or tasks that can complete with varying throughput and latency.
- SWF stores tasks, assigns them to workers when they are ready, monitors their progress, and maintains their state, including details on their completion.
- To coordinate tasks, you write a program that gets the latest state of each task from SWF and uses it to initiate subsequent tasks.
- SWF maintains an application’s execution state durably so that the application is resilient to failures in individual components.
-
With SWF, you can implement, deploy, scale, and modify these application components independently.
- Workflows
- Using SWF, you can implement distributed, asynchronous applications as workflows.
- Workflows coordinate and manage the execution of activities that can be run asynchronously across multiple computing devices and that can feature both sequential and parallel processing.
- When designing a workflow, analyze your application to identify its component tasks, which are represented in SWF as activities.
- The workflow’s coordination logic determines the order in which activities are executed.
- Workflow Domains
- Domains provide a way of scoping SWF resources within your AWS account.
- You must specify a domain for all the components of a workflow, such as the workflow type and activity types.
- It is possible to have more than one workflow in a domain
- Workflows in different domains cannot interact with one another.
- Workflow History
- The workflow history is a detailed, complete, and consistent record of every event that occurred since the workflow execution started.
- An event represents a discrete change in your workflow execution’s state, such as scheduled and completed activities, task timeouts, and signals.
- Actors
- SWF consists of a number of different types of programmatic features known as actors.
- Actors can be workflow starters, deciders, or activity workers. These actors communicate with SWF through its API.
- Actors can be developed in any programming language.
- Workflow starter
- is any application that can initiate workflow executions. e.g., a mobile application where a customer orders takeout food or requests a taxi.
- Activities within a workflow can run sequentially, in parallel, synchronously, or asynchronously.
- Decider:
- The logic that coordinates the tasks in a workflow is called the decider.
- The decider schedules the activity tasks and provides input data to the activity workers.
- The decider also processes events that arrive while the workflow is in progress and closes the workflow when the objective has been completed.
- Activity Worker
- is a single computer process (or thread) that performs the activity tasks in your workflow.
- Different types of activity workers process tasks of different activity types, and multiple activity workers can process the same type of task.
- When an activity worker is ready to process a new activity task, it polls SWF for tasks that are appropriate for that activity worker. After receiving a task, the activity worker processes the task to completion and then returns the status and result to SWF. The activity worker then polls for a new task.
- Tasks
- SWF provides activity workers and deciders with work assignments, given as one of 3 types of tasks:
- activity tasks,
- AWS Lambda tasks, and
- decision tasks.
- Activity task
- tells an activity worker to perform its function, such as to check inventory or charge a credit card.
- The activity task contains all the information that the activity worker needs to perform its function.
- AWS Lambda task
- is similar to an activity task, but executes an AWS Lambda function instead of a traditional SWF activity.
- Decision Task
- tells a decider that the state of the workflow execution has changed so that the decider can determine the next activity that needs to be performed.
- The decision task contains the current workflow history.
- SWF schedules a decision task when the workflow starts and whenever the state of the workflow changes, such as when an activity task completes.
- Each decision task contains a paginated view of the entire workflow execution history.
- The decider analyzes the workflow execution history and responds back to SWF with a set of decisions that specify what should occur next in the workflow execution. Essentially, every decision task gives the decider an opportunity to assess the workflow and provide direction back to SWF.
- SWF provides activity workers and deciders with work assignments, given as one of 3 types of tasks:
- Task Lists
- Task lists provide a way of organizing the various tasks associated with a workflow.
- Task lists are similar to dynamic queues. When a task is scheduled in SWF, you can specify a queue (task list) to put it in. Similarly, when you poll SWF for a task, you determine which queue (task list) to get the task from.
- Task lists provide a flexible mechanism to route tasks to workers.
- Task lists are dynamic in that you don’t need to register a task list or explicitly create it through an action. Ssimply scheduling a task creates the task list if it doesn’t already exist.
- Long Polling
- Deciders and activity workers communicate with SWF using long polling.
- The decider or activity worker periodically initiates communication with SWF, notifying SWF of its availability to accept a task, and then specifies a task list to get tasks from.
- Long polling works well for high-volume task processing.
- Deciders and activity workers can manage their own capacity.
- Object Identifiers
- SWF objects are uniquely identified by workflow type, activity type, decision and activity tasks, and workflow execution:
- Workflow Type: A registered workflow type is identified by its domain, name, and version. Workflow types are specified in the call to
RegisterWorkflowType. - Activity Type: A registered activity type is identified by its domain, name, and version. Activity types are specified in the call to
RegisterActivityType. - Task Token
- Each decision task and activity task is identified by a unique task token.
- The task token is generated by SWF and is returned with other information about the task in the response from
PollForDecisionTaskorPollForActivityTask. - is most commonly used by the process that received the task
- a process could pass the token to another process, which could then report the completion or failure of the task.
- Workflow execution
- A single execution of a workflow is identified by the domain, workflow ID, and run ID.
- The first two are parameters that are passed to
StartWorkflowExecution. The run ID is returned byStartWorkflowExecution.
- Workflow Execution Closure
- After you start a workflow execution, it is open.
- An open workflow execution can be closed as completed, canceled, failed, or timed out.
- It can also be continued as a new execution, or it can be terminated.
- The decider, the person administering the workflow, or SWF can close a workflow execution.
Amazon Simple Queue Service (SQS)
- managed message queueing service
- With Amazon SQS, you can offload the administrative burden of operating and scaling a highly available messaging cluster while paying a low price for only what you use.
- Most of the time each message will be delivered to your application exactly once, however the system should be idempotent by design (i.e., it must not be adversely affected if it processes the same message more than once).
- The service does not guarantee FIFO delivery of messages. If the system requires that order be preserved, you can place sequencing information in each message to reorder the messages when they are retrieved from the queue.
Message Lifecycle
Component 1sendsMessage Ato a queue, and the message is redundantly distributed across the SQS servers.- When
Component 2is ready to process a message, it retrieves messages from the queue, andMessage Ais returned. WhileMessage Ais being processed, it remains in the queue and is not returned to subsequently receive requests for the duration of the visibility timeout. Component 2deletesMessage Afrom the queue to prevent the message from being received and processed again after the visibility timeout expires.
Delay Queues and Visibility Timeouts
- Delay queues allow you to postpone the delivery of new messages in a queue for a specific number of seconds.
- Any message sent to delay queue will be invisible to consumers for the duration of the delay period.
- To create a delay queue, use
CreateQueueand set theDelaySecondsattribute to any value between 0 and 900 (15 minutes). - Existing queue can be turned into a delay queue by using
SetQueueAttributesto set the queue’sDelaySecondsattribute (default value = 0). - Delay queues are similar to visibility timeouts in that both features make messages unavailable to consumers for a specific period of time. The difference is that a delay queue hides a message when it is first added to the queue, whereas a visibility timeout hides a message only after that message is retrieved from the queue.
- When a message is in the queue but is neither delayed nor in a visibility timeout, it is considered to be “in flight.”
- Up to 120,000 messages can be in flight at any given time.
- SQS supports up to 12 hours’ maximum visibility timeout.
Separate Throughput from Latency
- SQS is accessed through HTTP request-response, and a typical request-response takes a bit less than 20ms from EC2.
- This means that from a single thread, you can, on average, issue 50+ API requests per second (a bit fewer for batch API requests since they do more work).
- The throughput scales horizontally, so the more threads and hosts you add, the higher the throughput. Using this scaling model, some AWS customers have queues that process thousands of messages every second.
Queue Operations, Unique IDs, and Metadata
- SQS Operations:
CreateQueue,ListQueues,DeleteQueue,SendMessage,SendMessageBatch,ReceiveMessage,DeleteMessage,DeleteMessageBatch,PurgeQueue,ChangeMessageVisibility,ChangeMessageVisibilityBatch,SetQueueAttributes,GetQueueAttributes,GetQueueUrl,ListDeadLetterSourceQueues,AddPermission, andRemovePermission. - Only the AWS account owner or an AWS identity that has been granted the proper permissions can perform operations.
- Messages are identified via a globally unique ID that SQS returns when the message is delivered to the queue.
- When you receive a message from the queue, the response includes a receipt handle, which you must provide when deleting the message.
Queue and Message Identifiers
SQS uses 3 identifiers:
- Queue URLs
- When creating a new queue, the queue name must be unique.
- SQS assigns each queue an identifier called a queue URL, which includes the queue name and other components that SQS determines.
- Whenever you want to perform an action on a queue, you must provide its queue URL.
- Message IDs
- SQS assigns each message a unique ID - returned as part of the
SendMessageresponse. - Max length = 100 characters.
- SQS assigns each message a unique ID - returned as part of the
- Receipt handles.
- Each time you receive a message from a queue, you receive a receipt handle for that message.
- The handle is associated with the act of receiving the message, not with the message itself.
- Receipt handle is needed to delete a message or to change the message visibility
- You must always receive a message before you can delete it (i.e., you can’t put a message into the queue and then recall it).
- Max length = 1,024 characters.
Message Attributes
- SQS provides support for message attributes.
- Message attributes allow you to provide structured metadata items (such as timestamps, geospatial data, signatures, and identifiers) about the message.
- Message attributes are optional and separate from, but sent along with, the message body.
- The receiver of the message can use this information to help decide how to handle the message without having to process the message body first.
- Max 10 attributes allowed per message.
- can be specified via AWS Console, AWS SDKs, or a query API.
Long Polling
- When an application queries the SQS queue for messages, it calls the function
ReceiveMessage. ReceiveMessagewill check for the existence of a message in the queue and return immediately, either with or without a message.ReceiveMessageburn CPU cycles and tie up a thread. So calling this in a loop repeatdly is problematic.- With long polling, you send a
WaitTimeSecondsargument toReceiveMessageof up to 20 seconds. - If there is no message in the queue, then the call will wait up to
WaitTimeSecondsfor a message to appear before returning. - If a message appears before the time expires, the call will return the message right away.
- Long polling drastically reduces the amount of load on your client.
Dead Letter Queues
- SQS provides support for dead letter queues.
- A dead letter queue is a queue that other (source) queues can target to send messages that for some reason could not be successfully processed.
- Benefit: ability to sideline and isolate the unsuccessfully processed messages, then analyze to determine the cause of failure.
- Messages can be sent to and received from a dead letter queue, just like any other Amazon SQS queue.
- can be created from SQS API and the SQS console.
Access Control
- While IAM can be used to control the interactions of different AWS identities with queues, there are often times when you will want to expose queues to other accounts. For example:
- to grant another AWS account a particular type of access to your queue (for example,
SendMessage). - to grant another AWS account access to your queue for a specific period of time.
- to grant another AWS account access to your queue only if the requests come from your EC2 instances.
- You want to deny another AWS account access to your queue.
- to grant another AWS account a particular type of access to your queue (for example,
- While close coordination between accounts may allow these types of actions through the use of IAM roles, that level of coordination is frequently unfeasible.
- SQS Access Control allows you to assign policies to queues that grant specific interactions to other accounts without that account having to assume IAM roles from your account.
- Sample policy below, gives the developer with AWS account number 12345 the SendMessage permission for the queue named 54321/queue1 in the US East region.
1 2 3 4 5 6 7 8 9 10 11 12 13 14 15 | |
Tradeoff Message Durability and Latency
- SQS does not return success to a
SendMessageAPI call until the message is durably stored in SQS. This makes the programming model very simple with no doubt about the safety of messages, unlike the situation with an asynchronous messaging model. - If you don’t need a durable messaging system, however, you can build an asynchronous, client-side batching on top of SQS libraries that delays enqueue of messages to SQS and transmits a set of messages in a batch.
- Caution: With a client-side batching approach, you could potentially lose messages when your client process or client host dies for any reason.
Analytics
Amazon Kinesis
- Kinesis is a streaming data platform to load and analyze massive data Kinesis Firehose: Kinesis Streams: Kinesis Analytics: A service enabling you to easily analyze streaming data real time with standard SQL Each of these services can scale to handle virtually limitless data streams.
Kinesis Firehose
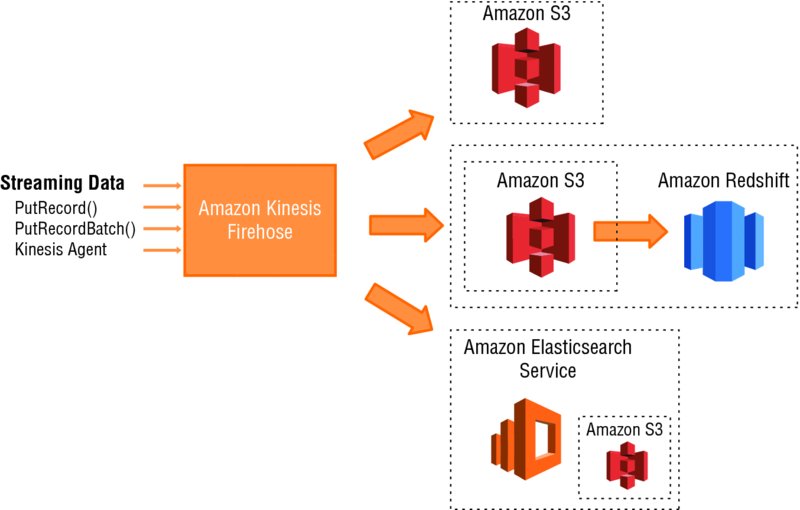
- A service to load massive volumes of streaming data into AWS
- receives stream data and stores it in S3, Redshift, or Amazon Elasticsearch.
- No need write any code; just create a delivery stream and configure the destination for your data.
- Clients write data to the stream using an AWS API call and the data is automatically sent to the proper destination.
- S3: When configured to save a stream to S3, Kinesis Firehose sends the data directly to S3.
- Redshift: For a Redshift destination, the data is first written to S3, and then a Redshift
COPYcommand is executed to load the data into Redshift. - Elasticsearch: Kinesis Firehose can also write data out to Amazon Elasticsearch, with the option to back the data up concurrently to S3.
Kinesis Streams
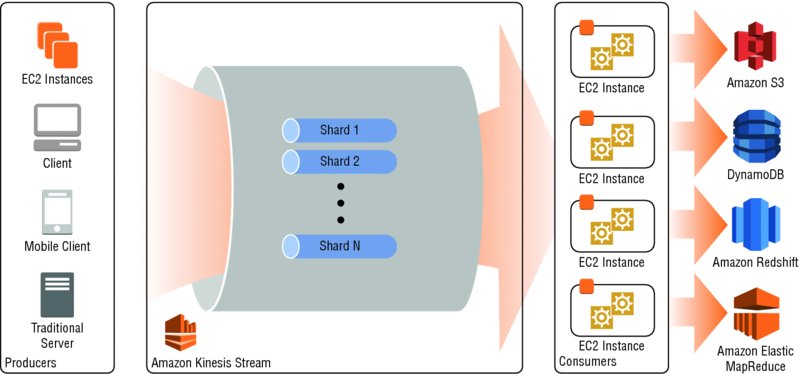
- A service to collect and process large streams of data records in real time.
- Using AWS SDKs, you can create an Kinesis Streams application that processes the data as it moves through the stream. Because response time for data intake and processing is in near real time, the processing is typically lightweight.
- Kinesis Streams can scale to support nearly limitless data streams by distributing incoming data across a number of shards. If any shard becomes too busy, it can be further divided into more shards to distribute the load further.
- The processing is then executed on consumers, which read data from the shards and run the Kinesis Streams application.
Use Cases
- Massive Data Ingestion: Kinesis Firehose
- Real-Time Processing of Massive Data Streams: Kinesis Streams
Amazon Elastic MapReduce (Amazon EMR)
- Amazon EMR provides a fully managed, on-demand Hadoop framework.
- When you launch an Amazon EMR cluster, you specify:
- The instance type of the nodes in the cluster
- The number of nodes in the cluster
- Hadoop version to run (supports several recent versions of Apache Hadoop, and MapR Hadoop.)
- Additional tools or applications like Hive, Pig, Spark, or Presto
- 2 types of storage that can be used with Amazon EMR:
- HDFS:
- All data is replicated across multiple instances to ensure durability.
- Amazon EMR can use EC2 instance storage or EBS for HDFS.
- When a cluster is shut down, instance storage is lost and the data does not persist.
- HDFS can also make use of EBS storage without losing data after shutdown.
- EMR File System (EMRFS)
- is an implementation of HDFS that allows clusters to store data on S3.
- EMRFS allows you to get the durability and low cost of S3 while preserving your data even if the cluster is shut down.
- HDFS:
- Persistent Clusters
- A persistent cluster continues to run 24×7 after it is launched.
- Persistent clusters are appropriate when continuous analysis is going to be run on the data.
- For persistent clusters, HDFS is a common choice.
- Persistent clusters take advantage of the low latency of HDFS, especially on instance storage, when constant operation means no data lost when shutting down a cluster.
- Transient Clusters
- Clusters that are started when needed and then immediately stopped when done are called transient clusters.
- EMRFS is well suited for transient clusters, as the data persists independent of the lifetime of the cluster.
- combination of local HDFS and EMRFS can also be used.
Use Cases
- Log Processing
- Clickstream Analysis
- Genomics and Life Sciences
AWS Data Pipeline
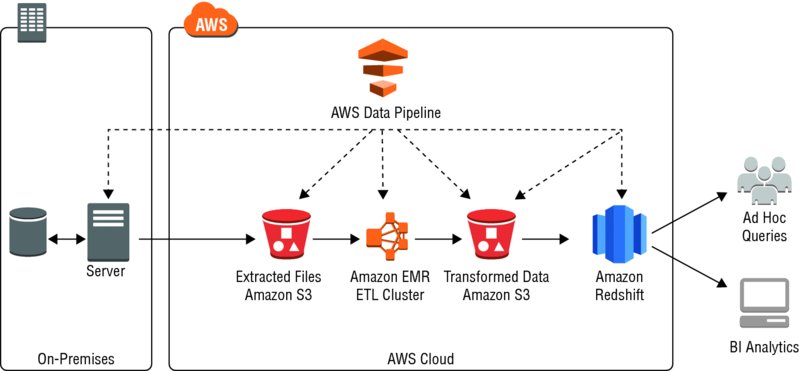
- is a web service that helps to reliably process and move data between different AWS compute and storage services, and also on-premises data sources, at specified intervals.
- AWS Data Pipeline can be used for virtually any batch mode ETL process.
- With AWS Data Pipeline, you can regularly access your data where it’s stored, transform and process it at scale, and efficiently transfer the results to S3, RDS, DynamoDB, and EMR.
- Everything in AWS Data Pipeline starts with the pipeline itself. A pipeline schedules and runs tasks according to the pipeline definition.
- The scheduling is flexible and can run every 15 minutes, every day, every week, and so forth.
- Data Nodes
- The pipeline interacts with data stored in data nodes.
- Data nodes are locations where the pipeline reads input data or writes output data, such as S3, a MySQL database, or a Redshift cluster.
- Data nodes can be on AWS or on your premises.
- The pipeline will execute activities that represent common scenarios, such as moving data from one location to another, running Hive queries, and so forth.
- Activities may require additional resources to run, such as an EMR cluster or an EC2 instance. In these situations, AWS Data Pipeline will automatically launch the required resources and tear them down when the activity is completed.
- Precondition: conditional statements that must be true before an activity can run. E.g., whether an S3 key is present, whether a DynamoDB table contains any data, and so forth.
- Retry: If an activity fails, retry is automatic - will continue to retry up to the limit you configure.
- You can define actions to take in the event when the activity reaches that limit without succeeding.
Use Cases
The pipeline in the picture performs the following workflow:
- Every hour an activity begins to extract log data from on-premises storage to S3. A precondition checks that there is data to be transferred before actually starting the activity.
- The next activity launches a transient EMR cluster that uses the extracted dataset as input, validates and transforms it, and then outputs the data to an S3 bucket.
- The final activity moves the transformed data from S3 to Redshift via
COPYcommand.
AWS Import/Export
- AWS Import/Export is a service that accelerates transferring large amounts of data into and out of AWS using physical storage appliances, bypassing the Internet.
- The data is copied to a device at the source (your data center or an AWS region), shipped via standard shipping mechanisms, and then copied to the destination (your data center or an AWS region).
- AWS Import/Export has two features that support shipping data into and out of your AWS infrastructure:
- AWS Import/Export Snowball (AWS Snowball)
- AWS Import/Export Disk.
- AWS Snowball
- uses Amazon-provided shippable storage appliances shipped through UPS.
- Each AWS Snowball is protected by AWS KMS and made physically rugged to secure and protect your data while the device is in transit.
- At the time of this writing, AWS Snowballs come in two sizes: 50TB and 80TB, and the availability of each varies by region.
- AWS Snowball provides the following features:
- can import and export data TB or even PB of data between your on-premises data storage locations and S3.
- Encryption is enforced, protecting your data at rest and in physical transit.
- don’t have to buy or maintain your own hardware devices.
- can manage your jobs through the AWS Snowball console.
- AWS Snowball is its own shipping container, and the shipping label is an E-Ink display that automatically shows the correct address when the AWS Snowball is ready to ship. You can drop it off with UPS, no box required.
- AWS Import/Export Disk
- supports data transfers directly onto and off of storage devices you own using the Amazon high-speed internal network.
- Features:
- can import your data into Glacier and EBS, in addition to S3.
- can export data from S3.
- Encryption is optional and not enforced.
- have to buy and maintain your own hardware devices.
- can’t manage your jobs through the AWS Snowball console.
- Unlike AWS Snowball, AWS Import/Export Disk has an upper limit of 16TB.
Use Cases
- Storage Migration: When companies shut down a data center, they often need to move massive amounts of storage to another location.
- Migrating Applications: Migrating an application to the cloud often involves moving huge amounts of data.
Terminology
- Network perimeter - a boundary between two or more portions of a network. It can refer to the boundary between your VPC and your network, it could refer to the boundary between what you manage versus what AWS manages.
- WAF (Web Application Firewall)
- NAT (Network Address Translation) instances and NAT Gateways - allows EC2 instances deployed in private subnets to gain Internet access
References
- Books
- AWS Certified Solution Architect - Study Guide
- CloudAcademy.com
- AWS Technical Foundation 110
- AWS Technical Foundation 120
- AWS Technical Foundation 140
- AWS Technical Foundation 160
- AWS Technical Foundation 180
- AWS Technical Foundation 190
- Foundations for Solutions Architect Associate on AWS course