Virtualization
Overview
Hypervisor
- The hypervisor sits in between the physical machine and virtual machines and provides virtualization services to the virtual machines. It intercepts the guest operating system operations on the virtual machines and emulates the operation on the host machine’s operating system.
- The hypervisor handles creating the virtual environment on which the guest virtual machines operate.
- It supervises the guest systems and makes sure that resources are allocated to the guests as necessary.
- The rapid development of virtualization technologies has driven the use of virtualization further by allowing multiple virtual servers to be created on a single physical server with the help of hypervisors, such as Xen, VMware Player, KVM, etc., and incorporation of hardware support in commodity processors, such as Intel VT and AMD-V.
Virtualization improves system utilization, decoupling applications from the underlying hardware, and enhancing workload mobility and protection.
Hypervisors and VMs are just one approach to virtual workload deployment. Container virtualization is quickly emerging as an efficient and reliable alternative to traditional virtualization, providing new features and new concerns for data center professionals.
VMs
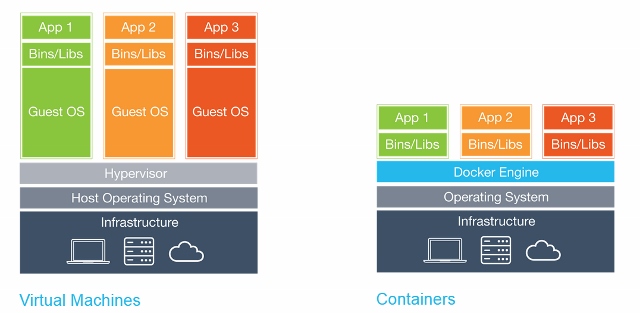
- VMs is primarily in the location of the virtualization layer and the way that OS resources are used.
- VMs rely on a hypervisor which is normally installed atop the actual bare metal system hardware. This has led to hypervisors being perceived as operating systems in their own right. Once the hypervisor layer is installed, VM instances can be provisioned from the system’s available computing resources. Each VM can then receive its own unique operating system and workload (application).
- Isolation - A full virtualized system gets its own set of resources allocated to it, and does minimal sharing. You get more isolation, but it is much heavier (requires more resources). VMs are fully isolated from one another – no VM is aware of (or relies on) the presence of another VM on the same system – and malware, application crashes and other problems impact only the affected VM.
- VMs can be migrated from one virtualized system to another without regard for the system’s hardware or operating systems.
Containers
- Containers are an encapsulation of an application with its dependencies.
- Containers share resources with the host OS and hence lighter than VMs.
- Containers can be started and stopped in a fraction of a second.
- Containers eliminate a whole class of bugs caused by environment changes- ‘it runs in my machine’
Docker
Benefits
- Ability to restrict resource utilization by using cgroups technology provided by the Linux Kernel
Docker flow explained

What happens when docker run hello-world is executed.
- The Docker client contacts the Docker daemon.
- The Docker daemon pulls the “hello-world” image from the Docker Hub.
- If not available in Hub, then it is pulled from Docker Store
- The Docker daemon creates a new container from that image within the Docker machine. It then runs the executable that produces the output.
- The Docker daemon streams that output to the Docker client, which sent it to your terminal.
Concepts
Docker File --input---> [Docker Client] --output--> Docker image- Images
- Images are the basis of the containers - Images are pulled from the registry
- Base images are images that have no parent image, usually images with an OS like ubuntu, busybox or debian.
- Child images are images that build on base images and add additional functionality.
- Official images are images that are officially maintained and supported by the folks at Docker. These are typically one word long. In the list of images above, the python, ubuntu, busybox and hello-world images are base images.
- User images are images created and shared by users like you and me. They build on base images and add additional functionality. Typically, these are formatted as user/image-name.
- Containers - Created from Docker images and run the actual application.
- Docker Daemon - The background service running on the host that manages building, running and distributing Docker containers. The daemon is the process that runs in the operation system to which clients talk to.
- Docker Client - The command line tool that allows the user to interact with the daemon. More generally, there can be other forms of clients too - such as Kitematic which provide a GUI to the users.
- Docker Hub - A registry of Docker images. You can think of the registry as a directory of all available Docker images. If required, one can host their own Docker registries and can use them for pulling images.
Union File System
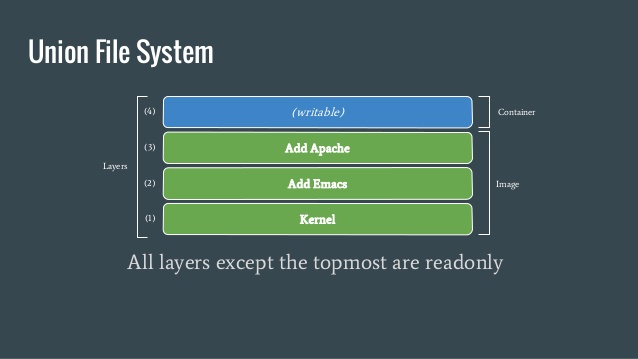
- Docker uses a union file system (UFS) for containers, which allows multiple filesystems to be mounted in a hierarchy and to appear as a single filesystem.
- The filesystem from the image has been mounted as a read-only layer, and any changes to the running container are made to a read- write layer mounted on top of this. Because of this, Docker only has to look at the topmost read-write layer to find the changes made to the running system.
- Docker images are made up of multiple layers. Each of these layers is a read-only filesystem. A layer is created for each instruction in a Dockerfile and sits on top of the previous layers. When an image is turned into a container, the Docker engine takes the image and adds a read-write filesystem on top (as well as initializing various settings such as the IP address, name, ID, and resource limits).
Images
- Each instruction in a Dockerfile results in a new image layer, which can also be used to start a container.
- The new layer is created by starting a container using the image of the previous layer, executing the Dockerfile instruction and saving a new image.
- When a Dockerfile instruction successfully completes, the intermediate container will be deleted, unless the
--rm=falseargument was given. - Since each instruction results in an static image, all running processes in the instruction will be stopped.
-
To start long-lived processes within the container, such as databases or SSH daemons, it must be launched from an
ENTRYPOINTorCMDinstruction. - DO NOT use a large folder as build context since it is tarred up and sent to docker daemon
- DO NOT create containers with passwords baked in
- Files that are removed by subsequent layers in the system are actually still present in the images; they’re just inaccessible
- Each layer is an independent delta from the layer below it. Every time you change a layer, it changes every layer that comes after it. Changing the preceding layers means that they need to be rebuilt, repushed, and repulled to deploy your image to development.
- Often you can use separate images for building (e.g., java-jdk) and distributing (e.g., java:jre) your software, which gets rid of the unnecessary build tooling).
Linking
By default, containers will be able to talk to each other whether or not they have been explicitly linked. If you want to prevent containers that haven’t been linked from communicating, use the arguments --icc=false and --iptables when starting the Docker daemon. Now when containers are linked, Docker will set up iptables rules to allow the containers to communicate on any ports that have been declared as exposed.
Volumes
- Volumes are files or directories that are directly mounted on the host and not part of the normal UFS. This means they can be shared with other containers and all changes will be made directly to the host filesystem.
- First way of initializing volume
docker run -it --name container-test -h CONTAINER -v /data debian /bin/bash- This will make the directory
/datainside the container into a volume. - Any files the image held inside the
/datadirectory will be copied into the volume. - We can find out where the volume lives on the host by running this on the host from a new shell:
docker inspect -f container-test
- Second way
VOLUME /directory: By default, the directory or file will be mounted on the host inside your Docker installation directory (normally/var/lib/docker/).
- Third way
docker run -d -v /host/dir:/container/dir <image>- specifies the host directory to use as the mount. This is not possible from a Dockerfile due to portability and security reasons (the file or directory may not exist in other systems, and containers shouldn’t be able to mount sensitive files like
/etc/passwdwithout explicit permission). docker run -v /home/adrian/data:/data debian ls /data- will mount the directory
/home/adrian/dataon the host as/datainside the container. This is commonly known as bind mount. - Any files already existing in the
/home/adrian/datadirectory will be available inside the container. - If the
/datadirectory already exists in the container, its contents will be hidden by the volume. - Unlike the first method, no files from the image will be copied into the volume, and the volume won’t be deleted by Docker (i.e.,
docker rm -vwill not remove a volume that is mounted at a user-chosen directory).
- will mount the directory
- Sharing data:
docker run -it -h NEWCONTAINER --volumes-from container-test debian /bin/bash.- This allows to share the volumes from
container-testto be shared with the NEWCONTAINER. - this works whether or not the container holding the volumes (container-test in this case) is currently running.
- As long as at least one existing container links to a volume, it won’t be deleted.
- This allows to share the volumes from
Plugin Architecture
- Registry
- Docker Hub, CoreOS Enterprise Registry, Artficatory
- Networking solution
- Creating network of containers that spans across hosts
- Solutions: Overlay (integrated solution), Weave, Apache Calico, Flannel, Linkerd service mesh
- Service Discovery
- Docker containers need to find a way to communicate with other services which could be running on other containers. As containers are dynamically assigned IPs, this is a complex problem.
- Solutions: etcd, Consul, Registrator, SkyDNS
- Orchestration and cluster management
- Solutions: Docker Swarm, Google Kubernetes, Marathon (a framework for Mesos), CoreOS’s Fleet, and OpenShift.
- Volumes
- For integration with other storage systems
- Solutions: Flocker (a multihost data management and migration tool), and GlusterFS (for distributed storage)
- Operating System
- minimal and easy-to-maintain distributions that are focused entirely on running con‐ tainers (or containers and VMs), especially within a context of powering a data- centre or cluster.
- Solutions: Project Atomic, CoreOS, and RancherOS.
- PaaS
- Solutions: Deis, Flynn, Paz
- Monitoring
- init, systemd, runit, upstart, and supervisord.
Command Reference
General
docker helpdocker versiondocker-machine versiondocker-compose versiondocker login- stores the login credentials to http://hub.docker.com in~/.docker/config.json
Images
docker imagesto view the imagesdocker pull <user/image:tag>docker pull busyboxpulls thebusyboximage from Docker Registry and saves it in the system. When ‘user’ is not provided, it defaults torootwhich is controlled by Docker Inc. When ‘tag’ name is not provided, it defaults tolatest.- to pull a particular tag version
docker pull ubuntu:12.04
docker rmito delete an imagedocker search <image>searches the Docker Hub for given image namedocker commit <container> <new_image_name>- to convert a container (stopped/running) into an imagedocker build <image_name> <Dockerfile_dir>- to convert a Dockerfile to an imagedocker push <user/image:tag>- publishes your image to Docker hub. Once published, it can be viewed at https://hub.docker.com/r// / docker history <image>- to view the full set of layers that make up an image
Containers
docker run hello-worlddocker run busybox- Docker client finds the image locally. If not found, pulls from registry
- loads up the container
- runs a command in that container (command not provided here)
- exited
docker run busybox echo 'Welcome to Docker'docker run -it busybox sh-itstarts an interactive tty terminal to the container- Pass
--rmflag to delete the container and associated file system when the container exits.
docker logs <container>docker port <container>- to see the portsdocker psshows all the containers that are runningdocker ps -ashows containers that exited in the past
docker inspect <container>- to get the container’s details like status, IP addr, etc.docker inspect <container> --format- to parse out IP
docker diff <container>- to view the files changed from within the containerdocker rm <container_id>clean up the containerdocker rm $(docker ps -a -q -f status=exited)clean up all the exited containers
docker stop <container_id>- to stop a container. A stopped container retains changes to its settings, meta‐ data, and filesystem, including runtime configuration such as IP address.docker start <container_id>- to start a stopped container
Volumes
docker volume ls- list the volumesdocker run -d -v /host/dir:/container/dir <image>- to attach a volume to a containerdocker volume rm $(docker volume ls -qf dangling=true)- to delete the dangling volumes
Docker Compose
- Docker Compose is designed to quickly get Docker development environments up and run‐ ning.
- It uses YAML files to store the configuration for sets of containers, saving developers from repetitive and error-prone typing or rolling their own solution.
- Compose will free us from the need to maintain our own scripts for orchestration, including starting, linking, updating, and stopping our containers.
- Bunch of containers is called ‘services’ in Compose lingo
Questions
- When we build docker images, where are the images stored?
- Best practices
- combine commands in RUN to reduce image size
- always use a user in Dockerfile
Kubernetes
 |
- For local single node cluster, use
minikube
Benefits
- co-location
- resource isolation
- self-healing
- declarative configuration (desired state is defined)
- pods from same application are distributed onto different machines for reliability
- graceful termination of pods for reliability (active requests are completed up to 30 secs)
- effective utilization of the compute nodes in the cluster
- user can define lower and upper limit of resources needed for an app
Concepts
- Namespaces
- Kubernetes uses namespaces to organize objects in the cluster.
- By default, the kubectl command-line tool interacts with the
defaultnamespace. It can be overridden bykubectl --namespace=mystuff.
- Context
- To change the default namespace permanently, you can use context.
- Deployment
- is a way to create an array of Pods
- Services
- kubectl
- CLI to interact with the Kubernetes API
- Everything in Kubernetes is represented by a RESTful resource (also known as Kubernetes objects). The
kubectlcommand makes HTTP requests to access the objects. e.g., https://your-k8s.com/api/v1/namespaces/default/pods/my-pod kubectl get <resource-name> <object-name>kubectl describe <resource-name> <object-name>- configuration file is located at
$HOME/.kube/config- stores the information on how to find and authenticate to a cluster
Pods
- Pods represent the atomic unit of work in a Kubernetes cluster.
- Pods = one or more containers working together symbiotically.
- To create a Pod, you write a pod manifest and submit it to the Kubernetes API server by using the CLI or (less frequently) by making HTTP and JSON calls to the server directly.
- Pods are described in a pod manifest file - in yaml or json format. They are stored in etcd (persistent storage)
- All containers in a pod always land on the same machine
- Each container within a pod runs in its own cgroup, but they share a number of Linux namespaces.
- Applications running in the same pod
- can connect to each using localhost and a fixed port
- share the same IP address and port space (network namespace),
- have the same hostname (Unix Time Shared[UTS] namespace),
- and can communicate using native interprocess communication channels over System V IPC or POSIX message queues (Interprocess Communication [IPC] namespace).
- Containers in different pods running on the same node might as well be on different servers.
- Pods don’t move and must be explicitly destroyed and rescheduled.
- When to create a pod?
- Will these containers work correctly if they land on different machines? If yes, then don’t group them in a pod. Otherwise, put them together in a pod. e.g., if all the containers want to share the file system.
- How a pod is created?
- User creates a pod via kubectl or by submitting a manifest file
- The Kubernetes API server accepts and processes Pod manifests before storing them in persistent storage (etcd).
- The scheduler uses the Kubernetes API to find pods that haven’t been scheduled to a node.
- The scheduler then places the pods onto nodes depending on the resources and other constraints expressed in the pod manifests.
- Multiple pods can be placed on the same machine as long as there are sufficient resources.
kubeletdaemon is responsible for creating and performing health checks on the pod
To create a pod directly
1 2 3 4 5 6 7 8 9 10 11 12 13 | |
To create a pod via manifest file
1 2 3 4 5 6 7 8 | |
Sample Pod Manifest YAML file
1 2 3 4 5 6 7 8 9 10 11 12 | |
Health Check
- Process health check
- Kubernetes process health check ensures that your container is always running. If not, K8S restarts it.
- A simple process check alone is insufficient. If the process is deadlocked, it won’t serve any requests. To address this, liveness and readiness probes are available.
- HTTP health check
- Liveness probe
- Liveness determines if an application is running properly.
- Containers that fail liveness checks are restarted.
- Readiness probe
- Readiness describes when a container is ready to serve user requests.
- Containers that fail readiness checks are removed from service load balancers.
- Liveness probe
- TCP health check
- For non-HTTP based APIs and databases
- Exec probes
- execute a script or program in the context of the container. If this script returns a zero exit code, the probe succeeds; otherwise, it fails.
execscripts are often useful for custom application validation logic that doesn’t fit neatly into an HTTP call.
Pod manifest sample
1 2 3 4 5 6 7 8 9 10 11 12 13 14 15 16 17 18 19 20 | |
Resource Management
To ensure the resources are maximally utilized, you can specifiy resource metrics in the manifest. Requests specify the minimum resource need and limits specify the maximum.
- Minimum required resources
- With Kubernetes, a Pod requests the resources required to run its containers. Kubernetes guarantees that these resources are available to the Pod.
- Resources are requested per container, not per Pod. The total resources requested by the Pod is the sum of all resources requested by all containers in the Pod. The reason for this is that in many cases the different containers have very different CPU requirements
- Requests are used when scheduling Pods to nodes. The Kubernetes scheduler will ensure that the sum of all requests of all Pods on a node does not exceed the capacity of the node.
- K8S supports requested resources like CPU, memory, GPUs and more.
- CPU request
- In a 4 CPU core machine, if a container requests for 1 CPU and if that is the only Pod running in that machine, then all the 4 cores are used. If another container of the same request type is added, then each container use 2 CPUs each. When 2 more containers of the same request type is added, then each container get 1 CPU each.
- CPU requests are implemented using the
cpu-sharesfunctionality in the Linuxkernel.
- Memory request
- Memory requests are handled similarly to CPU, but there is an important difference.
- If a container is over its memory request, the OS can’t just remove memory from the process, because it’s been allocated. Consequently, when the system runs out of memory, the kubelet terminates containers whose memory usage is greater than their requested memory. These containers are automatically restarted, but with less available memory on the machine for the container to consume.
- Maximum resource limit
- Limits specify the maximum limit of resources to use
Pod manifest sample
1 2 3 4 5 6 7 8 9 10 11 12 13 14 15 16 17 18 19 | |
Persistent Storage
- Many applications are stateful, and as such we must preserve any data and ensure access to the underlying storage volume regardless of what machine the application runs on. This can be achieved using a persistent volume backed by network-attached storage.
- emptyDir volume
- An
emptyDirvolume is scoped to the Pod’s lifespan, but can be shared between two containers. Useful for caching thumbnails, etc.
- An
- hostDir volume
- Some applications don’t actually need a persistent volume, but they do need some access to the underlying host filesystem. For example, they may need access to the
/devfilesystem in order to perform raw block-level access to a device on the system. For these cases, Kubernetes supports thehostDirvolume, which can mount arbitrary locations on the worker node into the container.
- Some applications don’t actually need a persistent volume, but they do need some access to the underlying host filesystem. For example, they may need access to the
- Remote network storage volumes
- Sometimes you will use a volume for truly persistent data that is independent of the lifespan of a particular Pod, and should move between nodes in the cluster if a node fails or a Pod moves to a different machine for some reason.
- To achieve this, Kubernetes supports a wide variety of remote network storage volumes
- including widely supported protocols like NFS or iSCSI
- cloud provider network storage
- Amazon’s Elastic Block Store
- Azure’s Files and Disk Storage
- Google’s Persistent Disk.
- Persistent Data using Remote Disks
- Oftentimes, you want the data a Pod is using to stay with the Pod, even if it is restarted on a different host machine.
- To achieve this, you can mount a remote network storage volume into your Pod.
- When using network-based storage, Kubernetes automatically mounts and unmounts the appropriate storage whenever a Pod using that volume is scheduled onto a particular machine.
Labels & Annotations
Labels
- primarily for user/admin
- are key/value pairs that can be attached to Kubernetes objects such as Pods and ReplicaSets.
- They can be arbitrary, and are useful for attaching identifying information to Kubernetes objects.
- Labels are used to identify and optional group objects in a cluster.
1 2 3 4 5 6 | |
Annotations
- primarily for tooling
- annotations are key/value pairs designed to hold non-identifying information that can be leveraged by tools and libraries.
- While labels are used to identify and group objects, annotations are used to provide extra information about where an object came from, how to use it, or policy around that object.
- There is overlap, and it is a matter of taste as to when to use an annotation or a label. When in doubt, add information to an object as an annotation and promote it to a label if you find yourself wanting to use it in a selector.
- Where to use?
- Kubernetes uses this primarily for rolling deployments to track rollout status and provide the necessary information required to roll back a deployment to a previous state.
- Keep track of a “reason” for the latest update to an object.
- Extend data about the last tool to update the resource and how it was updated (used for detecting changes by other tools and doing a smart merge).
- Build, release, or image information that isn’t appropriate for labels (may include a Git hash, timestamp, PR number, etc.).
- Provide extra data to enhance the visual quality or usability of a UI. For example, objects could include a link to an icon (or a base64-encoded version of an icon).
- Where not to use?
- Users should avoid using the Kubernetes API server as a general-purpose database.
- Annotations are good for small bits of data that are highly associated with a specific resource. If you want to store data in Kubernetes but you don’t have an obvious object to associate it with, consider storing that data in some other, more appropriate database.
- Labels can be used to filter objects server-side, whereas annotations can’t
1 2 3 4 | |
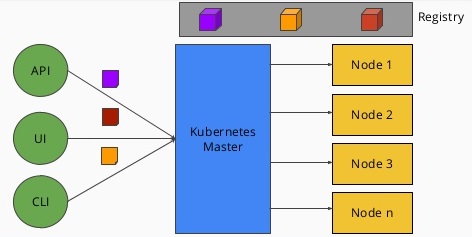
Cluster components
- All components run in the
kube-systemnamespace
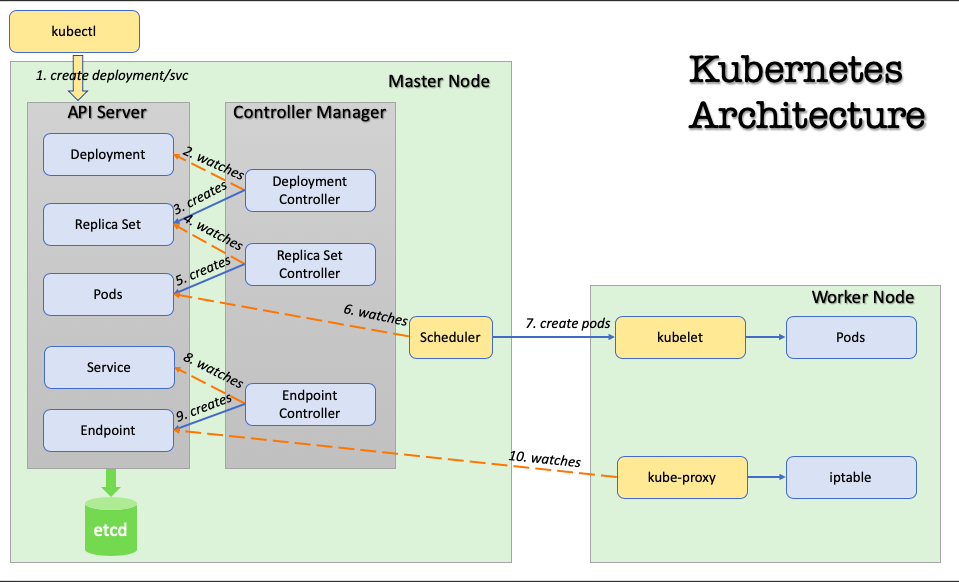
Image courtesy: https://medium.com/@tsuyoshiushio
| Architecture | Kubernetes Master | Kubernetes Node |
|---|---|---|
 |
 |
 |
- Types
- kube-proxy
- responsible for routing network traffic to load-balanced services in the Kubernetes cluster.
- must be present on every node in the cluster.
- Kubernetes has an API object named
DaemonSet, that is used in many clusters to accomplish this.
- kube-dns
- Kubernetes also runs a DNS server, which provides naming and discovery for the services that are defined in the cluster.
- This DNS server also runs as a replicated service on the cluster. Depending on the size of your cluster, you may see one or more DNS servers running in your cluster.
- The DNS service is run as a Kubernetes deployment, which manages these replicas.
- There is a also a Kubernetes service that performs load-balancing for the DNS server.
- Check
/etc/resolv.conffile in a container
- kube-dashboard
- The UI is run as a single replica, but it is still managed by a Kubernetes deployment for reliability and upgrades.
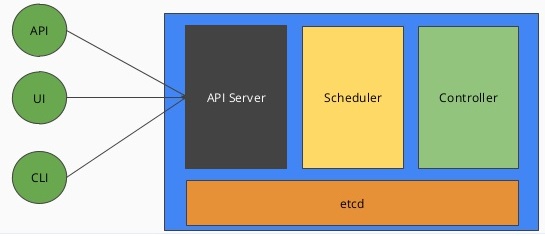
- The controller-manager is responsible for running various controllers that regulate behavior in the cluster: for example, ensuring that all of the replicas of a service are available and healthy.
- The scheduler is responsible for placing different pods onto different nodes in the cluster.
- The etcd server is the storage for the cluster where all of the API objects are stored.
- kube-proxy
- Node Types
- Master node
- has containers like the API server, scheduler, etc., which manage the cluster
- Kubernetes won’t generally schedule work onto master nodes to ensure that user workloads don’t harm the overall operation of the cluster.
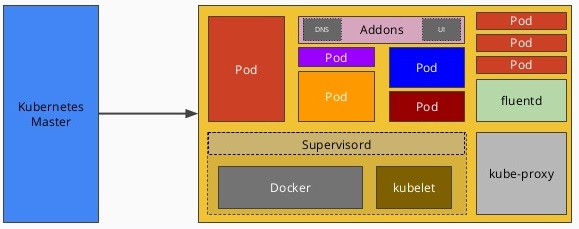
- Worker nodes
- where the application containers will run.
- Master node
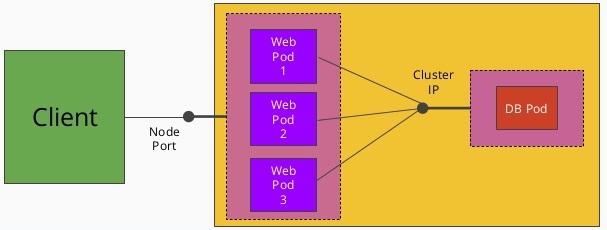
Services
 |
 |
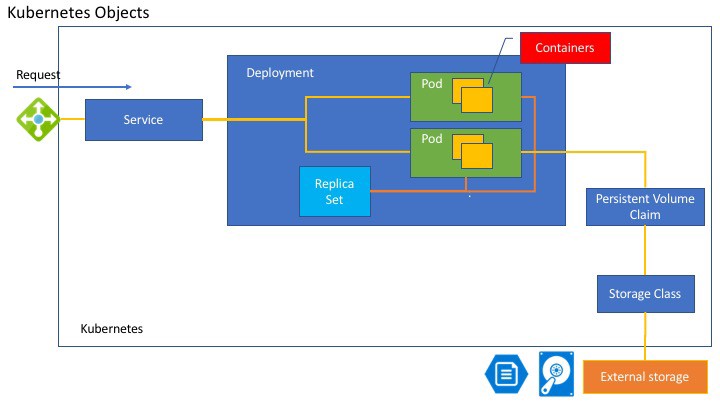
- Why services?
- We can always use labels to identify the set of pods we are interested in, get all of the pods for those labels, and dig out the IP address. But keeping the correct set of labels to use in sync can be tricky. This is why the Service object was created.
- A
Serviceobject is a way to create a named label selector. - The
kubernetesservice is automatically created for you so that you can find and talk to the Kubernetes API from within the app. - How to expose a service?
kubetctl expose <depl>- creates a new service from a deployment
- assigns a new type of virtual IP called cluster IP which is a special address the system will load-balance across all of the pods that are identified by the selector.
Traffic from a pod is intercepted on the host of the pod, not the destination of the connection.
- Types
Cluster IP-NodePort-LoadBalancer-
-
A service without any pod is completely valid
- DNS Service
- Kubernetes provides a DNS service (installed as a system component when the cluster was first created)
- DNS service is exposed to Pods running in the cluster
- It provides DNS names for cluster IPs
- Sample fully qualified DNS name:
alpaca-prod.default.svc.cluster.local alpaca-prod- name of the servicedefault- namespace that this service is insvc- recognizing that this is a servicecluster.local- The base domain name for the cluster. This is the default and what you will see for most clusters. Administrators may change this to allow unique DNS names across multiple clusters.
- Endpoints
- For every Service object, Kubernetes creates a buddy Endpointsobject that contains the IP addresses for that service
- Apps that want to use services without using a cluster IP can use ‘Endpoints’.
- To use a service, an advanced application can talk to the Kubernetes API directly to look up endpoints and call them.
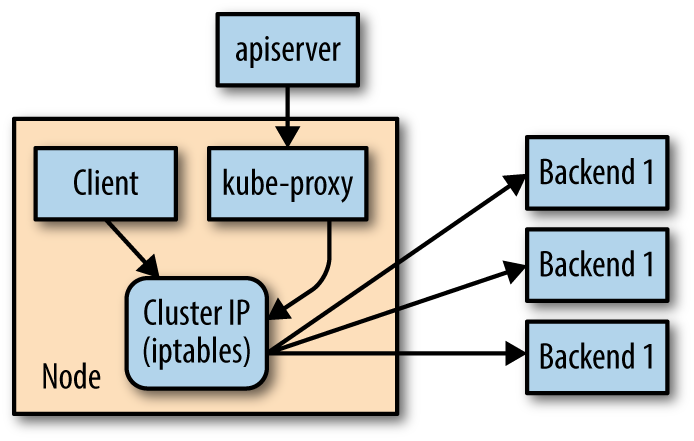
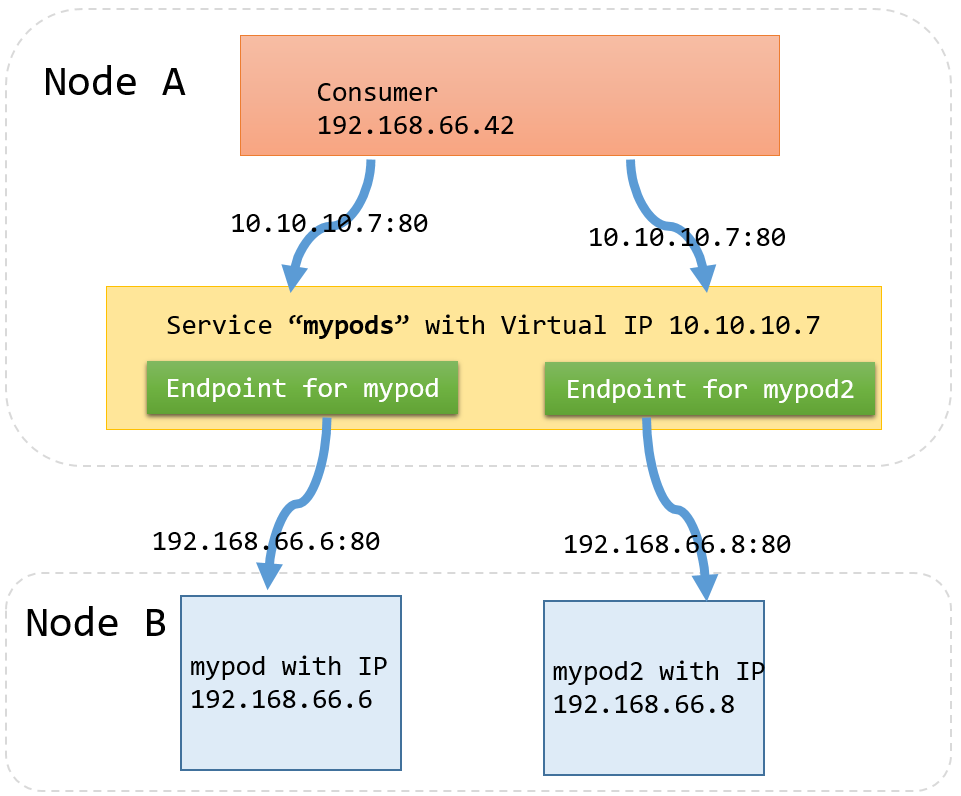
- kube-proxy
- Cluster IPs are stable virtual IPs that load-balance traffic across all of the endpoints in a service. This magic is performed by a component running on every node in the cluster called the
kube-proxy kube-proxywatches for new services in the cluster via the API server. It then programs a set of iptables rules in the kernel of that host to rewrite the destination of packets so they are directed at one of the endpoints for that service.- If the set of endpoints for a service changes (due to pods coming and going or due to a failed readiness check) the set of iptables rules is rewritten.
- The cluster IP itself is usually assigned by the API server as the service is created. However, when creating the service, the user can specify a specific cluster IP.
- Once set, the cluster IP cannot be modified without deleting and recreating the Service object.
- Cluster IPs are stable virtual IPs that load-balance traffic across all of the endpoints in a service. This magic is performed by a component running on every node in the cluster called the
- Daemons
supervisordis a lightweight process monitor and control system that can be used to keep kubelet and docker running.- fluentd is a daemon which helps provide cluster-level logging.
OSCAP- security- prometheus - monitoring and alerting toolkit (heapster)
- flannel - layer 3 network fabric designed for Kubernetes
- [linkerd]
- envoy
- istio
systemdjournald
ReplicaSets
- Multiple replica of containers are needed for variety of reasons like:
- Redundancy - Multiple running instances mean failure can be tolerated.
- Scale - Multiple running instances mean that more requests can be handled.
- Sharding - Different replicas can handle different parts of a computation in parallel.
- Composing Pods with ReplicaSets provides the foundation for building robust applications with automatic failover, and makes deploying those applications a breeze by enabling scalable and sane deployment patterns.
- ReplicaSets should be used for any Pod you care about, even if it is a single Pod! Some people even default to using ReplicaSets instead of Pods.
- ReplicaSet enables a user managing a replicated set of Pods considers them as a single entity to be defined and managed. A ReplicaSet acts as a cluster-wide Pod manager, ensuring that the right types and number of Pods are running at all times.
-
ReplicaSets provide the underpinning for building self-healing apps. Pods managed by ReplicaSets are automatically rescheduled under certain failure conditions such as node failures and network partitions.
- ReplicaSets and Pods are loosely coupled. Though ReplicaSets create and manage Pods, they do not own the Pods they create.
- ReplicaSets use label queries to identify the set of Pods they should be managing.
- ReplicaSets monitor cluster state using a set of Pod labels. Labels are used to filter Pod listings and track Pods running within a cluster. When ReplicaSets are initially created, the ReplicaSet fetches a Pod listing from the Kubernetes API and filters the results by labels. Based on the number of Pods returned by the query, the ReplicaSet deletes or creates Pods to meet the desired number of replicas.
- ReplicaSets that create multiple Pods and the services that load-balance to those Pods are also totally separate, decoupled API objects.
- Quarantining faulty containers
- When a server misbehaves, Pod-level health checks will automatically restart that Pod. But if your health checks are incomplete, a Pod can be misbehaving but still be part of the replicated set. In these situations, while it would work to simply kill the Pod, that would leave your developers with only logs to debug the problem. Instead, you can modify the set of labels on the sick Pod. Doing so will disassociate it from the ReplicaSet (and service) so that you can debug the Pod. The ReplicaSet controller will notice that a Pod is missing and create a new copy, but because the Pod is still running, it is available to developers for interactive debugging, which is significantly more valuable than debugging from logs.
- Designing with ReplicaSets
- every Pod that is created by the ReplicaSet controller is entirely homogeneous. ReplicaSets are designed for stateless (or nearly stateless) services. The elements created by the ReplicaSet are interchangeable; when a ReplicaSet is scaled down, an arbitrary Pod is selected for deletion. Your application’s behavior shouldn’t change because of such a scale-down operation.
Sample ReplicaSet Spec
- ReplicaSet name must be unique within the cluster (
metadata.name)
1 2 3 4 5 6 7 8 9 10 11 12 13 14 15 16 17 | |
Reconciliation Loop
- The reconciliation loop is a single loop that constantly runs, observes the current state of the world and takes action to try to make the observed state match the desired state.
- it handles both user actions to scale up or scale down the ReplicaSet, as well as node failures or nodes rejoining the cluster after being absent.
- Foundation for the self-healing system
- How it works?
- INPUT:
- REPLICAS: # of mypods that should be running
- ALGORITHM
- running = # of running pods with label
name=mypod - If running > REPLICAS, then delete some mypods
- If running < REPLICAS, then launch some mypods
- Goto 1
- running = # of running pods with label
- INPUT:
Autoscaling
- Kubernetes supports autoscaling
- Horizontal pod autoscaling (HPA) - creating additional replicas of a Pod when needed
- Vertical pod autoscaling - K8S does not support this at the time of this writing
- Cluster autoscaling - where the number of machines in the cluster is scaled in response to resource needs
- HPA requires the presence of out-of-the-box pod called Heapster which keeps track of metrics and provides an API for consuming metrics HPA uses when making scaling decisions.
Because of the decoupled nature of Kubernetes, there is no direct link between the horizontal pod autoscaler and the ReplicaSet. While this is great for modularity and composition, it also enables some antipatterns. In particular, it’s a bad idea to combine both autoscaling and imperative or declarative management of the number of replicas. If both you and an autoscaler are attempting to modify the number of replicas, it’s highly likely that you will clash, resulting in unexpected behavior.
Command Reference
kubectl versionkubectl cluster-info- displays the cluster information- Get
kubectl get componentstatuses- view a simple diagnostic of the clusterkubectl get nodes- list out all the nodes in the clusterkubectl get daemonSets --namespace=kube-system kube-proxy- to view proxykubectl get services --namespace=kube-system kube-dns- to view the service that performs load-balancing for the DNS serverskubectl get deployments --namespace=kube-system kubernetes-dashboard- to view the UI serverkubectl get services --namespace=kube-system kubernetes-dashboard- to view the service that performs load-balancing for the dashboard
- Config
kubectl config set-context my-context --namespace=mystuff- To create a new namespacekubectl config use-context my-context- to set the default namespace in context
- Object management
kubectl apply -f object.yaml- to create/update an objectkubectl delete -f object.yaml- to delete an objectkubectl edit <resource-name> <object-name>- to edit object state interactively
- Deployments
kubectl run <deployment-name> --image <name> --replicas=<number> --labels="k1=v1,k2=v2"- create a deploymentkubectl get deployments --show-labels- get deployments with their labelkubectl get deployments --namespace=kube-system kube-dns- to view the dns serverskubectl edit deployment/<depl-name>- to view/edit deployment manifest
- Labels
kubectl label pods <pod-name> <key=value>- to add a label to a podkubectl label pods <pod-name> -<key>- to remove a label from a podkubectl get pods -L -<label>- to view all pods with a labelkubectl label deployments <depl-name> <key=value>- to add a label to a deploymentkubectl label deployments <depl-name> -<key>- to remove a label from a deploymentkubectl get deployments -L -<label>- to view all deployments with a labelkubectl get deployments --selector="k1=v1,k2=v2"- to view all deployments with all the labels specified
- Services
kubectl expose deployment <depl-name>- to expose a deployment as a servicekubectl get services -o wide- to view all the serviceskubectl describe service <svc>
- ReplicaSets
kubectl describe rs <name>kubectl get pods <pod-name> -o yaml- pods with annotation entrykubernetes.io/created-byare the ones created by Kuberneteskubectl scale <replicaset> --replicas=4- to reset/edit the number of replicaskubectl delete rs <replicaset>- to delete the replicaset and the podskubectl delete rs <replicaset> --cascade=false- to delete only the replicaset and not the pods
- Autoscaling
kubectl autoscale rs <pod-name> --min=2 --max=5 --cpu-percent=80- creates an autoscaler that scales between two and five replicas with a CPU threshold of 80%.kubectl get hpa
- Debugging
kubectl describe nodes <node_name>- to get more information about a specific nodekubectl logs <pod-name>- to view the logs from all the containers in a podkubectl logs <pod-name> -c <container>- to view the logs from a particular containerkubectl exec -it <pod-name> --bash- to execute a command in a running containerkubectl cp <remote-file> <local-file>- to copy a file to and from a container
OpenShift
- Pod
- A pod is one or more containers guaranteed to be running on the same host. The containers within a pod share a unique IP address. They can communicate with each other via the “localhost” and also all share any volumes (persistent storage).
- Replication Controller
- When scaled up, an application will have more than one copy of itself, and each copy will have its own local state. Each copy corresponds to a different instance of a pod with the pods being managed by the replication controller.
- Service
- As each pod has a unique IP, we need an easy way to address the set of all pods as a whole. This is where a service comes into play.
- A Service groups pods and provides a common DNS name and an optional, load-balanced IP address to access them
- The service gets its own IP and a DNS name. When making a connection to a service, OpenShift will automatically route the connection to one of the pods associated with that service.
- Although a service has a DNS name, it is still only accessible within the OpenShift cluster and is not accessible externally.
- To make a service externally accessible, a route needs to be created.
- Creating a route automatically sets up haproxy or a hardware-based router, with an externally addressable DNS name, exposing the service and load-balancing inbound traffic across the pods.
- Build
- Deployment
- A deployment is an update to your application, triggered by a changed image or configuration
- There are 2 deployment strategies: rolling and recreate
- Rolling Strategy
- This is the default deployment strategy in OpenShift
- A rolling deployment slowly replaces instances of the previous version of an application with instances of the new version of the application.
- A rolling deployment can wait for new pods to become ready via a readiness check before scaling down the old instances. Rolling deployment can be aborted if a problem occurs.
- It runs old and new instances of the application in parallel and balances traffic across them as new instances are deployed and old instances shut down. It enables an update with no down time.
- When to use?:
- not suitable strategy where multiple instances of the same application cannot be run at the same time
- where instances of both old and new code cannot be run at the same time.
- Recreate Strategy
- shuts down all running instances of the old app, before starting up the new instances
- When to use?:
- where more than one instance of the app cannot run at the same time.
- where old and new code of the app cannot be run at the same time. e.g., apps running a traditional relational db
- Custom strategy
- Complicated custom strategies like Blue-Green or A/B deployment strategies can be implemented by using multiple deployment configurations and reconfiguring what pods are associated with the exposed service for an app using labels
- Scaling
- The number of pods can be scaled up or down via the web console
- Reducing the number replicas to zero is same as taking the app offline. Users trying to connect will get http 503 error.
- Before scaling up, make sure the app is cloud-native (in other words, 12-factor methodology compliant) app and is safe to scaling
- Database cannot scaled up in a traditional ways since only the primary instance should have the ability to update data. Scaling can still be performed, but usually on read-only instances of the DB
- Automatic scaling
- can be configured by defining the upper and lower thresholds of CPU usage by pod.
- If the upper threshold is consistently exceeded by the pods, a new instance of the app is started.
- If the CPU drops below lower threshold, then the replicas are scaled down.
- Health check
- Types
- Readiness probe: used to determine if the new instance of the app is running properly before reconfiguring the router to send traffic to it
- Liveness probe: runs periodically once traffic has been switched to an instance to ensure it is still behaving correctly. If the liveness probe fails, then the instance of the app is automatically shutdown by OpenShift and a new one is created.
- Both probes can be implemented in 3 different ways
- HTTP check: a container is considered healthy if a HTTP request against a defined url returns status 200 or 399
- Container check: a container is considered healthy if a defined command returns with a zero exit status
- TCP socket check: a container is considered healthy if a connection can be established to the exposed port of the app
- Types
Commands
oc types- quick summary of OpenShift concepts and definitionsoc whoamioc cluster up- to start the OpenShift clusteroc new-app <base_image> <sourcecode_git_url> --name='<app-name>'- to create a new app from source codeoc expose service <routename>- to expose a routeoc get routes- to view all the routesoc statusoc start-build <app>oc get pods- get all running instancesoc get pods --selector key=value- selectively query pods with label
oc describe pod/<instance_name>- details about an instanceoc get builds- list all builds- Logs
oc logs build/<buildname>- show build logsoc logs <podname>- show application logsoc logs --follow <podname>- tail the logs while the app is runningoc logs --previous <podname>- to view the logs from last attempt. This is useful when app fails to start after successive failures.
- Environment settings
oc set env <deploymentconfig>/<container> --list- list the env variables exported to a containeroc set env <deploymentconfig>/<container> key1=val1 key2=val2- note: each configuration change triggers a redeployment of the app.oc set env <buildconfig>/<container> key1=val1- setting the build config env variables. Note: any env variable set for build will also be used for containersoc env dc <app_name> -e key1=val1 -e key2=val2- adding environment variables to deployment config of an appoc explain- gets the list of what can be set in a configuration
- Debugging
oc rsh <app>- to remote shell into the running podoc exec <app> <command>- run a command and exit immediately with resultsoc debug dc/<app>- when app starts to fail, run this cmd. This will start up an instance of the image for the app, but instead of running the normal app command, it will run an interactive shell instead
- Deleting
oc delete project <name>-
oc delete all --selector key=val- deletes bc, dc, route, service, pod associated with the label The following service(s) have been created in your project: postgresql.Username: insult Password: insult Database Name: insults Connection URL: postgresql://postgresql:5432/
oc env dc insults -e POSTGRESQL_USER=insult -e PGPASSWORD=insult POSTGRESQL_DATABASE=insults
Containerization Patterns
Sidecar Pattern (single node)

- Application container contains the core logic of the application
- Sidecar container is to augment and improve the application container, often without the application container’s knowledge.
- Sidecar containers are coscheduled onto the same machine via an atomic container group, such as the pod API object in Kubernetes
- Use cases
- Adding HTTPS to a legacy service that is on HTTP. Sidecar can act as a proxy to incoming traffic enforcing HTTPS security.
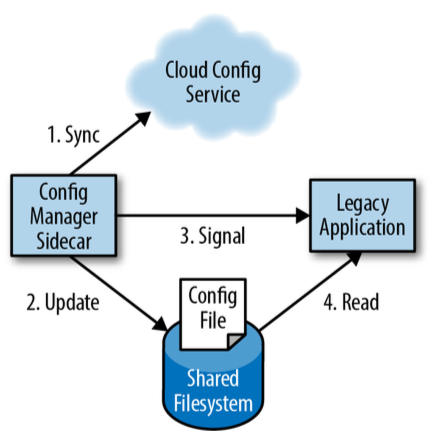
- Synchronize configurations for a legacy service - pull configuration updates from API service periodically, update a file and notify the legacy service.
| HTTPS example | Config Sync example |
|---|---|
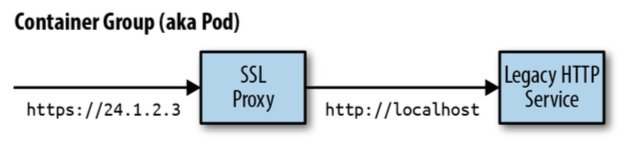 |
 |
Ambassador Pattern (single node)

- an ambassador container brokers interactions between the application container and the rest of the world
- Use cases
- used for sharding service

Adapter Pattern (single node)

- Adapter container is used to modify the interface of the application container so that it conforms to some predefined interface that is expected of all applications.
- For example, an adapter might ensure that an application implements a consistent monitoring interface. Or it might ensure that log files are always written to
stdoutor any number of other conventions - Use cases
- Monitoring: Keeping the application container untouched, one can add an adapter container that contains the tools for transforming the monitoring interface exposed by the application container into the interface expected by the general-purpose monitoring system like Prometheus.
- Logging: capturing logs from a wide variety of heterogenous systems and input into common logging interface.
References
- Books
- Mastering Docker
- O’Reilly - Using Docker
- O’Reilly - OpenShift for Developers
- O’Reilly - Kubernetes - Up & Running
- O’Reilly - Designing Distributed Systems