Spring Security
- Introduction
- Managing Users
- Dealing with Passwords
- Implementing authentication
- Using the SecurityContext
- Using a holding strategy for the security context
- Using a holding strategy for asynchronous calls
- Using a holding strategy for standalone applications
- Forwarding the security context with DelegatingSecurityContextRunnable
- Forwarding the security context with DelegatingSecurityContextExecutorService
- Using and configuring HTTP Basic
- Using the SecurityContext
- Configuring authorization: Restricting access
- Configuring authorization: Applying restrictions
- Implementing filters
- Applying CSRF
- Applying CORS
- References
Introduction
First Intro Project
- Spring Boot scans for components only in the package (and its subpackages) that contains the class annotated with
@SpringBootApplication. If you annotate classes with any of the stereotype components in Spring outside of the main package, you must explicitly declare the location using the@ComponentScanannotation.
1 2 3 4 5 6 7 8 | |
1 2 3 4 5 6 7 8 | |
- When you run the app, and access the endpoint
curl http://localhost:8080/hello, you get the below error
1 2 3 4 5 6 | |
- By default, Spring Security expects the default username (
user). Each time you run the application, it generates a new password and prints this password in the console. - It works once the generated password is passed in as input
With cURL, you can set the HTTP basic username and password with the
-uflag. Behind the scenes, cURL encodes the string<username>:<password>in Base64 and sends it as the value of the Authorization header prefixed with the string Basic. And with cURL, it’s probably easier for you to use the-uflag. But it’s also essential to know what the real request looks like. So, let’s give it a try and manually create the Authorization header.
1 2 3 4 5 6 7 8 | |
High-level overview
-
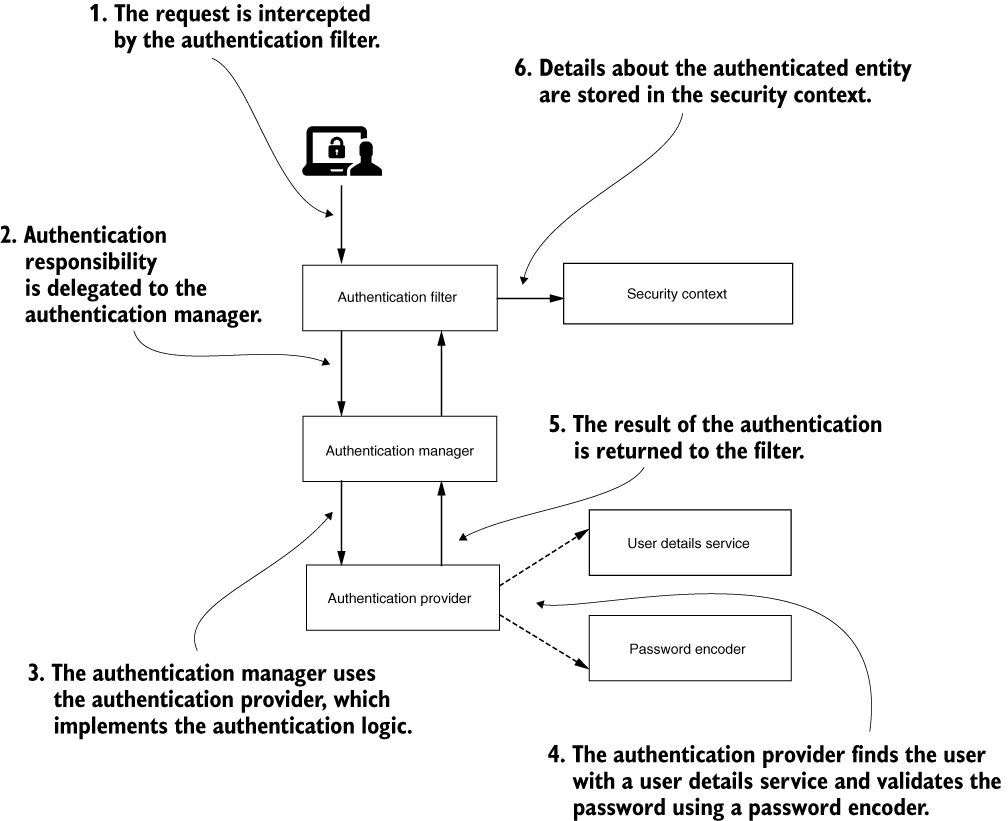
The main components acting in the authentication process for Spring Security and the relationships among these. This architecture represents the backbone of implementing authentication with Spring Security. ## Authentication process
- Steps
- The authentication filter delegates the authentication request to the authentication manager and, based on the response, configures the security context.
- The authentication manager uses the authentication provider to process authentication.
- The authentication provider implements the authentication logic.
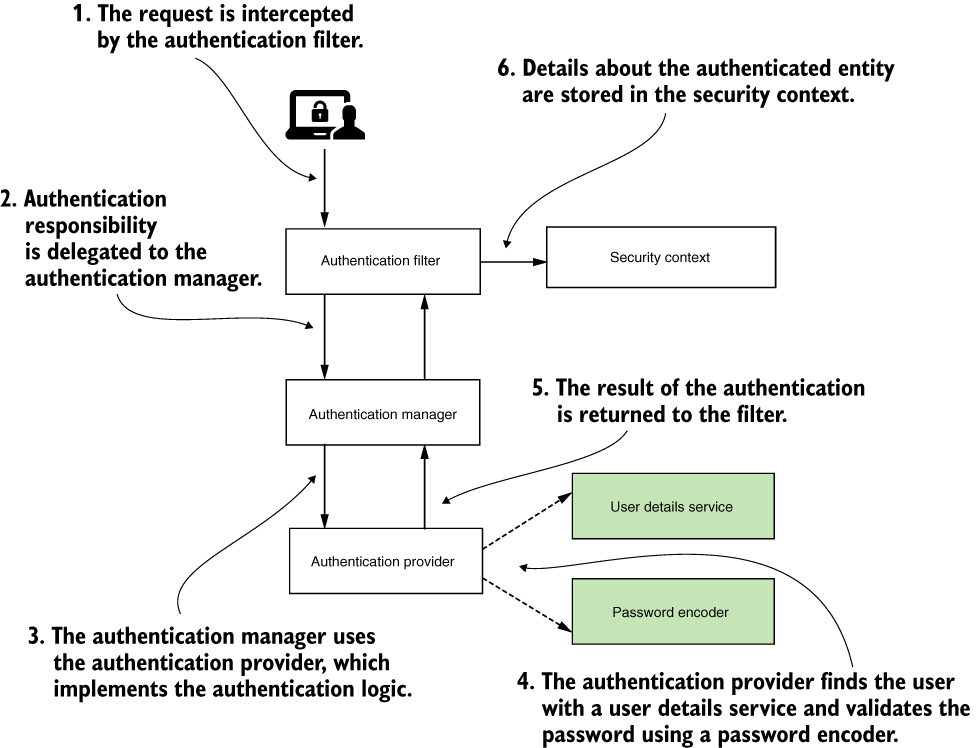
- The user details service implements user management responsibility, which the authentication provider uses in the authentication logic.
- The password encoder implements password management, which the authentication provider uses in the authentication logic.
- The security context keeps the authentication data after the authentication process.
- An object that implements a
UserDetailsServicecontract with Spring Security manages the details about users.
- PasswordEncoder
- The
PasswordEncoderdoes two things:- Encodes a password
- Verifies if the password matches an existing encoding
- the
PasswordEncoderis mandatory for the Basic authentication flow - a
PasswordEncoderexists together with the defaultUserDetailsService. When we replace the default implementation of the UserDetailsService, we must also specify aPasswordEncoder
- The
- AuthenticationProvider
- The
AuthenticationProviderdefines the authentication logic, delegating the user and password management. A default implementation of theAuthenticationProvideruses the default implementations provided for theUserDetailsServiceand thePasswordEncoder. Implicitly, your application secures all the endpoints.
- The
- Override default configurations
- In some cases, developers choose to use beans in the Spring context for the configuration. In other cases, they override various methods for the same purpose.
- Configuring a project with a mix of styles is not desirable as it makes the code difficult to understand and affects the maintainability of the application.
Overriding the UserDetailsService component
- The application now uses the instance of type UserDetailsService you added to the context instead of the default autoconfigured one. But, at the same time, you won’t be able to access the endpoint anymore for two reasons:
- You don’t have any users.
- You don’t have a
PasswordEncoder.
- When building the instance, we have to provide the username, the password, and at least one authority. The authority is an action allowed for that user, and we can use any string for this.
- Because we overrode
UserDetailsService, we also have to declare aPasswordEncoder. Trying the example now, you’ll see an exception when you call the endpoint. When trying to do the authentication, Spring Security realizes it doesn’t know how to manage the password and fails. - The
NoOpPasswordEncoderinstance treats passwords as plain text. It doesn’t encrypt or hash them. For matching,NoOpPasswordEncoderonly compares the strings using the underlyingequals(Object o)method of the String class.
1 2 3 4 5 6 7 8 9 10 11 12 13 14 15 16 17 18 19 20 21 | |
Overriding the endpoint authorization configuration
- With default configuration, all the endpoints assume you have a valid user managed by the application. Also, by default, your app uses HTTP Basic authentication as the authorization method.
- Not all endpoints of an application need to be secured, and for those that do, we might need to choose different authorization rules. To make such changes, we start by extending the
WebSecurityConfigurerAdapterclass. Extending this class allows us to override theconfigure(HttpSecurity http). - The
permitAll()call in the configuration, together with theanyRequest()method, makes all the endpoints accessible without the need for credentials:
1 2 3 4 5 6 7 8 9 10 11 12 | |
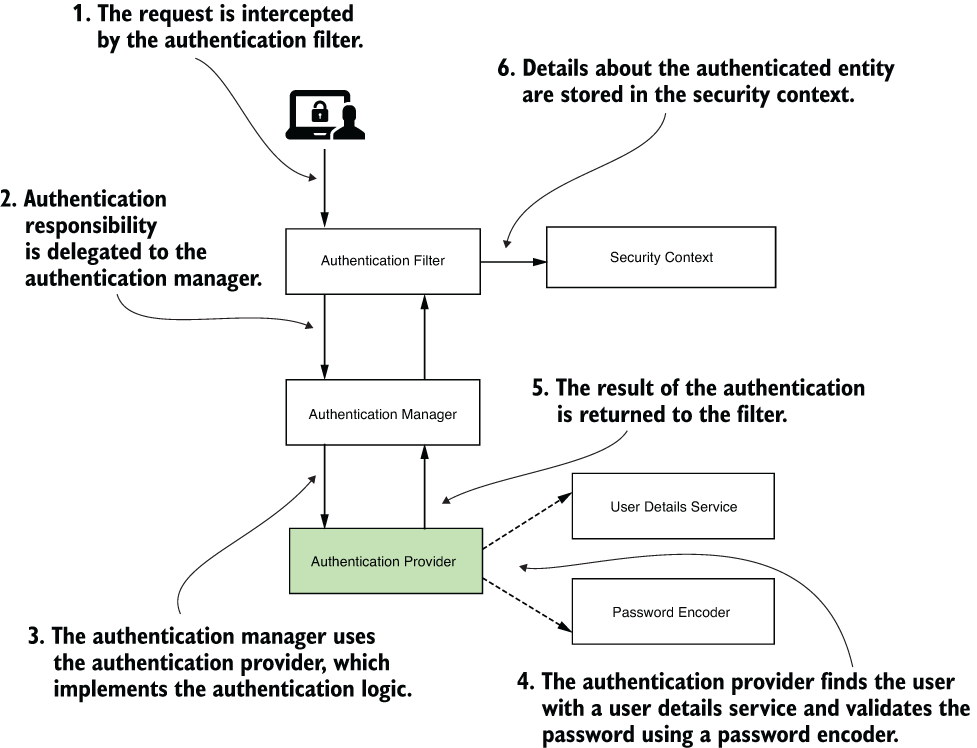
Overriding the AuthenticationProvider implementation
- Below example shows the
AuthenticationProvider, which implements the authentication logic and delegates to theUserDetailsServiceandPasswordEncoderfor user and password management. So we could say that with this section, we go one step deeper in the authentication and authorization architecture to learn how to implement custom authentication logic withAuthenticationProvider - I recommend that you respect the responsibilities as designed in the Spring Security architecture. This architecture is loosely coupled with fine-grained responsibilities. That design is one of the things that makes Spring Security flexible and easy to integrate in your applications. But depending on how you make use of its flexibility, you could change the design as well. You have to be careful with these approaches as they can complicate your solution. For example, you could choose to override the default
AuthenticationProviderin a way in which you no longer need aUserDetailsServiceorPasswordEncoder.
1 2 3 4 5 6 7 8 9 10 11 12 13 14 15 16 17 18 19 20 21 22 | |
1 2 3 4 5 6 7 8 9 10 11 12 13 | |
- Using multiple configuration classes in your project
- good practice to separate the responsibilities even for the configuration classes. We need this separation because the configuration starts to become more complex.
- You can’t have both classes extending
WebSecurityConfigurerAdapterin this case. If you do so, the dependency injection fails. You might solve the dependency injection by setting the priority for injection using the@Orderannotation. But, functionally, this won’t work, as the configurations exclude each other instead of merging.
Managing Users
- Classes
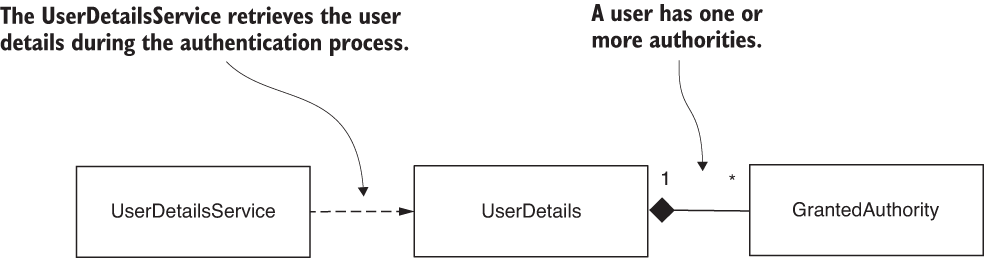
UserDetails- which describes the user for Spring Security.GrantedAuthority- which allows us to define actions that the user can execute.UserDetailsManager- which extends theUserDetailsServicecontract. Beyond the inherited behavior, it also describes actions like creating a user and modifying or deleting a user’s password.
Implementing authentication in Spring Security
- The
UserDetailsServiceis only responsible for retrieving the user by username. This action is the only one needed by the framework to complete authentication. - The
UserDetailsManageradds behavior that refers to adding, modifying, or deleting the user, which is a required functionality in most applications. The separation between the two contracts is an excellent example of the interface segregation principle. Separating the interfaces allows for better flexibility because the framework doesn’t force you to implement behavior if your app doesn’t need it. If the app only needs to authenticate the users, then implementing the UserDetailsService contract is enough to cover the desired functionality.
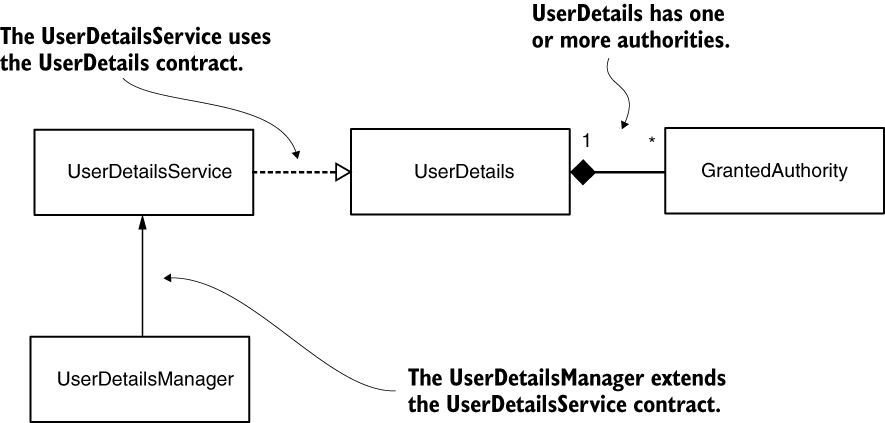
- Dependencies between the components involved in user management. The
UserDetailsServicereturns the details of a user, finding the user by its name. TheUserDetailscontract describes the user. A user has one or more authorities, represented by theGrantedAuthorityinterface. To add operations such as create, delete, or change password to the user, theUserDetailsManagercontract extendsUserDetailsServiceto add operations.
Describing the user
- For Spring Security, a user definition should respect the
UserDetailscontract. TheUserDetailscontract represents the user as understood by Spring Security. The class of your application that describes the user has to implement this interface, and in this way, the framework understands it.
1 2 3 4 5 6 7 8 9 | |
- Spring Security uses authorities to refer either to fine-grained privileges or to roles, which are groups of privileges.
Detailing on the GrantedAuthority contract
- the actions granted for a user are called authorities.
- The authorities represent what the user can do in your application. Without authorities, all users would be equal.
- To create an authority, you only need to find a name for that privilege so you can refer to it later when writing the authorization rules.
1 2 3 | |
- The
SimpleGrantedAuthorityclass offers a way to create immutable instances of the type GrantedAuthority.GrantedAuthority g1 = () -> "READ";GrantedAuthority g2 = new SimpleGrantedAuthority("READ");
Using a builder to create instances of the UserDetails type
The User class from the org.springframework.security.core.userdetails package is a simple way to build instances of the UserDetails type. Using this class, you can create immutable instances of UserDetails.
1 2 3 4 5 6 | |
Understanding the UserDetailsService contract
1 2 3 | |
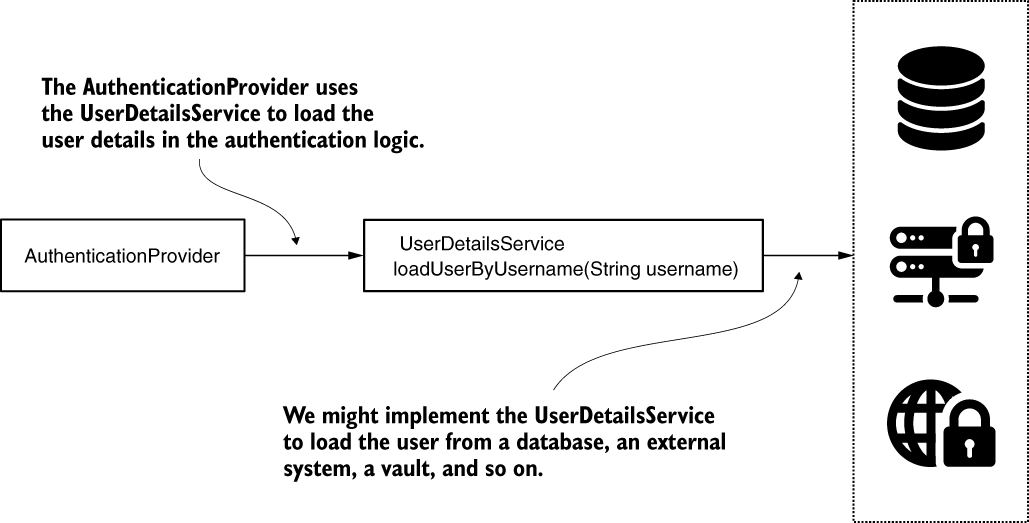
The authentication implementation calls the loadUserByUsername(String username) method to obtain the details of a user with a given username . The username is, of course, considered unique. The user returned by this method is an implementation of the UserDetails contract. If the username doesn’t exist, the method throws a UsernameNotFoundException.
The AuthenticationProvider is the component that implements the authentication logic and uses the UserDetailsService to load details about the user. To find the user by username, it calls the loadUserByUsername(String username) method.
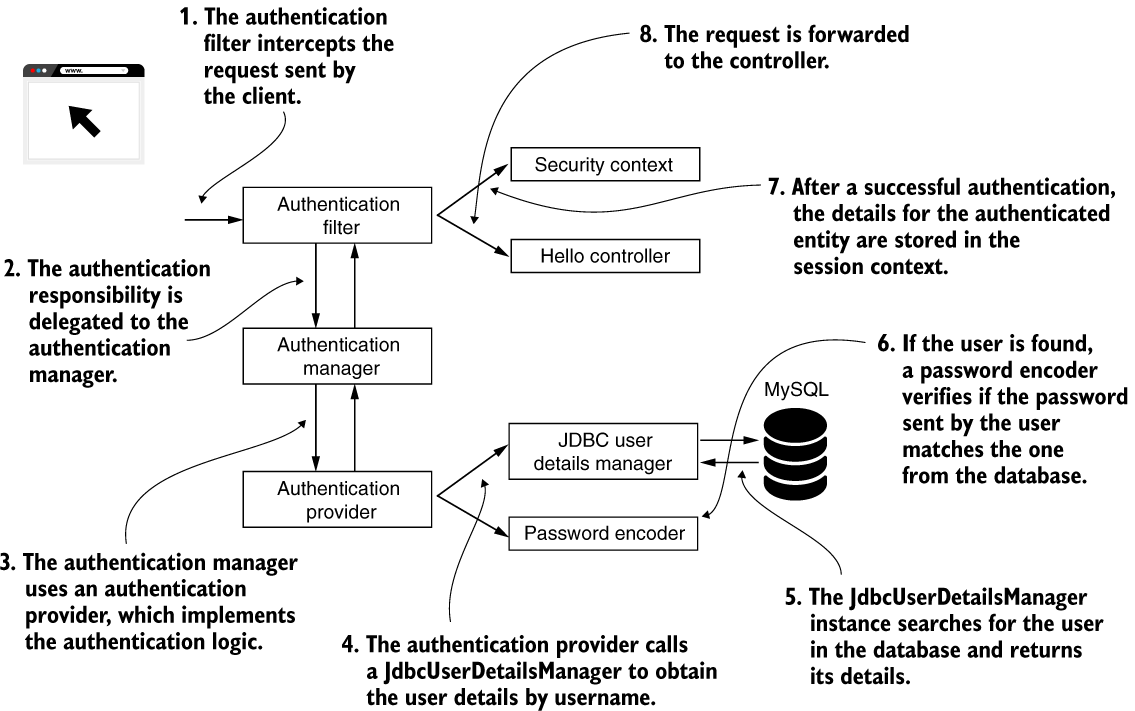
Implementing the UserDetailsManager contract
The Spring Security authentication flow. Here we use a JDBCUserDetailsManager as our UserDetailsService component. The JdbcUserDetailsManager uses a database to manage users.
1 2 3 4 5 6 7 | |
Dealing with Passwords
Understanding the PasswordEncoder contract
1 2 3 4 5 6 7 8 9 | |
1 2 3 4 5 6 7 8 9 10 11 12 13 14 15 16 17 | |
Spring Security provides the following encoders out-of-the-box:
NoOpPasswordEncoder–Doesn’t encode the password but keeps it in cleartext. We use this implementation only for examples. Because it doesn’t hash the password, you should never use it in a real-world scenario.StandardPasswordEncoder–Uses SHA-256 to hash the password. This implementation is now deprecated, and you shouldn’t use it for your new implementations. The reason why it’s deprecated is that it uses a hashing algorithm that we don’t consider strong enough anymore, but you might still find this implementation used in existing applications.Pbkdf2PasswordEncoder–Uses the password-based key derivation function 2 (PBKDF2).BCryptPasswordEncoder–Uses a bcrypt strong hashing function to encode the password.SCryptPasswordEncoder–Uses an scrypt hashing function to encode the password.
Implementing authentication
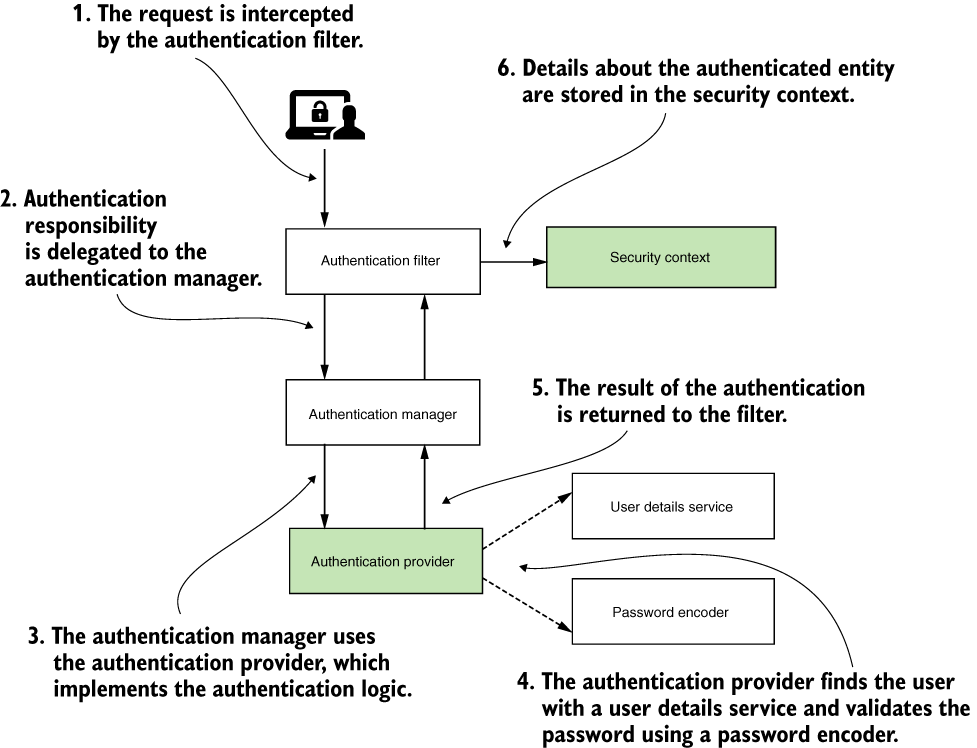
The authentication process, which has only two possible results:
- The entity making the request is not authenticated. The user is not recognized, and the application rejects the request without delegating to the authorization process. Usually, in this case, the response status sent back to the client is HTTP 401 Unauthorized.
- The entity making the request is authenticated. The details about the requester are stored such that the application can use these for authorization. The
SecurityContextinterface is the instance that stores the details about the current authenticated request.
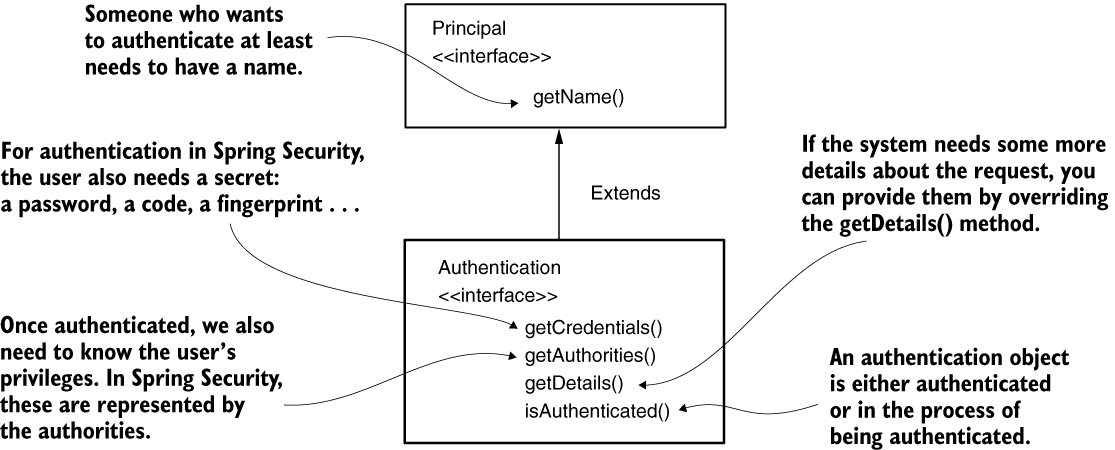
The Authentication interface represents the authentication request event and holds the details of the entity that requests access to the application. You can use the information related to the authentication request event during and after the authentication process. The user requesting access to the application is called a principal. If you’ve ever used the Java Security API in any app, you learned that in the Java Security API, an interface named Principal represents the same concept.
1 2 3 4 5 6 7 8 9 10 | |
1 2 3 4 5 6 | |
The AuthenticationProvider responsibility is strongly coupled with the Authentication contract. The authenticate() method receives an Authentication object as a parameter and returns an Authentication object. We implement the authenticate() method to define the authentication logic.
- The method should throw an
AuthenticationExceptionif the authentication fails. - If the method receives an authentication object that is not supported by your implementation of
AuthenticationProvider, then the method should returnnull. This way, we have the possibility of using multipleAuthenticationtypes separated at the HTTP-filter level. - The method should return an
Authenticationinstance representing a fully authenticated object. For this instance, theisAuthenticated()method returns true, and it contains all the necessary details about the authenticated entity. Usually, the application also removes sensitive data like a password from this instance. After implementation, the password is no longer required and keeping these details can potentially expose them to unwanted eyes.
The second method in the AuthenticationProvider interface is supports-(Class<?> authentication). You can implement this method to return true if the current AuthenticationProvider supports the type provided as an Authentication object. Observe that even if this method returns true for an object, there is still a chance that the authenticate() method rejects the request by returning null. Spring Security is designed like this to be more flexible and to allow you to implement an AuthenticationProvider that can reject an authentication request based on the request’s details, not only by its type.
AuthenticationManager delegates to one of the available authentication providers. The AuthenticationProvider might not support the provided type of authentication. On the other hand, if it does support the object type, it might not know how to authenticate that specific object. The authentication is evaluated, and an AuthenticationProvider that can say if the request is correct or not responds to the AuthenticationManager.
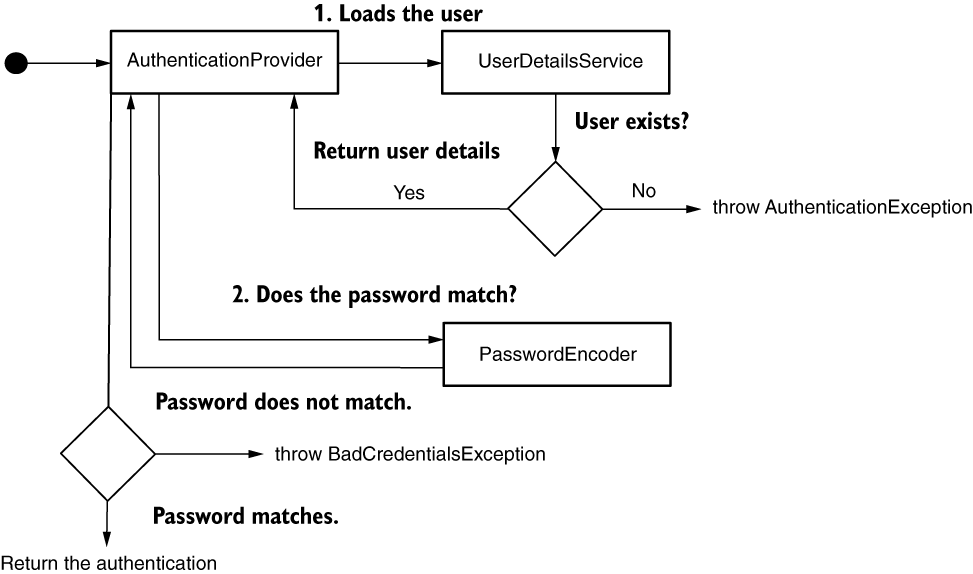
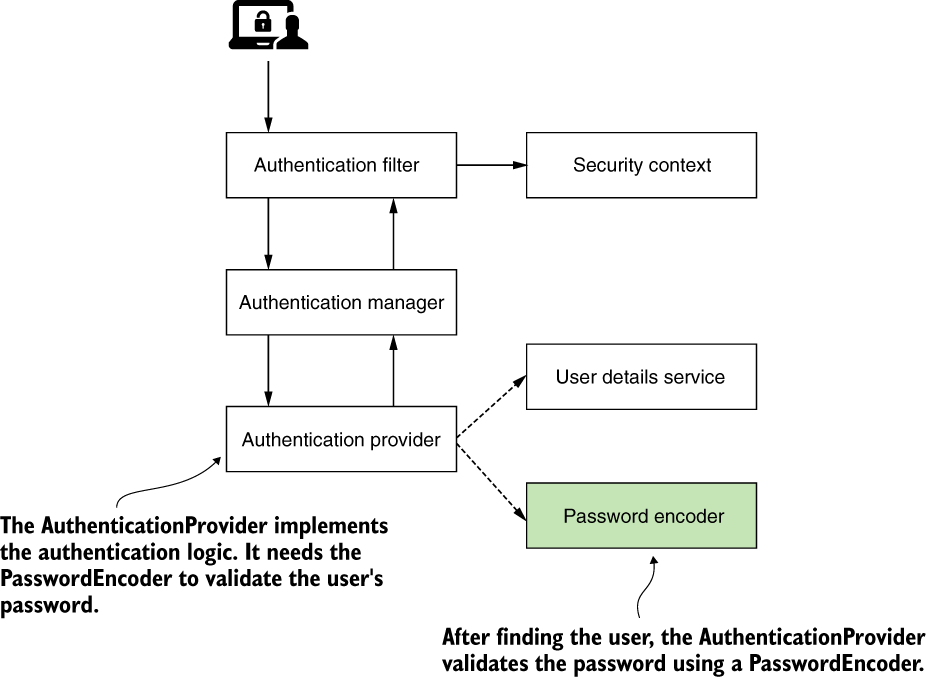
If the user doesn’t exist, the loadUserByUsername() method should throw an AuthenticationException. In this case, the authentication process stops, and the HTTP filter sets the response status to HTTP 401 Unauthorized. If the username exists, we can check further the user’s password with the matches() method of the PasswordEncoder from the context. If the password does not match, then again, an AuthenticationException should be thrown. If the password is correct, the AuthenticationProvider returns an instance of Authentication marked as “authenticated,” which contains the details about the request.
To plug in the new implementation of the AuthenticationProvider, override the configure(AuthenticationManagerBuilder auth) method of the WebSecurityConfigurerAdapter class in the configuration class of the project.
Using the @Autowired annotation over a field declared as an AuthenticationProvider. Spring recognizes the AuthenticationProvider as an interface (which is an abstraction). But Spring knows that it needs to find in its context an instance of an implementation for that specific interface. In our case, the implementation is the instance of CustomAuthenticationProvider, which is the only one of this type that we declared and added to the Spring context using the @Component annotation.
1 2 3 4 5 6 7 8 9 10 11 12 13 | |
Using the SecurityContext
It is likely that you will need details about the authenticated entity after the authentication process ends. You might, for example, need to refer to the username or the authorities of the currently authenticated user. Is this information still accessible after the authentication process finishes?
Once the AuthenticationManager completes the authentication process successfully, it stores the Authentication instance for the rest of the request. The instance storing the Authentication object is called the security context.
1 2 3 4 | |
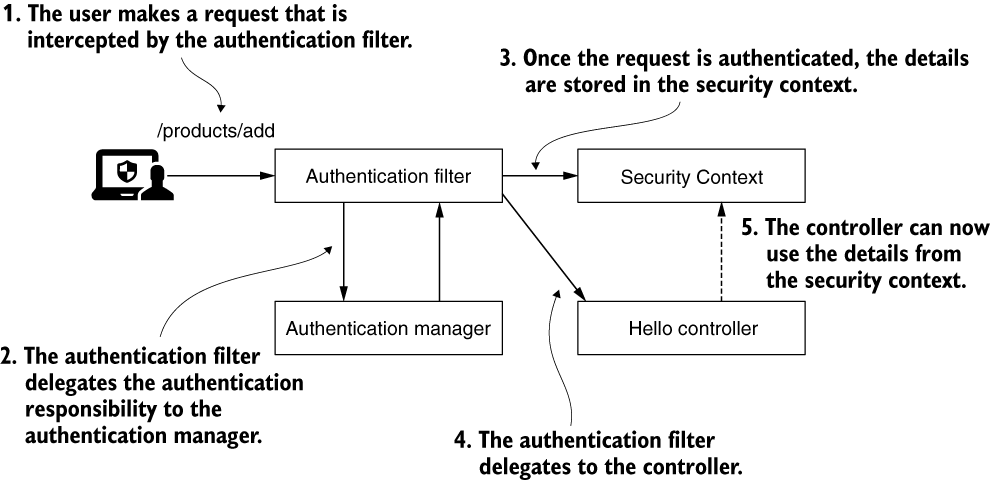
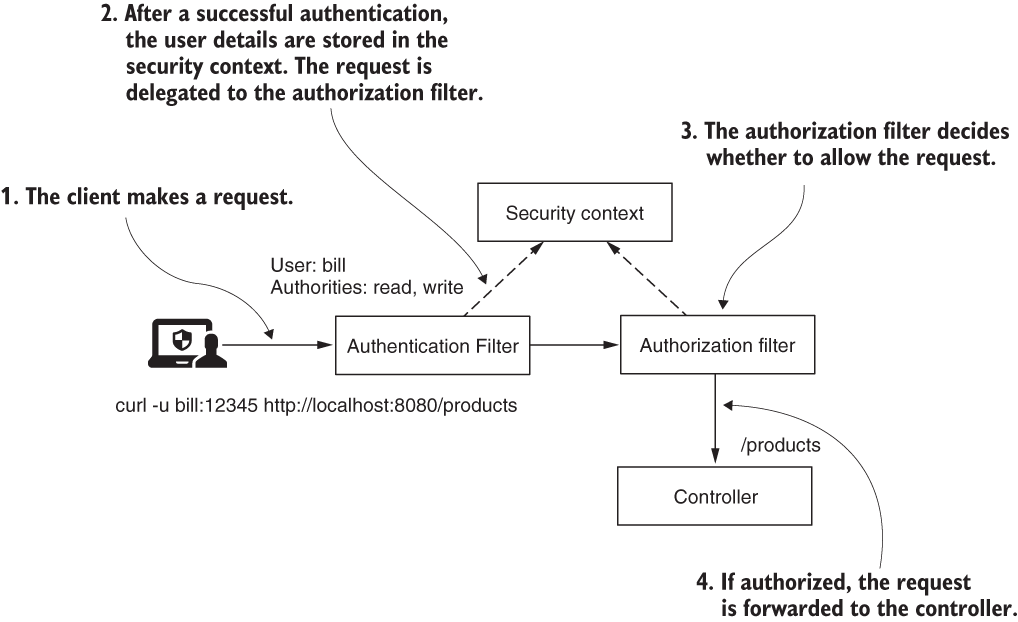
After successful authentication, the authentication filter stores the details of the authenticated entity in the security context. From there, the controller implementing the action mapped to the request can access these details when needed.
Spring Security offers three strategies to manage the SecurityContext with an object in the role of a manager. It’s named the SecurityContextHolder:
MODE_THREADLOCAL–Allows each thread to store its own details in the security context. In a thread-per-request web application, this is a common approach as each request has an individual thread.MODE_INHERITABLETHREADLOCAL–Similar toMODE_THREADLOCALbut also instructs Spring Security to copy the security context to the next thread in case of an asynchronous method. This way, we can say that the new thread running the @Async method inherits the security context.MODE_GLOBAL–Makes all the threads of the application see the same security context instance.
Using a holding strategy for the security context
The first strategy for managing the security context is the MODE_THREADLOCAL strategy. This strategy is also the default for managing the security context used by Spring Security. With this strategy, Spring Security uses ThreadLocal to manage the context. This implementation works as a collection of data but makes sure that each thread of the application can see only the data stored in the collection. This way, each request has access to its security context. No thread will have access to another’s ThreadLocal. And that means that in a web application, each request can see only its own security context. We could say that this is also what you generally want to have for a backend web application.
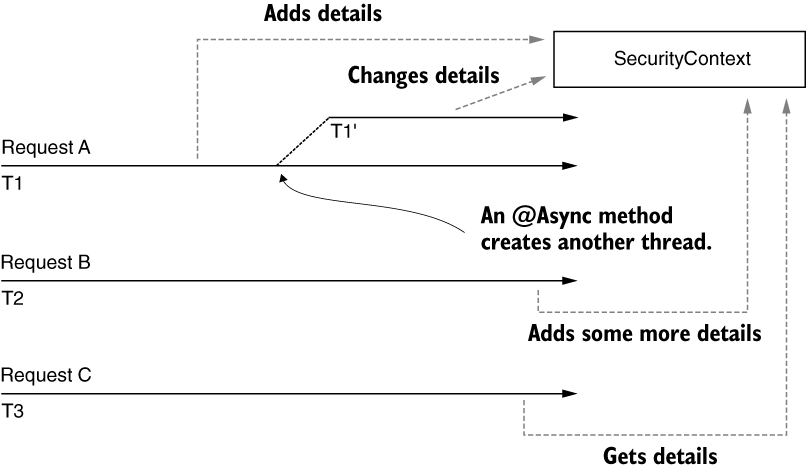
Below figure offers an overview of this functionality. Each request (A, B, and C) has its own allocated thread (T1, T2, and T3). This way, each request only sees the details stored in their security context. But this also means that if a new thread is created (for example, when an asynchronous method is called), the new thread will have its own security context as well. The details from the parent thread (the original thread of the request) are not copied to the security context of the new thread.
This architecture only applies to the traditional servlet application where each request has its own thread assigned. It does not apply to reactive applications.
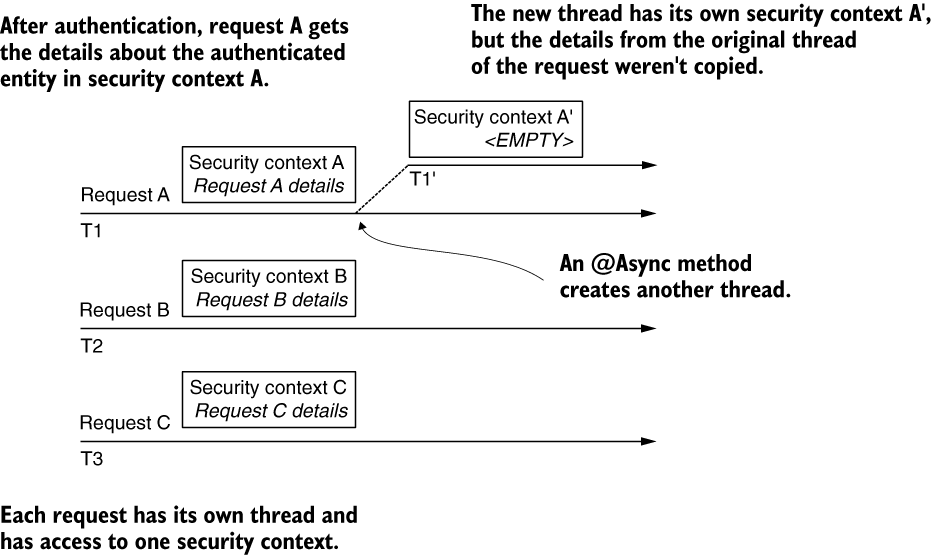
Each request has its own thread, represented by an arrow. Each thread has access only to its own security context details. When a new thread is created (for example, by an @Async method), the details from the parent thread aren’t copied.
Being the default strategy for managing the security context, this process does not need to be explicitly configured. Just ask for the security context from the holder using the static getContext() method wherever you need it after the end of the authentication process.
1 2 3 4 5 6 7 | |
Obtaining the authentication from the context is even more comfortable at the endpoint level, as Spring knows to inject it directly into the method parameters. You don’t need to refer every time to the SecurityContextHolder class explicitly.
Using a holding strategy for asynchronous calls

The situation gets more complicated if we have to deal with multiple threads per request. Look at what happens if you make the endpoint asynchronous. The thread that executes the method is no longer the same thread that serves the request.
1 2 3 4 5 6 7 8 | |
1 2 3 4 5 | |
If you try the code as it is now, it throws a NullPointerException on the line that gets the name from the authentication, which is String username = context.getAuthentication().getName().
This is because the method executes now on another thread that does not inherit the security context. For this reason, the Authorization object is null and, in the context of the presented code, causes a NullPointerException. In this case, you could solve the problem by using the MODE_INHERITABLETHREADLOCAL strategy. This can be set either by calling the SecurityContextHolder.setStrategyName() method or by using the system property spring.security.strategy. By setting this strategy, the framework knows to copy the details of the original thread of the request to the newly created thread of the asynchronous method.
1 2 3 4 5 6 7 8 9 10 | |
This works, however, only when the framework itself creates the thread (for example, in case of an
@Asyncmethod). If your code creates the thread, you will run into the same problem even with theMODE_INHERITABLETHREADLOCALstrategy. This happens because, in this case, the framework does not know about the thread that your code creates.
Using a holding strategy for standalone applications
If what you need is a security context shared by all the threads of the application, you change the strategy to MODE_GLOBAL.
With MODE_GLOBAL used as the security context management strategy, all the threads access the same security context. This implies that these all have access to the same data and can change that information. Because of this, race conditions can occur, and you have to take care of synchronization.
Be aware that the SecurityContext is not thread safe. So, with this strategy where all the threads of the application can access the SecurityContext object, you need to take care of concurrent access.
Forwarding the security context with DelegatingSecurityContextRunnable
What happens when your code starts new threads without the framework knowing about them? Sometimes we name these self-managed threads because it is we who manage them, not the framework.
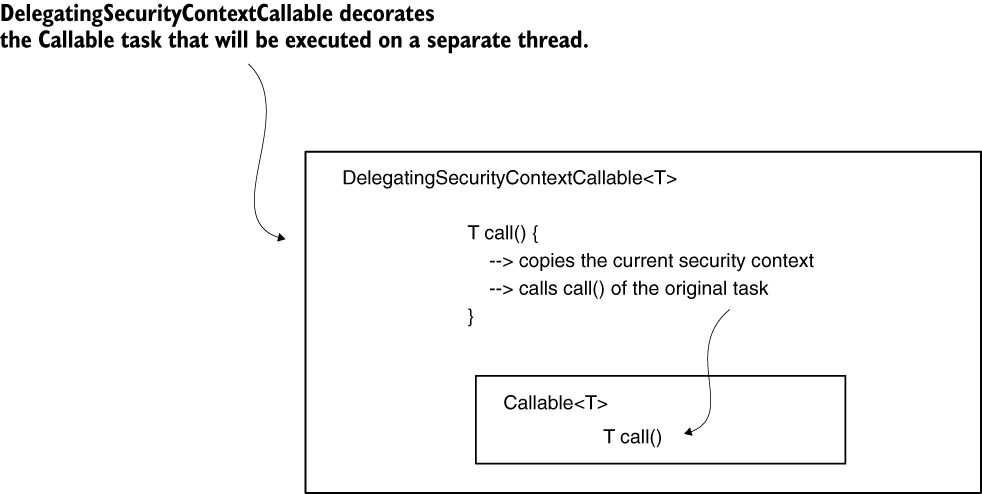
No specific strategy of the SecurityContextHolder offers you a solution to self-managed threads. In this case, you need to take care of the security context propagation. One solution for this is to use the DelegatingSecurityContextRunnable to decorate the tasks you want to execute on a separate thread. The DelegatingSecurityContextRunnable extends Runnable. You can use it following the execution of the task when there is no value expected. If you have a return value, then you can use the Callable<T> alternative, which is DelegatingSecurityContextCallable<T>. Both classes represent tasks executed asynchronously, as any other Runnable or Callable. Moreover, these make sure to copy the current security context for the thread that executes the task.
1 2 3 4 5 6 7 8 9 10 11 12 13 14 | |
If you run the application as is, you get nothing more than a NullPointerException. Inside the newly created thread to run the callable task, the authentication does not exist anymore, and the security context is empty. To solve this problem, we decorate the task with DelegatingSecurityContextCallable, which provides the current context to the new thread, as provided by this listing.
1 2 3 4 5 6 7 8 9 10 11 12 13 14 15 | |
Forwarding the security context with DelegatingSecurityContextExecutorService
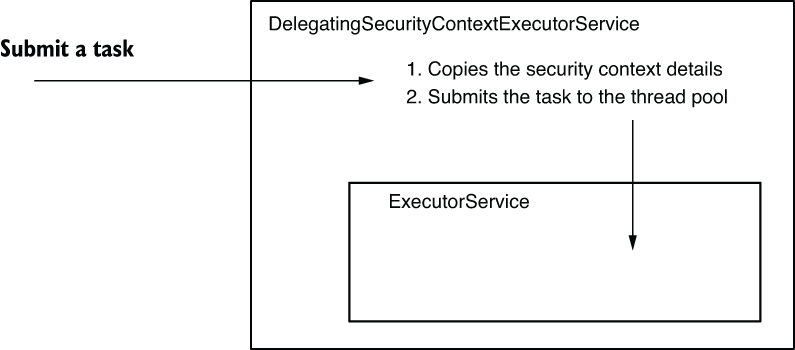
- But we have a second option to deal with the security context propagation to a new thread, and this is to manage propagation from the thread pool instead of from the task itself. An alternative to decorating tasks is to use a particular type of
Executor. - The propagation of the security context happens because an implementation called
DelegatingSecurityContextExecutorServicedecorates theExecutorService. It also takes care of the security context propagation.
1 2 3 4 5 6 7 8 9 10 11 12 13 14 15 | |
Using and configuring HTTP Basic
- For example, you might want to implement a specific logic for the case in which the authentication process fails. You might even need to set some values on the response sent back to the client in this case.
- You can also call the
httpBasic()method of theHttpSecurityinstance with a parameter of typeCustomizer. This parameter allows you to set up some configurations related to the authentication method. - Also, by using a
Customizer, we can customize the response for a failed authentication. You need to do this if the client of your system expects something specific in the response in the case of a failed authentication. You might need to add or remove one or more headers. Or you can have some logic that filters the body to make sure that the application doesn’t expose any sensitive data to the client.
1 2 3 4 5 6 7 8 9 10 11 12 13 | |
- To customize the response for a failed authentication, we can implement an
AuthenticationEntryPoint. Itscommence()method receives theHttpServletRequest, theHttpServletResponse, and theAuthenticationExceptionthat cause the authentication to fail. Below listing demonstrates a way to implement theAuthenticationEntryPoint, which adds a header to the response and sets the HTTP status to 401 Unauthorized.
1 2 3 4 5 6 7 8 9 10 11 | |
Configuring authorization: Restricting access
- Authorization is the process during which the system decides if an identified client has permission to access the requested resource
- In Spring Security, once the application ends the authentication flow, it delegates the request to an authorization filter. The filter allows or rejects the request based on the configured authorization rules.
- When the client makes the request, the authentication filter authenticates the user. After successful authentication, the authentication filter stores the user details in the security context and forwards the request to the authorization filter. The authorization filter decides whether the call is permitted. To decide whether to authorize the request, the authorization filter uses the details from the security context.
Restricting access based on authorities and roles
- A user has one or more authorities (actions that a user can do). During the authentication process, the
UserDetailsServiceobtains all the details about the user, including the authorities. The application uses the authorities as represented by theGrantedAuthorityinterface for authorization after it successfully authenticates the user - An authority is an action that a user can perform with a system resource. An authority has a name that the
getAuthority()behavior of the object returns as aString. We use the name of the authority when defining the custom authorization rule. Often an authorization rule can look like this: “Jane is allowed to delete the product records,” or “John is allowed to read the document records.” In these cases, delete and read are the granted authorities. The application allows the users Jane and John to perform these actions, which often have names like read, write, or delete.
1 2 3 | |
1 2 3 4 5 | |
1 2 3 4 5 6 7 8 9 | |
You provide the name of the authority allowed to the user as a parameter of the hasAuthority() method. The application needs, first, to authenticate the request and then, based on the user’s authorities, the app decides whether to allow the call.
__1. hasAuthority() method
hasAuthority('WRITE') – Stipulates that the user needs the WRITE authority to call the endpoint.
1 2 3 4 5 6 7 8 | |
__2. hasAnyAuthority() method
hasAnyAuthority('READ', 'WRITE')–Specifies that the user needs one of either the READ or WRITE authorities. With this expression, you can enumerate all the authorities for which you want to allow access.
1 2 3 | |
__3. access() method
To specify access based on user authorities, the third way you find in practice is the access() method. The access() method is more general, however. It receives as a parameter a Spring expression (SpEL) that specifies the authorization condition. This method is powerful, and it doesn’t refer only to authorities. However, this method also makes the code more difficult to read and understand. For this reason, I recommend it as the last option, and only if you can’t apply one of the hasAuthority() or hasAnyAuthority() methods presented earlier.
1 2 3 | |
1 2 3 4 5 | |
Restricting access for all endpoints based on user roles
- Roles are coarse grained. Each user with a specific role can only do the actions granted by that role. When applying this philosophy in authorization, a request is allowed based on the purpose of the user in the system. Only users who have a specific role can call a certain endpoint.
- Imagine, in your application, a user can either only have read authority or have all: read, write, and delete authorities. In this case, it might be more comfortable to think that those users who can only read have a role named READER, while the others have the role ADMIN. Having the ADMIN role means that the application grants you read, write, update, and delete privileges.
- Roles are represented using the same contract in Spring Security
GrantedAuthority. When defining a role, its name should start with theROLE_prefix. At the implementation level, this prefix specifies the difference between a role and an authority.
1 2 3 4 5 6 7 8 9 | |
To set constraints for user roles, you can use one of the following methods:
hasRole()–Receives as a parameter the role name for which the application authorizes the request.hasAnyRole()–Receives as parameters the role names for which the application approves the request.access()–Uses a Spring expression to specify the role or roles for which the application authorizes requests. In terms of roles, you could usehasRole()orhasAnyRole()as SpEL expressions.
1 2 | |
When building users with the User builder class as we did in the example for this section, you specify the role by using the roles() method. This method creates the GrantedAuthority object and automatically adds the ROLE_ prefix to the names you provide.
Make sure the parameter you provide for the
roles()method DOES NOT include theROLE_prefix. If that prefix is inadvertently included in therole()parameter, the method throws an exception. In short, when using theauthorities()method, include theROLE_prefix. When using theroles()method, do not include theROLE_prefix.
Important to remember that the access() method is generic. For example, to configure access to the endpoint to be allowed only after 12:00 pm, you can use the following SpEL expression:
1
| |
Restricting access to all endpoints
1 2 | |
Configuring authorization: Applying restrictions
Using matcher methods to select endpoints
- We use matcher methods to choose the requests to which we apply authorization configuration.
- Requests can be selected by path, by HTTP method or both.
- Spring Security offers you three types of matcher methods:
- MVC matchers–You use MVC expressions for paths to select endpoints.
- Ant matchers–You use Ant expressions for paths to select endpoints.
- regex matchers–You use regular expressions (regex) for paths to select endpoints.
MVC matchers
- We create an application that exposes two endpoints:
/helloand/ciao. We want to make sure that only users having the ADMIN role can call the/helloendpoint. Similarly, we want to make sure that only users having the MANAGER role can call the/ciaoendpoint. - To specify that only users having the ADMIN role can call the endpoint
/hellowhen authorizing requests, we use themvcMatchers()method.
1 2 3 4 5 6 7 8 | |
If you now add any other endpoint to your application, it is accessible by default to anyone, even unauthenticated users.
The permitAll() method states that all other requests are allowed without authentication.
When you use matchers to refer to requests, the order of the rules should be from particular to general. This is why the
anyRequest()method cannot be called before a more specific matcher method likemvcMatchers().
1 2 3 4 5 6 7 8 9 | |
If you have designed an endpoint to be accessible to anyone, you can call it without providing a username and a password for authentication. In this case, Spring Security won’t do the authentication. If you, however, provide a username and a password, Spring Security evaluates them in the authentication process. If they are wrong (not known by the system), authentication fails, and the response status will be 401 Unauthorized. To be more precise, if you call the /hola endpoint for the configuration presented in listing 8.4, the app returns the body “Hola!” as expected, and the response status is 200 OK.
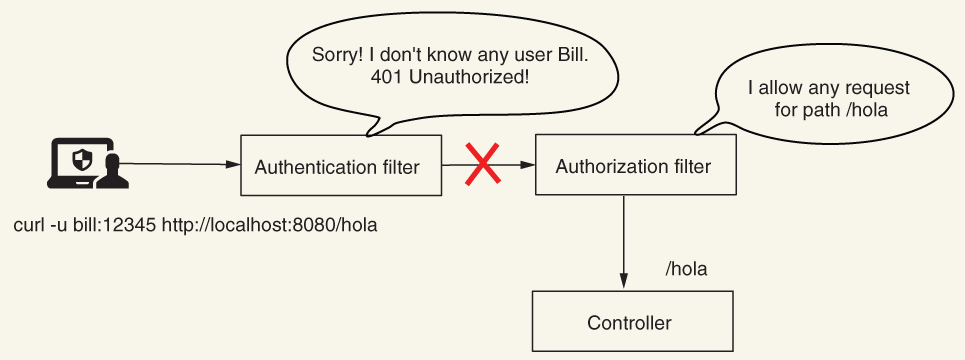
The authorization filter allows any request to the /hola path. But because the application first executes the authentication logic, the request is never forwarded to the authorization filter. Instead, the authentication filter replies with an HTTP 401 Unauthorized.
The permitAll() method refers to authorization configuration only, and if authentication fails, the call will not be allowed further.
To make all the other endpoints accessible only for authenticated users. To do this, you would change the permitAll() method with authenticated() as presented in the following listing. Similarly, you could even deny all other requests by using the denyAll() method.
1 2 3 4 5 6 7 8 9 10 | |
Multiple endpoints can have the same authorization rules, so you don’t have to set them up endpoint by endpoint
Selecting requests for authorization using MVC matchers
This matcher uses the standard MVC syntax for referring to paths. This syntax is the same one you use when writing endpoint mappings with annotations like @RequestMapping, @GetMapping, @PostMapping, and so forth. The two methods you can use to declare MVC matchers are as follows:
mvcMatchers(HttpMethod method, String... patterns)–Lets you specify both the HTTP method to which the restrictions apply and the paths. This method is useful if you want to apply different restrictions for different HTTP methods for the same path.mvcMatchers(String... patterns)–Simpler and easier to use if you only need to apply authorization restrictions based on paths. The restrictions can automatically apply to any HTTP method used with the path.
Spring Security applies, by default, protection against cross-site request forgery (CSRF).
1 2 3 4 5 6 7 8 9 | |
For the current project, we want to ensure that the same rules apply for all requests for paths starting with /a/b. These paths in our case are /a/b and /a/b/c. To achieve this, we use the ** operator. (Spring MVC borrows the path-matching syntaxes from Ant.)
1 2 3 4 5 | |
The ** operator refers to any number of pathnames. You can use it as we have done in the last example so that you can match requests with paths having a known prefix. You can also use it in the middle of a path to refer to any number of pathnames or to refer to paths ending in a specific pattern like /a/**/c. Therefore, /a/**/c would not only match /a/b/c but also /a/b/d/c and a/b/c/d/e/c and so on. If you only want to match one pathname, then you can use a single *. For example, a/*/c would match a/b/c and a/d/c but not a/b/d/c.
1 2 3 4 5 | |
Common expressions used for path matching with MVC matchers
| Expression | Description |
/a |
Only path /a. |
/a/* |
The * operator replaces one pathname. In this case, it matches /a/b or /a/c, but not /a/b/c. |
/a/** |
The ** operator replaces multiple pathnames. In this case, /a as well as /a/b and /a/b/c are a match for this expression. |
/a/{param} |
This expression applies to the path /a with a given path parameter. |
/a/{param:regex} |
This expression applies to the path /a with a given path parameter only when the value of the parameter matches the given regular expression. |
Ant matchers
The Ant matchers apply exactly the given Ant expressions for patterns but know nothing about subtle Spring MVC functionality. In this case, /hello doesn’t apply as an Ant expression to the /hello/ path. If you also want to secure the /hello/ path, you have to individually add it or write an Ant expression that matches it as well.
1 2 | |
Implementing filters
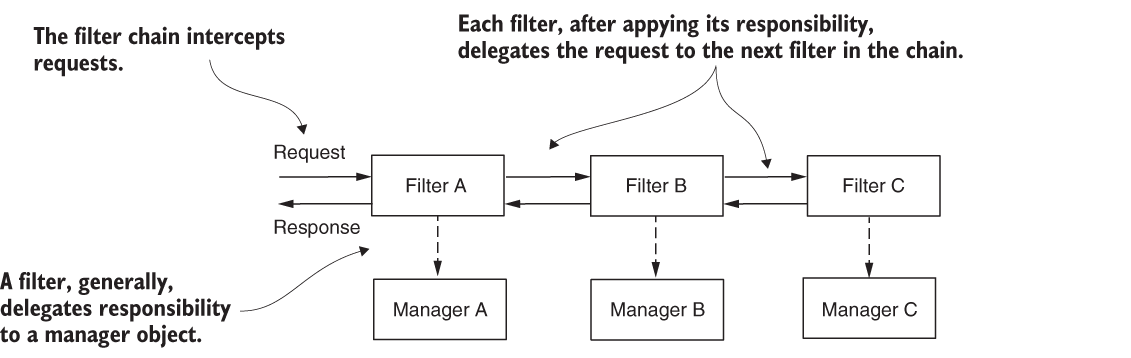
- In Spring Security, in general, HTTP filters manage each responsibility that must be applied to the request. The filters form a chain of responsibilities.
- The filter chain receives the request. Each filter uses a manager to apply specific logic to the request and, eventually, delegates the request further along the chain to the next filter.
- Spring Security provides filter implementations that you add to the filter chain through customization, but you can also define custom filters.
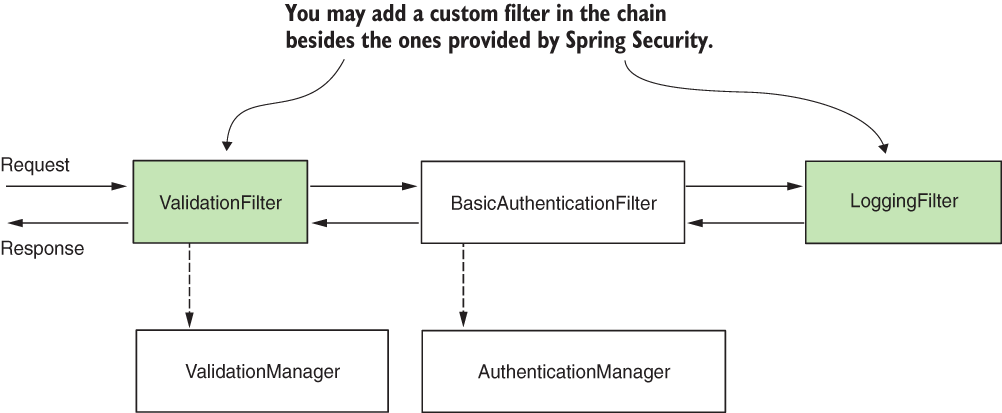
You can customize the filter chain by adding new filters before, after, or at the position of existing ones. This way, you can customize authentication as well as the entire process applied to request and response.
- Custom filters can created by implementing the
javax.servlet.Filterpackage. - Default implementations from Spring Security:
BasicAuthenticationFiltertakes care of HTTP Basic authentication, if present.CsrfFiltertakes care of cross-site request forgery (CSRF) protection.CorsFiltertakes care of cross-origin resource sharing (CORS) authorization rules,
- Call to the
httpBasic()method, an instance of theBasicAuthenticationFilteris added to the chain. - Each filter has an order number. This determines the order in which filters are applied to a request. You can add custom filters along with the filters provided by Spring Security.
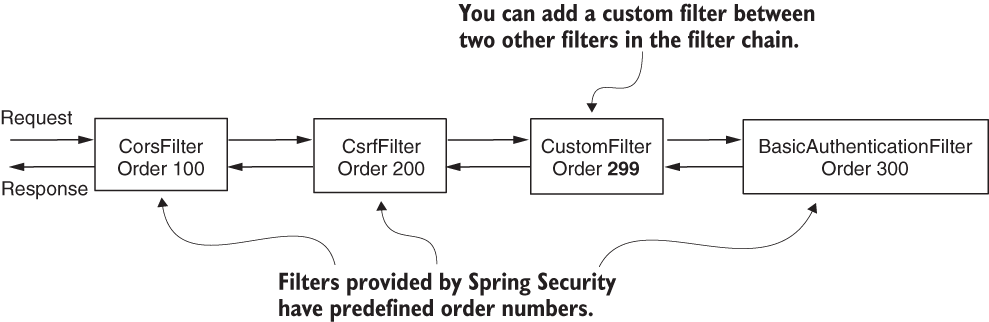
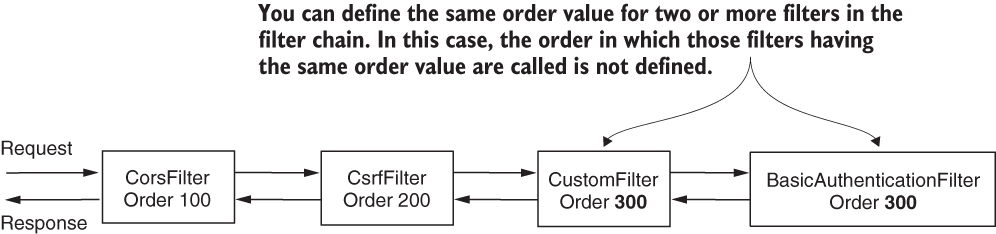
- If multiple filters have the same position, the order in which they are called is not defined.
Adding a filter before an existing one in chain
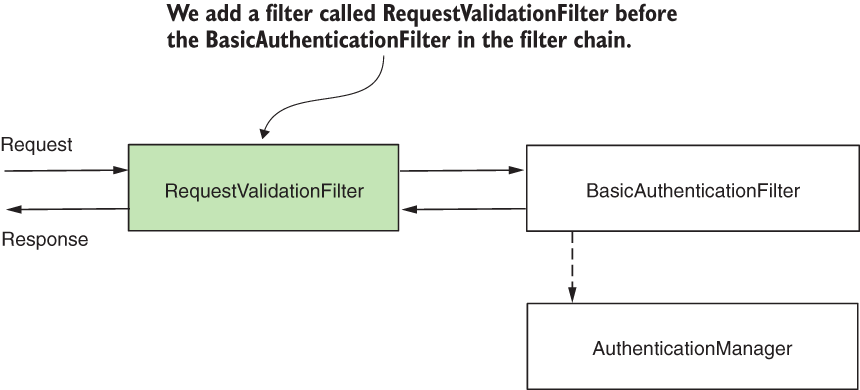
- For our example, we add a
RequestValidationFilter, which acts before the authentication filter. TheRequestValidationFilterensures that authentication doesn’t happen if the validation of the request fails. - In our case, the request must have a mandatory header named
RequestId. If the header doesn’t exist, we set an HTTP status 400 Bad Request on the response without forwarding it to the next filter in the chain.
1 2 3 4 5 6 7 8 9 10 11 12 13 14 15 16 | |
1 2 3 4 5 6 7 8 9 10 11 12 | |
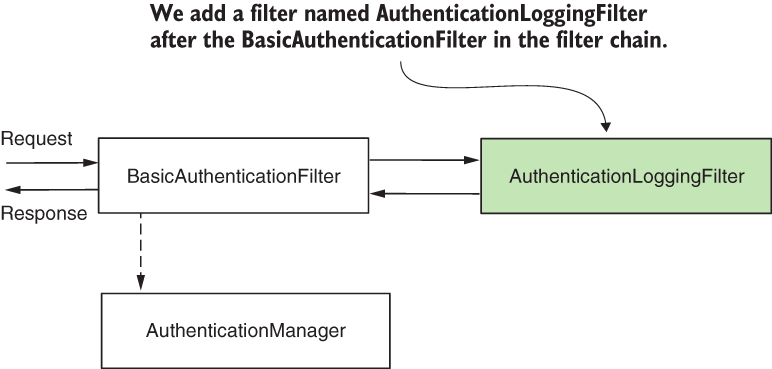
Adding a filter after an existing one in chain
1 2 3 4 5 6 7 8 9 10 11 12 13 14 15 | |
Adding a filter at the location of another in the chain
- In this section, we discuss adding a filter at the location of another one in the filter chain. You use this approach especially when providing a different implementation for a responsibility that is already assumed by one of the filters known by Spring Security.
- A typical scenario is replacing HTTP Basic authentication flow in following scenarios:
- Identification based on a static header value for authentication
- Using a symmetric key to sign the request for authentication
- Using a one-time password (OTP) in the authentication process
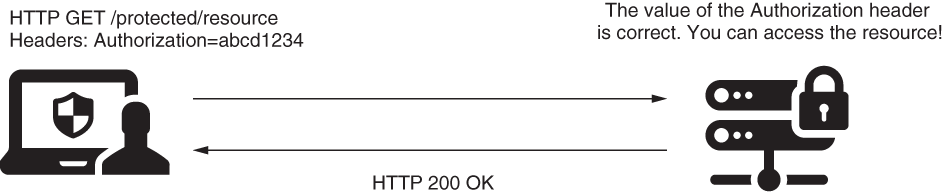
1. Identification based on a static header value for authentication
- This approach offers weak security related to authentication, but architects and developers often choose it in calls between backend applications for its simplicity.
- The request contains a header with the value of the static key. If this value matches the one known by the application, it accepts the request.
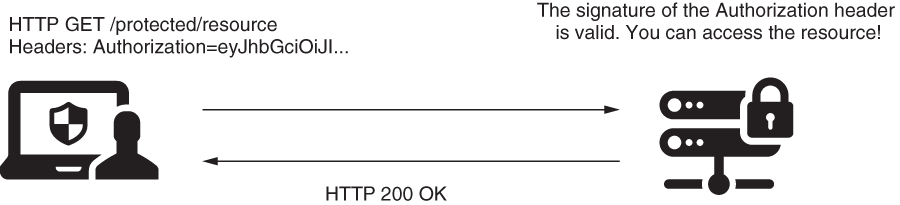
2. Using a symmetric key to sign the request for authentication
- In this scenario, using symmetric keys to sign and validate requests, both client and server know the value of a key (client and server share the key). The client uses this key to sign a part of the request (for example, to sign the value of specific headers), and the server checks if the signature is valid using the same key . The server can store individual keys for each client in a database or a secrets vault. Similarly, you can use a pair of asymmetric keys.
- The Authorization header contains a value signed with a key known by both client and server (or a private key for which the server has the public pair). The application checks the signature and, if correct, allows the request.
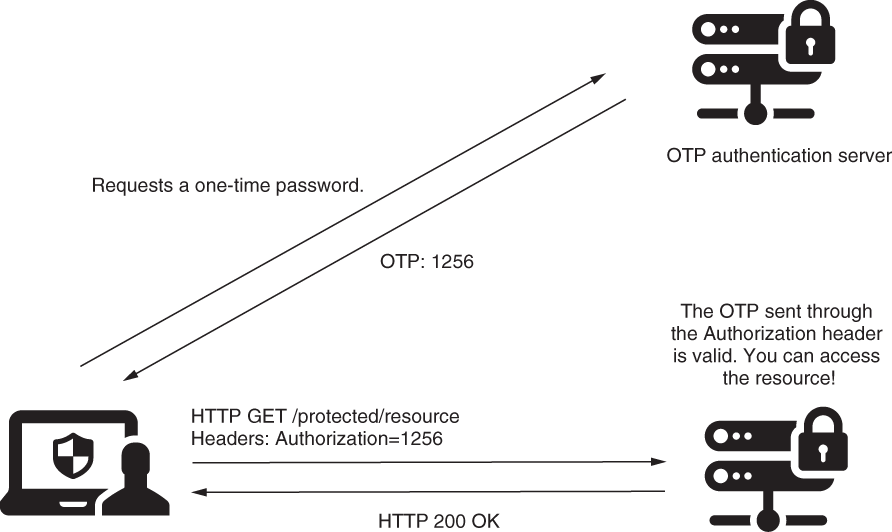
3. Using a one-time password (OTP) in the authentication process
- And finally, using an OTP in the authentication process, the user receives the OTP via a message or by using an authentication provider app like Google Authenticator.
- To access the resource, the client has to use a one-time password (OTP). The client obtains the OTP from a third-party authentication server. Generally, applications use this approach during login when multifactor authentication is required.
1 2 3 4 5 6 7 8 9 10 11 12 13 14 15 16 17 18 19 20 21 22 | |
1 2 3 4 5 6 7 8 9 10 11 12 13 | |
- When
UserDetailsServiceis not defined, Spring Boot automatically configures one. But in our scenario, we don’t need aUserDetailsServiceat all because the concept of the user doesn’t exist. We only validate that the user requesting to call an endpoint on the server knows a given value. Application scenarios are not usually this simple and often require aUserDetailsService. But, if you anticipate or have such a case where this component is not needed, you can disable autoconfiguration.
1
| |
Filter implementations from Spring Security
- Spring Security offers a few abstract classes that implement the
Filterinterface and for which you can extend your filter definitions. - For example, you could extend the
GenericFilterBeanclass, which allows you to use initialization parameters that you would define in aweb.xmldescriptor file where applicable. - A more useful class that extends the
GenericFilterBeanisOncePerRequestFilter. When adding a filter to the chain, the framework doesn’t guarantee it will be called only once per request.OncePerRequestFilter, as the name suggests, implements logic to make sure that the filter’sdoFilter()method is executed only one time per request.
Applying CSRF
- CSRF (Cross-site request forgery) protection, which is enabled by default in Spring Security
- How CSRF works?
- CSRF attacks assume that a user is logged into a web application. They’re tricked by the attacker into opening a page that contains scripts that execute actions in the same application the user was working on. Because the user has already logged in (as we’ve assumed from the beginning), the forgery code can now impersonate the user and do actions on their behalf.
- How do we protect our users from such scenarios?
- What CSRF protection wants to ensure is that only the frontend of web applications can perform mutating operations (by convention, HTTP methods other than GET, HEAD, TRACE, or OPTIONS). Then, a foreign page, like the one in our example, can’t act on behalf of the user.
- How can we achieve this?
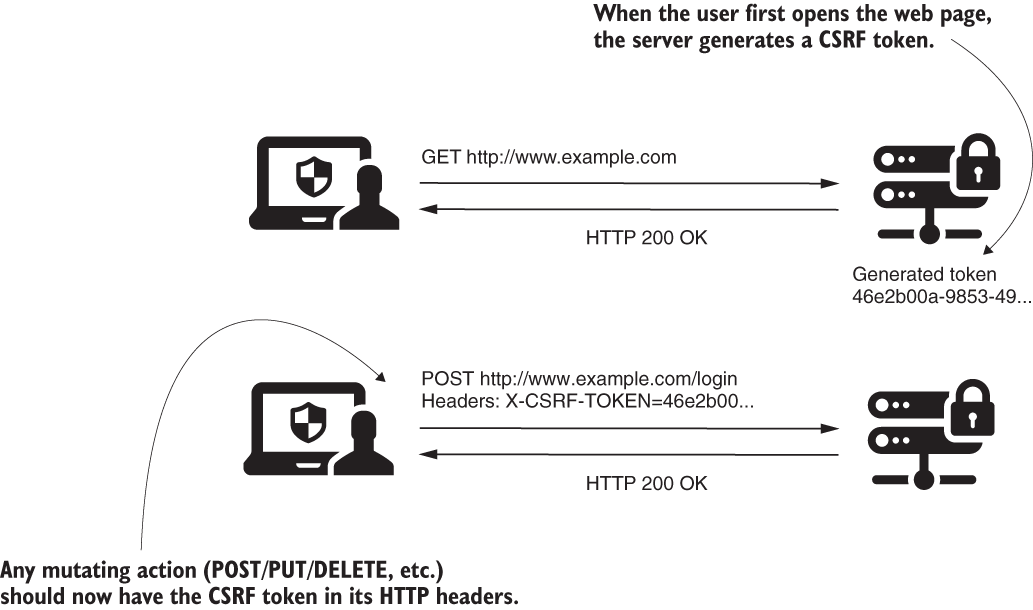
- What you know for sure is that before being able to do any action that could change data, a user must send a request using HTTP GET to see the web page at least once. When this happens, the application generates a unique token.
- The application now accepts only requests for mutating operations (POST, PUT, DELETE, and so forth) that contain this unique value in the header. The application considers that knowing the value of the token is proof that it is the app itself making the mutating request and not another system.
- Any page containing mutating calls, like POST, PUT, DELETE, and so on, should receive through the response the CSRF token, and the page must use this token when making mutating calls.
- Spring Security CsrfFilter
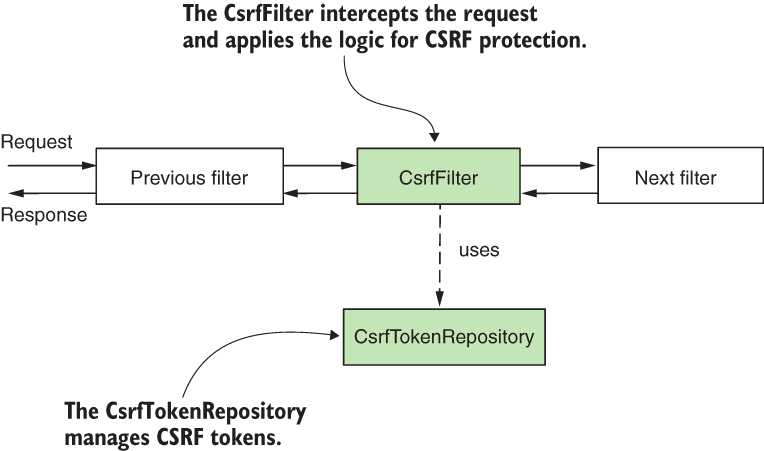
- The starting point of CSRF protection is a filter in the filter chain called
CsrfFilter. - The
CsrfFilterintercepts requests and allows all those that use these HTTP methods: GET, HEAD, TRACE, and OPTIONS. - For all other requests, the filter expects to receive a header containing a token. If this header does not exist or contains an incorrect token value, the application rejects the request and sets the status of the response to HTTP 403 Forbidden.
- The starting point of CSRF protection is a filter in the filter chain called
- What is this token, and where does it come from?
- These tokens are nothing more than string values. You have to add the token in the header of the request when you use any method other than GET, HEAD, TRACE, or OPTIONS. If you don’t add the header containing the token, the application doesn’t accept the request.
- The
CsrfFilteruses a component namedCsrfTokenRepositoryto manage the CSRF token values that generate new tokens, store tokens, and eventually invalidate these. - By default, the
CsrfTokenRepositorystores the token on the HTTP session and generates the tokens as random universally unique identifiers (UUIDs).
Adding the CsrfTokenLogger (shaded) after the CsrfFilter. This way, the CsrfTokenLogger can obtain the value of the token from the _csrf attribute of the request where the CsrfFilter stores it. The CsrfTokenLogger prints the CSRF token in the application console, where we can access it and use it to call an endpoint with the HTTP POST method.
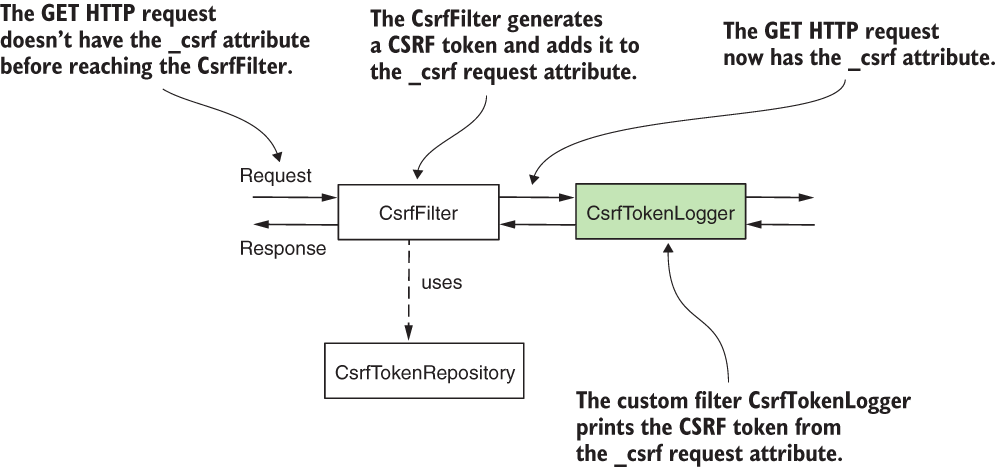
While calling the POST endpoint you also need to specify the session ID (JSESSIONID) because the default implementation of CsrfTokenRepository stores the value of the CSRF token on the session
1 2 3 | |
- You use CSRF protection for web apps running in a browser, where you should expect that mutating operations can be done by the browser that loads the displayed content of the app.
- Did you notice that the login operation in that application used HTTP POST? Then why didn’t we need to do anything explicitly about CSRF in that case? The reason why we didn’t observe this was because we didn’t develop any mutating operation within it ourselves.
- For the default login, Spring Security correctly applies CSRF protection for us. The framework takes care of adding the CSRF token to the login request.
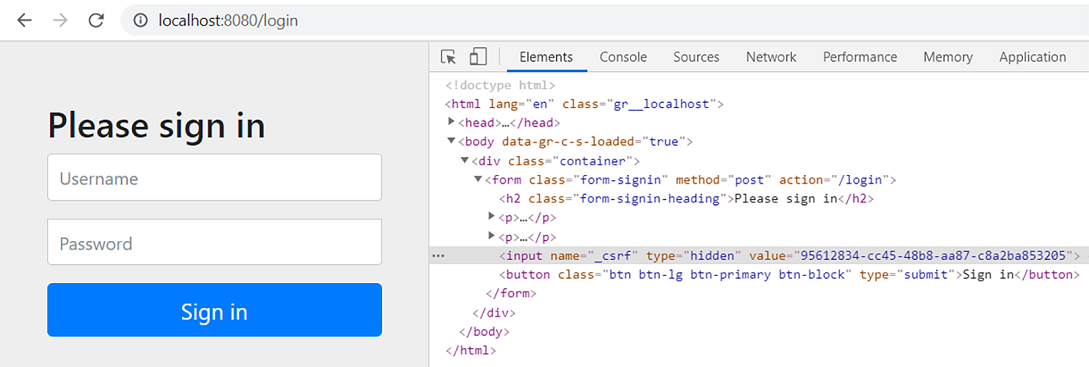
- After running the application, you can access the default login page. If you inspect the form using the inspect element function of your browser, you can observe that the default implementation of the login form sends the CSRF token. This is why your login works with CSRF protection enabled even if it uses an HTTP POST request
- The default form login uses a hidden input to send the CSRF token in the request. This is why the login request that uses an HTTP POST method works with CSRF protection enabled.
- For any action or asynchronous JavaScript request your page uses to call a mutable action, you need to send a valid CSRF token. This is the most common way used by an application to make sure the request doesn’t come from a third party. A third-party request could try to impersonate the user to execute actions on their behalf.
Downsides of CSRF tokens
- CSRF tokens work well in an architecture where the same server is responsible for both the frontend and the backend, mainly for its simplicity. But CSRF tokens don’t work well when the client is independent of the backend solution it consumes. This scenario happens when you have a mobile application as a client or a web frontend developed independently (Angular, ReactJS, or Vue.js). This is why you need to know how to implement the security approach for these cases as well.
Disabling CSRF for endpoints
- By default, CSRF protection applies to any path for endpoints called with HTTP methods other than GET, HEAD, TRACE, or OPTIONS
- CSRF can be disabled for certain endpoints only as follows:
- Ant Expressions
- Calling the
ignoringAntMatchers(String paths)method, you can specify the Ant expressions representing the paths that you want to exclude from the CSRF protection mechanism.
- Calling the
- MVC Expressions
- A more general approach is to use a
RequestMatcher. Using this allows you to apply the exclusion rules with regular MVC expressions as well as with regexes (regular expressions).
- A more general approach is to use a
- Ant Expressions
1 2 3 | |
1 2 3 | |
1 2 3 4 | |
Customizing CSRF
- Another need often found in the requirements of the application is customizing the management of CSRF tokens.
- By default, the application stores CSRF tokens in the HTTP session on the server side. This simple approach is suitable for small applications, but it’s not great for applications that serve a large number of requests and that require horizontal scaling. The HTTP session is stateful and reduces the scalability of the application.
- Spring Security offers two contracts that you need to implement to do this:
CsrfToken–Describes the CSRF token itselfCsrfTokenRepository–Describes the object that creates, stores, and loads CSRF tokens
1 2 3 4 5 6 | |
DefaultCsrfTokenimplements theCsrfTokencontract and creates immutable instances containing the required values: the name of the request attribute and header, and the token itself.- Example
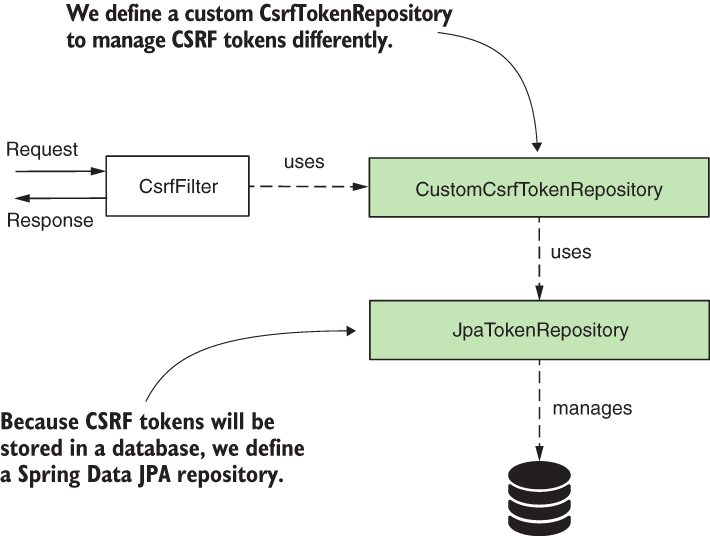
- The
CsrfTokenuses a custom implementation ofCsrfTokenRepository. This custom implementation uses aJpaRepositoryto manage CSRF tokens in a database. - Approach 1: Tokens associated to userId: In our example, we use a table in a database to store CSRF tokens. We assume the client has an ID to identify themselves uniquely. The application needs this identifier to obtain the CSRF token and validate it. Generally, this unique ID would be obtained during login and should be different each time the user logs in. This strategy of managing tokens is similar to storing them in memory. In this case, you use a session ID. So the new identifier for this example merely replaces the session ID.
- Approach 2: With token expiry: An alternative to this approach would be to use CSRF tokens with a defined lifetime. With such an approach, tokens expire after a time you define. You can store tokens in the database without linking them to a specific user ID. You only need to check if a token provided via an HTTP request exists and is not expired to decide whether you allow that request.
- The
1 2 3 4 5 | |
Applying CORS
- Cross-origin resource sharing (CORS)
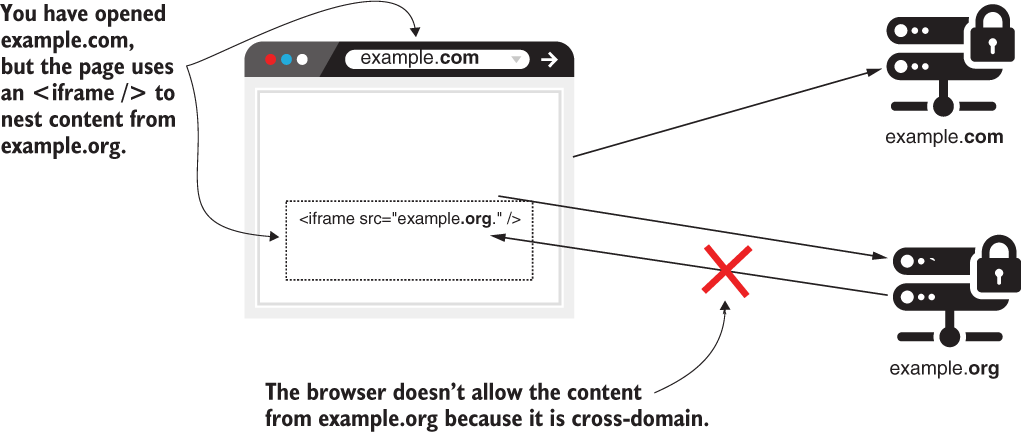
- The necessity for CORS came from web applications. By default, browsers don’t allow requests made for any domain other than the one from which the site is loaded. For example, if you access the site from
example.com, the browser won’t let the site make requests toapi.example.com.
- The necessity for CORS came from web applications. By default, browsers don’t allow requests made for any domain other than the one from which the site is loaded. For example, if you access the site from
- How CORS works?
- Even if the
example.orgpage is loaded in an iframe from theexample.comdomain, the calls from the content loaded inexample.orgwon’t load. Even if the application makes a request, the browser won’t accept the response. - Any situation in which an application makes calls between two different domains is prohibited. (even if the port numbers are different on the same host)
- Even if the
- How to resolve?
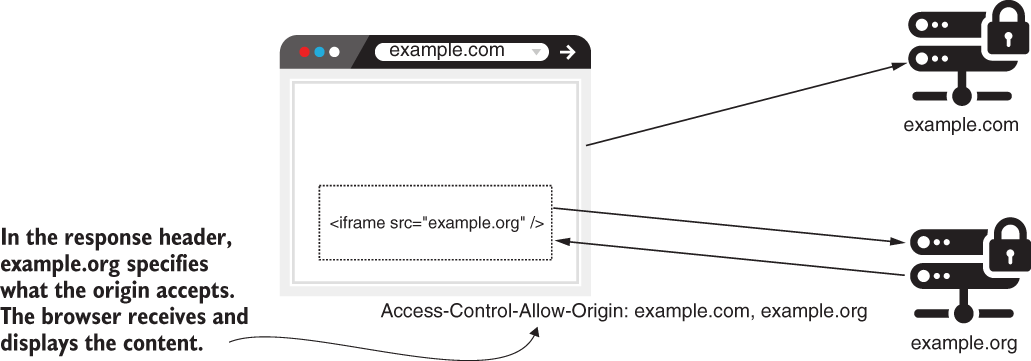
- CORS allows you to specify from which domain your application allows requests and what details can be shared. The CORS mechanism works based on HTTP headers . The most important are
Access-Control-Allow-Origin–Specifies the foreign domains (origins) that can access resources on your domain.Access-Control-Allow-Methods–Lets us refer only to some HTTP methods in situations in which we want to allow access to a different domain, but only to specific HTTP methods. You use this if you’re going to enable example.com to call some endpoint, but only with HTTP GET, for example.Access-Control-Allow-Headers–Adds limitations to which headers you can use in a specific request.
- CORS allows you to specify from which domain your application allows requests and what details can be shared. The CORS mechanism works based on HTTP headers . The most important are
- To simulate the cross-origin call, we can access the page in a browser using the domain localhost. From the JavaScript code, we make the call using the IP address 127.0.0.1. Even if localhost and 127.0.0.1 refer to the same host, the browser sees these as different strings and considers these different domains
- Pre-flight requests
- the browser first makes a call using the HTTP OPTIONS method to test whether the request should be allowed. We call this test request a preflight request. If the preflight request fails, the browser won’t attempt to honor the original request.
- The preflight request and the decision to make it or not are the responsibility of the browser. You don’t have to implement this logic. But it is important to understand it, so you won’t be surprised to see cross-origin calls to the backend even if you did not specify any CORS policies for specific domains.
Applying CORS policies using @CrossOrigin annotation
- You can place the
@CrossOriginannotation directly above the method that defines the endpoint and configure it using the allowed origins and methods. - Allow origins: The value parameter of
@CrossOriginreceives an array to let you define multiple origins; for example,@CrossOrigin({"example.com", "example.org"}). - You can also set the allowed headers and methods using the
allowedHeadersattribute and themethodsattribute of the annotation. - For both origins and headers, you can use the asterisk (
*) to represent all headers or all origins. However, it’s always better to filter the origins and headers that you want to allow and never allow any domain to implement code that accesses your applications’ resources. By allowing all origins, you expose the application to cross-site scripting (XSS) requests, which eventually can lead to DDoS attacks
1 2 3 4 5 6 7 | |
- Pros
- The advantage of using
@CrossOriginto specify the rules directly where the endpoints are defined is that it creates good transparency of the rules.
- The advantage of using
- Cons
- The disadvantage is that it might become verbose, forcing you to repeat a lot of code. It also imposes the risk that the developer might forget to add the annotation for newly implemented endpoints.
Applying CORS using a CorsConfigurer
1 2 3 4 5 6 7 8 9 10 11 12 13 14 15 16 17 18 19 20 21 22 23 | |
References
- Book - Spring Security in Action (Manning publications)