Security
- Overview
- 1. Authentication
- 2. Authorization
- 3. Cryptography
- 4. Session Management
- Books and Trainings
- References
Overview
Application Security has 4 aspects:
- Authentication - proving user identity, often called user ‘login’.
- Authorization - access control
- Cryptography - protecting or hiding data from prying eyes
- Session Management - per-user time-sensitive state
Core Concepts

3 Main concepts in security
- Subject - “the currently executing user”. It could be more than a human user. e.g., daemon apps, 3rd party apps, etc.
- SecurityManager - manages security operations for all users
- Realm - acts the bridge/connector between the security provider and your application’’ security data like user accounts, access controls, etc.
1. Authentication
- Process of verifying a user’’ identity. Also called ‘login’ process.
Authentication Token = Principal(username) + Credential(password)- If the submitted credentials match what the system expects for that user identity (principal), the user is considered authenticated.
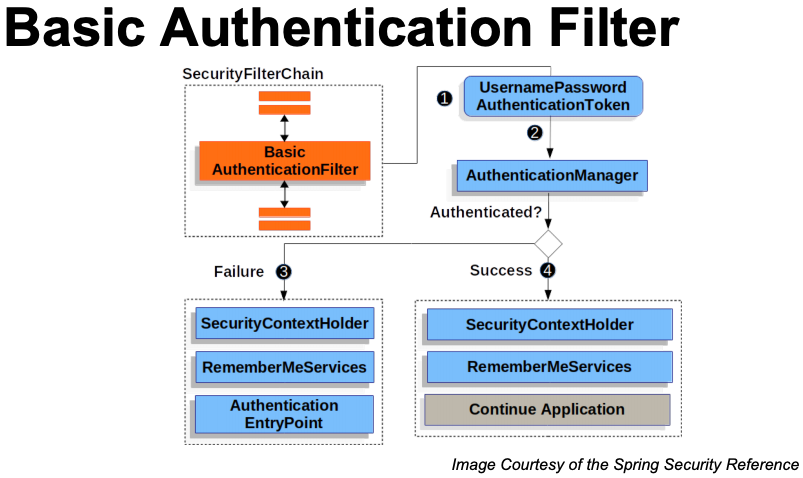
Basic Authentication
Basic authentication is the simplest protocol available for performing authentication over HTTP. It involves sending a Base64-encoded username and password within a request header to the server. With Basic authentication (with and without SSL), your name and password do get automatically Base64- encoded.
The server checks to see if the username exists within its system and verifies the sent password. The client needs to send this Authorization header with each and every request it makes to the server.
Unauthorized request
- The 401 response tells the client that it is not authorized to access the URI it tried to invoke on.
- The WWW-Authenticate header specifies which authentication protocol the client should use.
- In this case, Basic means basic authentication should be used. The realm attribute identifies a collection of secured resources on a website.
1 2 | |
Response with authorization details
- To perform authentication, the client must send a request with the Authorization header set to a Base64-encoded string of our username and a colon character, followed by the password. If our username is bburke and our password geheim, the Base64-encoded string of bburke:geheim will be
YmJ1cmtlOmdlaGVpbQ==. - The client needs to send this Authorization header with each and every request it makes to the server.
1 2 | |
Downside: The problem with this approach is that if this request is intercepted by a hostile entity on the network, the hacker can easily obtain the username and password and use it to invoke its own requests. Using an encrypted HTTP connection, HTTPS, solves this problem. With an encrypted connection, a rogue programmer on the network will be unable to decode the transmission and get at the Authorization header. Still, security-paranoid network administrators are very squeamish about sending passwords over the network, even if they are encrypted within SSL packets.
Digest Authentication
Digest authentication was invented so that clients would not have to send clear text passwords over HTTP. It involves exchanging a set of secure MD5 hashes of the username, password, operation, URI, and optionally the hash of the message body itself. It is a hash value generated with the following pseudocode:
1 2 | |
1 2 3 4 5 | |
The nonce and opaque attributes are special server-generated keys that will be used to build the subsequent authenticated request.
1 2 3 | |
- The nonce and opaque attributes are a copy of the values sent with the earlier WWWAuthenticate header.
- The uri attribute is the base URI you are invoking on.
- The nc attribute is a request counter that should be incremented by the client with each request. This prevents hostile clients from replaying a request.
- The cnonce attribute is a unique key generated by the client and can be anything the client wants.
-
The response attribute is where all the meat is. It is a hash value generated with the following pseudocode:
- When the server receives this request, it builds its own version of the response hash using its stored, secret values of the username and password. If the hashes match, the user and its credentials are valid.
1 2 3 4 5 6 7 8 9 10 | |
Pros
- The password is never used directly by the protocol. For example, the server doesn’t even need to store clear text passwords. It can instead initialize its authorization store with pre-hashed values.
- Also, since request hashes are built with a nonce value, the server can expire these nonce values over time. This, combined with a request counter, can greatly reduce replay attacks. When the server receives this request, it builds its own version of the response hash using its stored, secret values of the username and password. If the hashes match, the user and its credentials are valid.
Cons
This approach is that unless you use HTTPS, you are still vulnerable to man-in-the-middle attacks, where the middleman can tell a client to use Basic authentication to obtain a password.
X.509 certificates
- HTTPS is not only an encryption mechanism - it can also be used for authentication.
- When you first interact with a secure website, your browser receives a digitally signed certificate from the server that identifies it.
- Your browser verifies this certificate with a central authority like VeriSign. This is how you guarantee the identity of the server you are interacting with and make
- sure you’re not dealing with some man-in-the-middle security breach.
- HTTPS can also perform two-way authentication. In addition to the client receiving a signed digital certificate representing the server, the server can receive a certificate that represents and identifies the client.
- When a client initially connects to a server, it exchanges its certificate and the server matches it against its internal store.
- Once this link is established, there is no further need for user authentication, since the certificate has already positively identified the user.
SSL, or Secure Socket Layer, is a technology which allows web browsers and web servers to communicate over a secured connection. This means that the data being sent is encrypted by one side, transmitted, then decrypted by the other side before processing. This is a two-way process, meaning that both the server AND the browser encrypt all traffic before sending out data.
Another important aspect of the SSL protocol is Authentication. This means that during your initial attempt to communicate with a web server over a secure connection, that server will present your web browser with a set of credentials, in the form of a “Certificate”, as proof the site is who and what it claims to be. In certain cases, the server may also request a Certificate from your web browser, asking for proof that you are who you claim to be. This is known as “Client Authentication,” although in practice this is used more for business-to-business (B2B) transactions than with individual users. Most SSL-enabled web servers do not request Client Authentication.
Pros
Most secure way to perform authentication on web.
Cons
Managing of the certificates is painful. The server must create a unique certificate for each client that wants to connect to the service. From the browser/human perspective, this can be a pain, as the user has to do some extra configuration to interact with the server.
OpenID
- OpenID is the most common open web protocol for handling federated authentication or federated identity.
- OpenID Connect is the next-generation version of OpenID based on OAuth 2.0.
- Few other identity protocols: SAML, WS-Federation, WS-Trust, SCIM, etc.
What is Federated Authentication?
- Although many applications have their own system of accounts (including usernames and passwords), some applications rely on other services to verify the identity of users. This is called federated authentication.
- In a corporate IT environment, applications may trust on the following to authenticate users
- an Active Directory server
- a LDAP server, or
- a SAML provider
-
On the Web, applications often trust OpenID providers (such as Google or Yahoo!) to handle the authentication of users.
- eliminates the need for each web application to build its own custom authentication system, and it makes it much easier and faster for users to sign up and sign into sites around the Web.
- Comparison to OAuth2
- Passing permission to access authentication information (the user’s identity) to a site is very similar to passing along delegated access to a user’s data.
- OpenID Connect is built on top of OAuth 2.0 and is designed as a modular specification.
How OpenID Flow works?
The basic flow for OpenID Connect is:
- The application requests OAuth 2.0 authorization for one or more of the OpenID Connect scopes (
openid,profile,email,address) by redirecting the user to an identity provider. - After the user approves the OAuth authorization request, the user’s web browser is redirected back to the application using a traditional OAuth flow.
- The app makes a request to the Check ID Endpoint. This endpoint returns the user’s identity (
user_id) as well as other bits, such as theaudandstate, which must be verified by the client to ensure valid authentication. - If the client requires additional profile information about the user, such as the user’s full name, picture, and email address, the client can make requests to the UserInfo Endpoint.
ID Token
- With OpenID Connect authentication, there is an additional type of OAuth token: an ID token.
_ The ID token, or
id_token, represents the identity of the user being authenticated. This is a separate token from the access token, which is used to retrieve the user’s profile information or other user data requested during the same authorization flow. - The ID token is a JSON Web Token (JWT), which is a digitally signed and/or encrypted representation of the user’s identity asserted by the identity provider. Instead of using cryptographic operations to validate the JSON Web Token, it can be treated as an opaque string and passed to the Check ID Endpoint for interpretation. This flexibility keeps with the spirit of OAuth 2.0 and OpenID Connect being significantly easier to use than their predecessors.
Google’s OpenID Connect implementation uses the following Endpoints:
- Check ID Endpoint - https://www.googleapis.com/oauth2/v1/tokeninfo
- UserInfo Endpoint - https://www.googleapis.com/oauth2/v1/userinfo
CheckID Endpoint
1 2 | |
1 2 3 4 5 6 7 | |
If this verification is completed successfully, the user_id is known to represent the unique identifier for the authenticated user, within the scope of the issuer (iss). If storing the identifier in a user database table and multiple identity providers are supported by your application, it is recommended that both values be stored upon account creation and queried upon each subsequent authentication request.
UserInfo Endpoint
1 2 3 | |
1 2 3 4 5 6 7 8 9 10 11 12 13 | |
Security Properties
- Replay attacks occur when legitimate credentials are sent multiple times for malicious purposes.
- There are 2 main types of replay attacks we wish to prevent:
- (1) An attacker capturing a user’s OAuth credentials as they log in to a site and using them later on the same site.
- Solution: The OAuth 2.0 specification requires the OAuth endpoint and APIs to be accessed over SSL/TLS to prevent man-in-the-middle attacks, such as the first case.
- (2) A rogue application developer using the OAuth token a user was issued to log in to their malicious app in order to impersonate the user on a different legitimate app.
- Solution: To solve this, use the Check ID Endpoint to verify that the credentials issued by the OAuth provider were issued to the correct application.
- It is recommended that all developers use the Check ID Endpoint or decode the JSON Web Token to verify the asserted identity, though this is not strictly necessary in some cases when the application uses the server-side Web Application flow and the UserInfo Endpoint provides all required information.
- (1) An attacker capturing a user’s OAuth credentials as they log in to a site and using them later on the same site.
2. Authorization
Authorization is essentially access control - controlling what your users can access in your application, such as resources, web pages, etc.
Simple Access Control List (ACL)
- Roles/Users assigned with access to certain features. Users are assigned to roles. This model is not flexible since roles cannot be added dynamically
- Permissions are defined for features. Users are assigned permissions. This model allows dynamic addition of users.
OAuth
OAuth 2.0 = Federated Authorization
OpenID Connect = Federated Authentication
- What is OAuth?
- OAuth is a delegated authorization protocol
- Delegated authorization is granting access to another person or application to perform actions on your behalf.
- When you drive your car to a classy hotel, they may offer valet parking. You then authorize the valet attendant to drive your car by handing him the key in order to let him perform actions on your behalf.
- OAuth works similarly—a user grants access to an application to perform actions on the user’’ behalf and the application can only perform the authorized actions.
- Benefits of OAuth?
- OAuth provides the ability to access a user’’ data securely, without handing over the account password.
- OAuth eliminates data silos
- Having a common protocol for handling API authorization greatly improves the developer experience.
- Why not basic username and password?
- user may not trust providing their credentials to your app
- username-password provides only authn, not authz
- only way a user can revoke access to your app is by changing the password
- difficult to implement stronger authentication like CAPTCHAs or multi-factor auths
- Diff b/w OAuth 1.0 and 2.0?
- OAuth 1.0
- required cryptographic signatures be sent with each API request to verify the identity and authorization of the client.
- Cons
- Cryptography is challenging for the casual developer to grasp and also challenging for even highly skilled engineers to master.
- OAuth 2.0
- eliminated the complex signature requirements and introduced the use of bearer tokens.
- Cons
- removing signatures makes it easy for developers to make mistakes and accidentally send their credentials to a malicious API endpoint, which can then abuse these credentials to make additional requests because they’re not protected by a signature.
- OAuth 1.0
- Mitigating concerns with OAuth 2.0 Bearer Tokens
- When implementing OAuth 2.0, calling any APIs, or using a library, you should verify that it properly handles SSL/TLS certificate chain validation by doing the following things:
- Checking that the hostname on the certificate returned by the server matches the hostname in the URL being accessed
- Verifying each certificate in the chain properly chains up to a valid and trusted certificate authority (CA)
- Ensuring that the certificate authority bundle on your server is secure and not able to be modified by potential attackers
- When implementing OAuth 2.0, calling any APIs, or using a library, you should verify that it properly handles SSL/TLS certificate chain validation by doing the following things:
- Tools
Roles
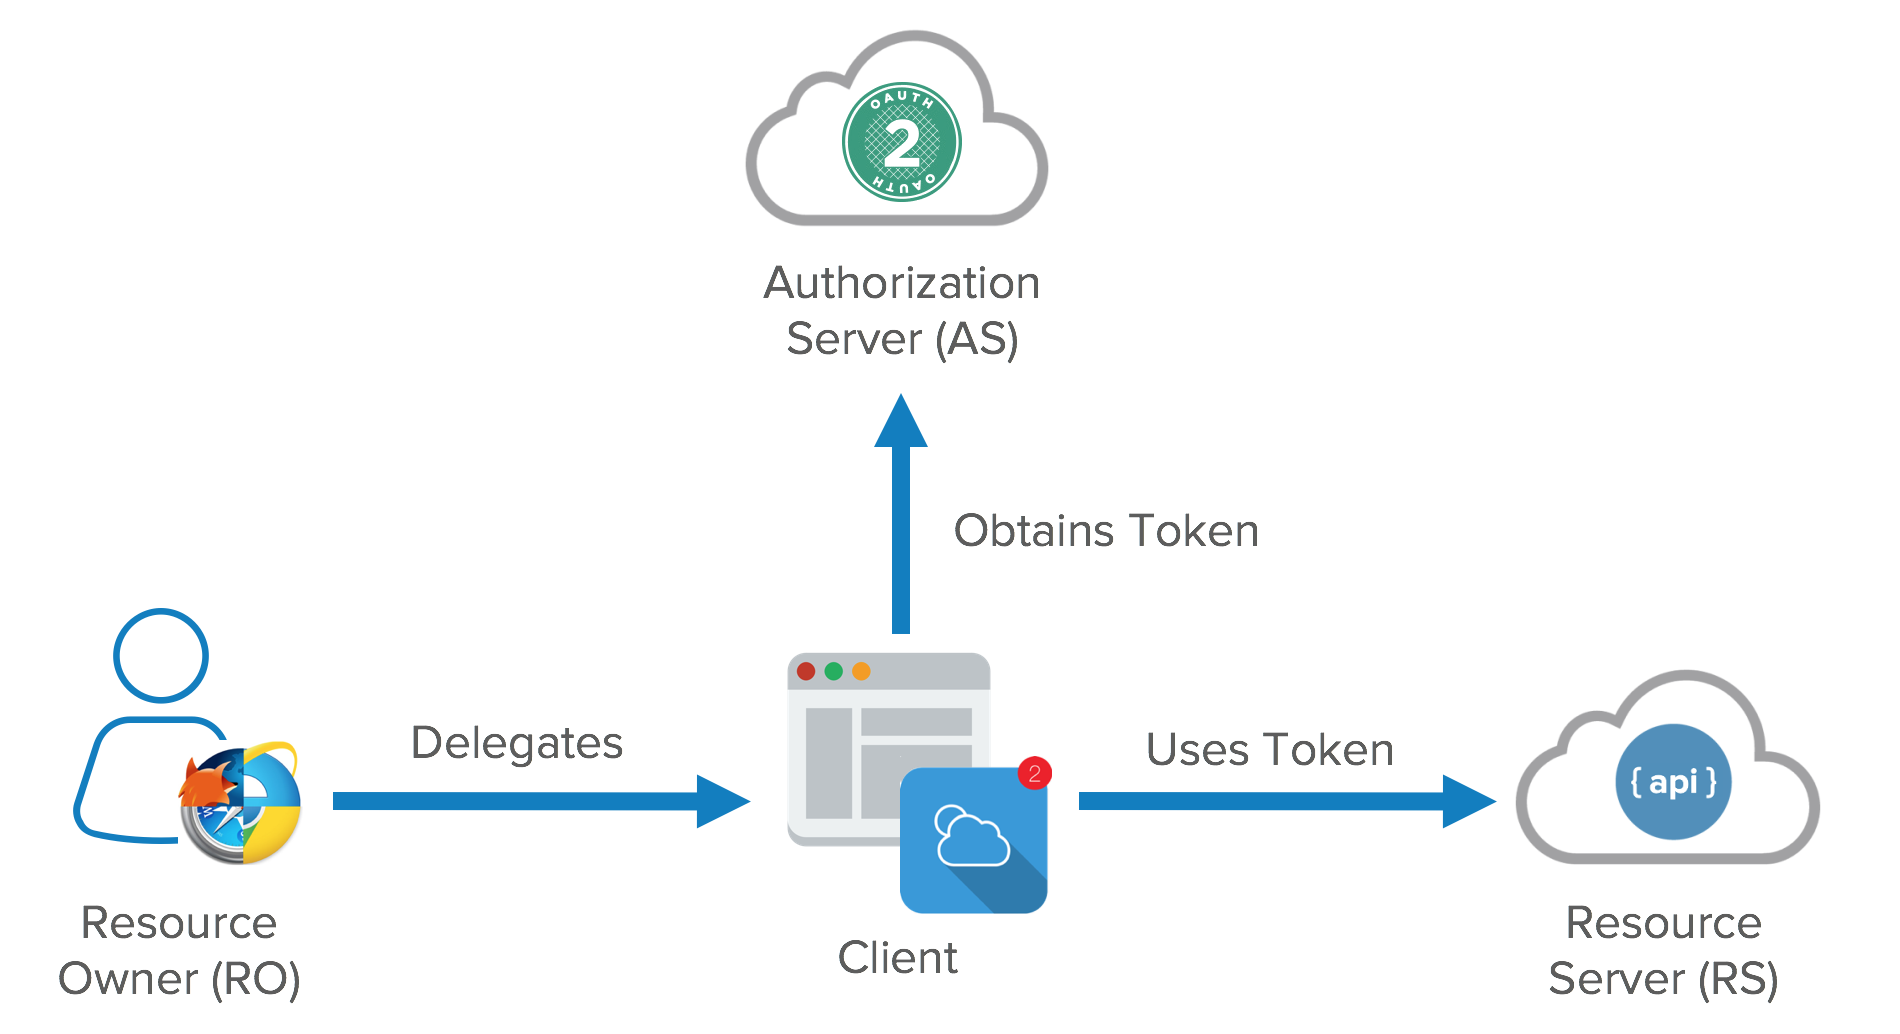
- Resource server
- The server hosting user-owned resources that are protected by OAuth. This is typically an API provider that holds and protects data such as photos, videos, calendars, or contacts. e.g., Google, Facebook, etc.
- Resource owner
- Typically the user of an application, the resource owner has the ability to grant access to their own data hosted on the resource server.
- Client
- An application making API requests to perform actions on protected resources on behalf of the resource owner and with its authorization. e.g., Quora
- Authorization server
- The authorization server gets consent from the resource owner and issues access tokens to clients for accessing protected resources hosted by a resource server. e.g., Okta, Auth0
- Smaller API providers may use the same application and URL space for both the authorization server and resource server.
Client Registration
- OAuth requires that applications register with the authorization server so that API requests are able to be properly identified. While the protocol allows for registration using automated means, most API providers require manual registration via filling out a form on their developer websites.
- After registration is complete, the developer is issued client credentials:
- Client ID - Specified as
client_idwhen interacting with the resource server - Client Secret - Specified as
client_secretwhen exchanging an authorization code for an access token and refreshing access tokens using the server-side Web Application Flow.
- Client ID - Specified as
- Why Register?
- Registration enables the application developer to obtain client credentials, which are used to authenticate requests made to the authorization server. These credentials are critical in protecting the authenticity of requests when performing operations such as exchanging authorization codes for access tokens and refreshing access tokens
- Google APIs Console
- Microsoft Windows Live application management site.
- Facebook Developers site.
Access Tokens
- OAuth 2.0 authorized APIs require only bearer tokens to make authorized requests.
- Bearer tokens are a type of access token whereby simple possession of the token values provides access to protected resources. No additional information, such as a cryptographic key, is needed to make API calls.
- The preferred method of authorizing requests is by sending the access token in a HTTP Authorization header
1 2 3 | |
Authorization Flows
OAuth2 protocol defines 4 primary “grant types” used for obtaining authorization and also defines an extension mechanism for enabling additional grant types.
Every OAuth2 grant type flow has the same goal: To obtain authorization key/access token, which represents a set of permissions, from the user, and perform something on her behalf.
Achieving this goal is a 2-part flow:
- Get Access Token: Acquire the authorization key/access token for the user from the OAuth provider, e.g., Twitter
- Use Access Token: Use the authorization key/access token to perform something by calling a protected API endpoint on behalf of the user, e.g., post a tweet
In principle, the Get Access Token flow has 5 steps (as shown in the diagram below):
- Pre-register Client (App) with OAuth Server to get Client ID/Client Secret
- OAuth Server authenticates user when she clicks on the App’s social login button, which is tagged with Client ID
- OAuth Server solicits user permission to allow the App to perform something on her behalf
- OAuth Server sends secret code to App
- App acquires Key/Access Token from OAuth Server by presenting secret code and client secret
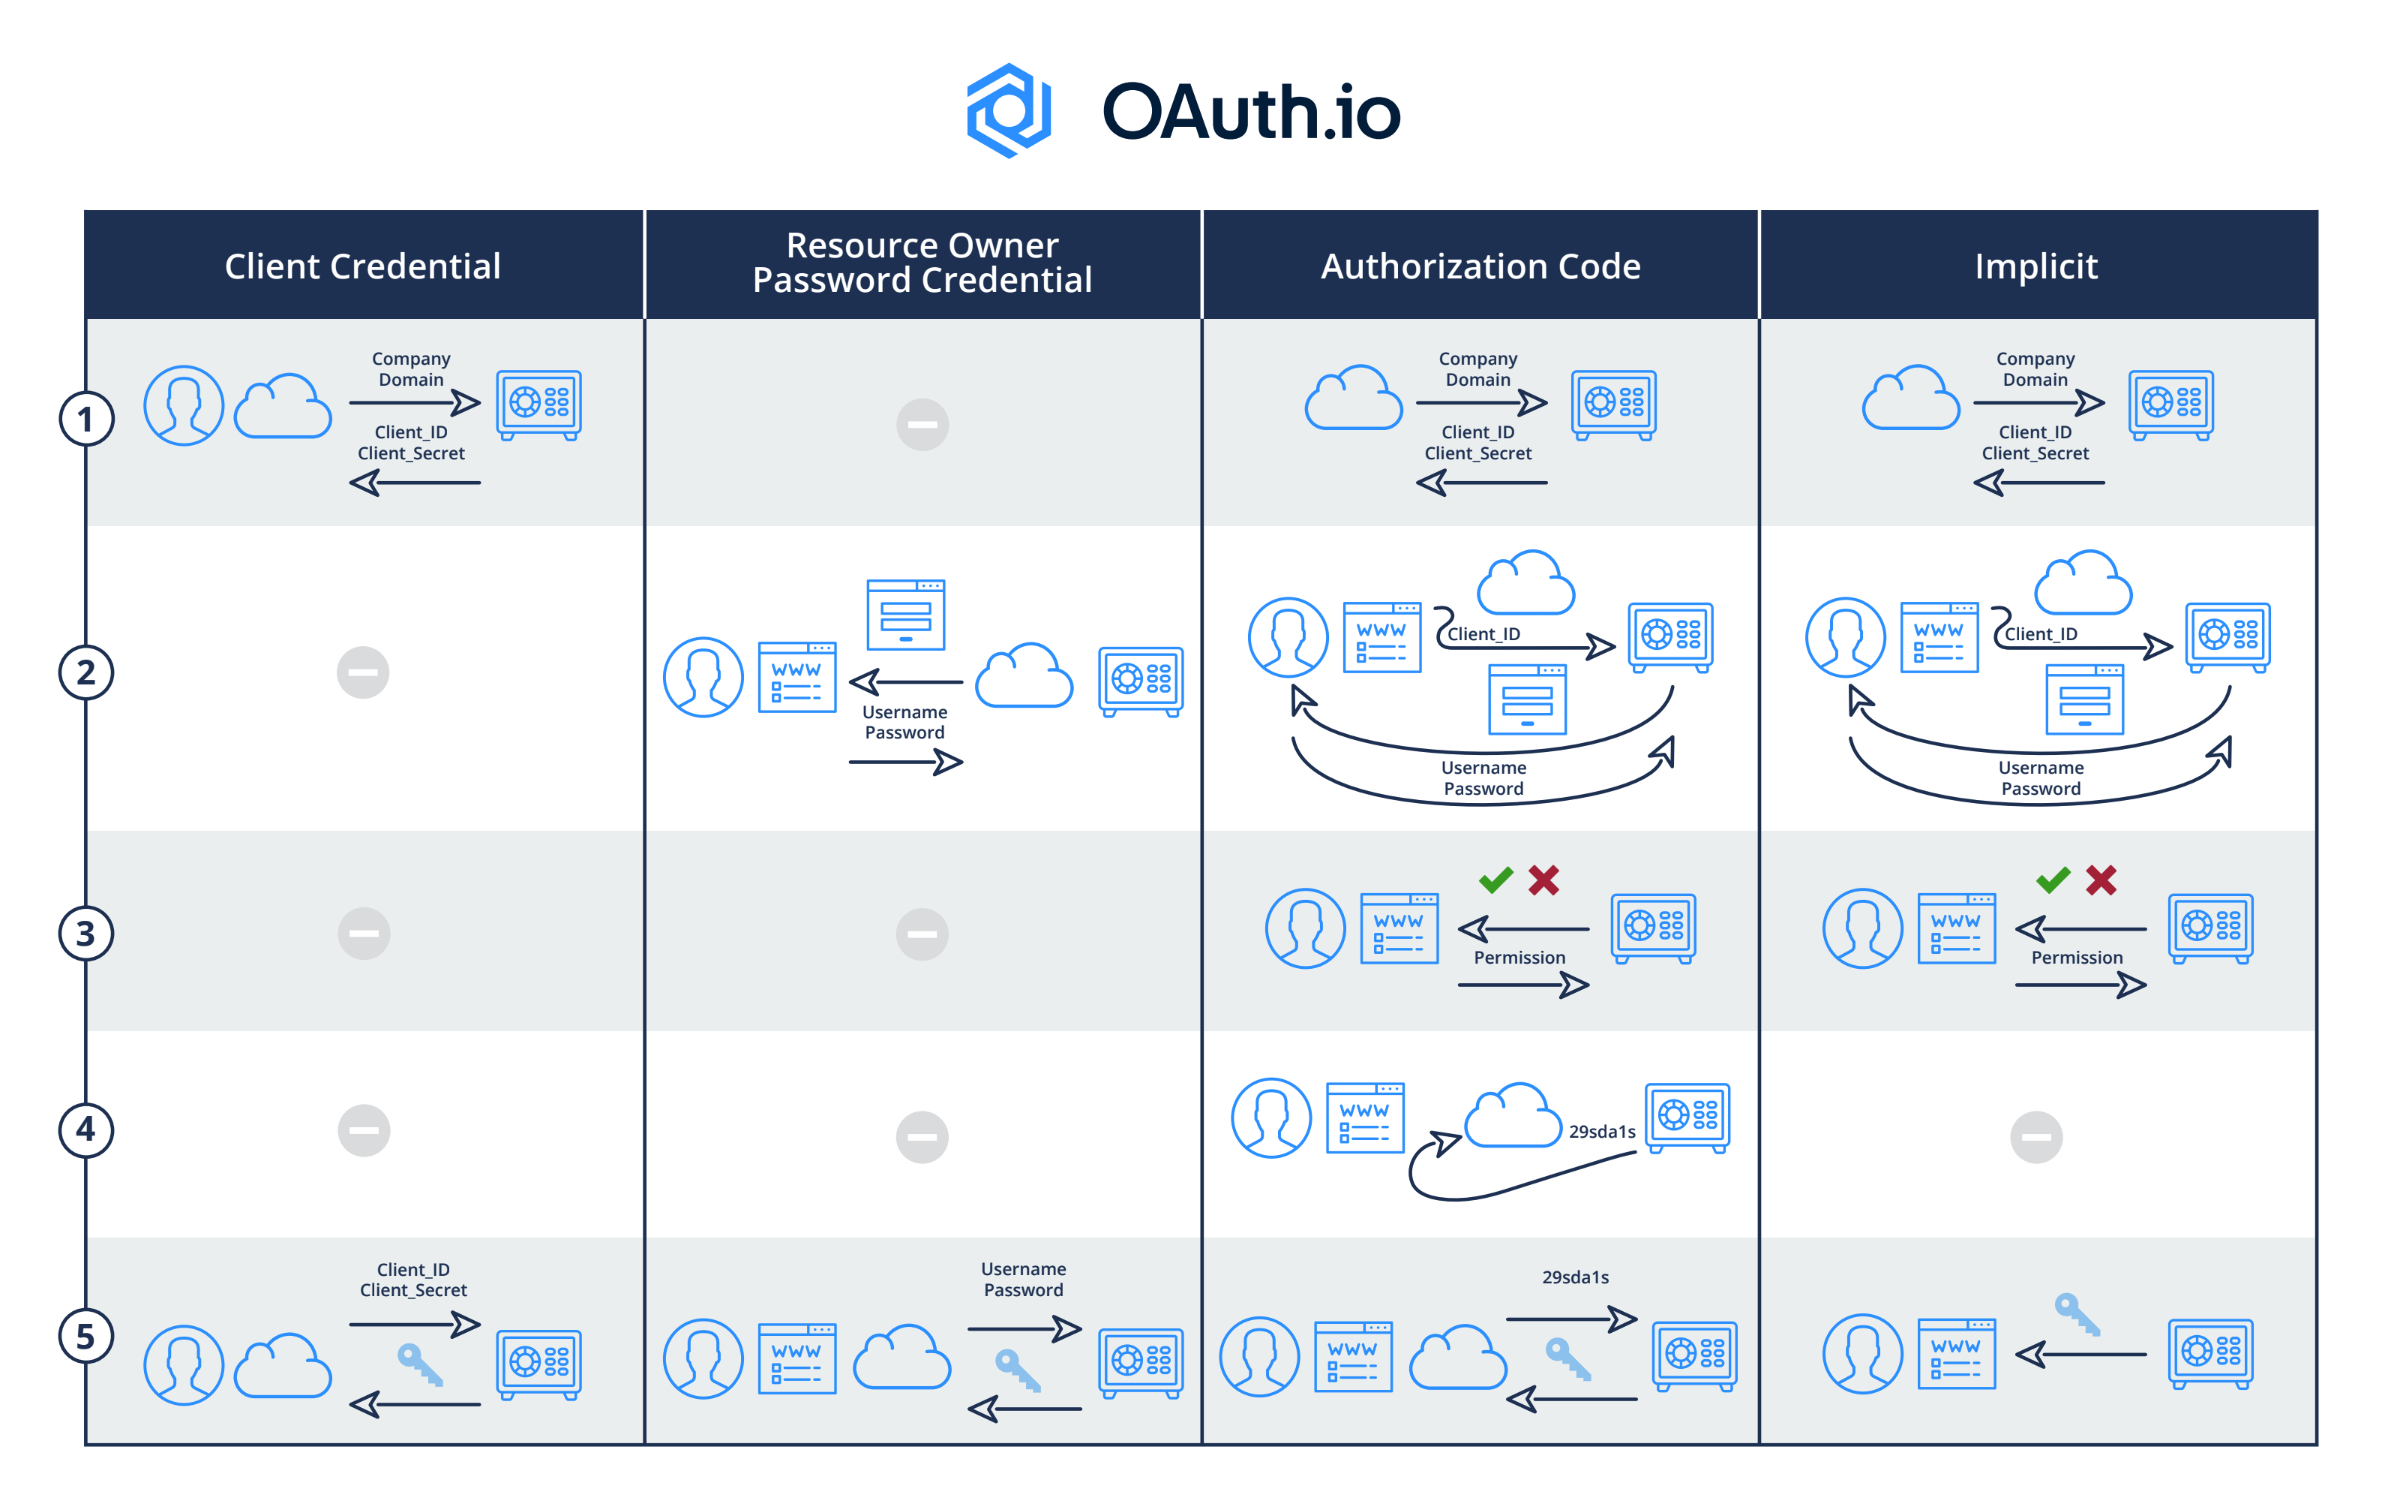
1. Authorization code
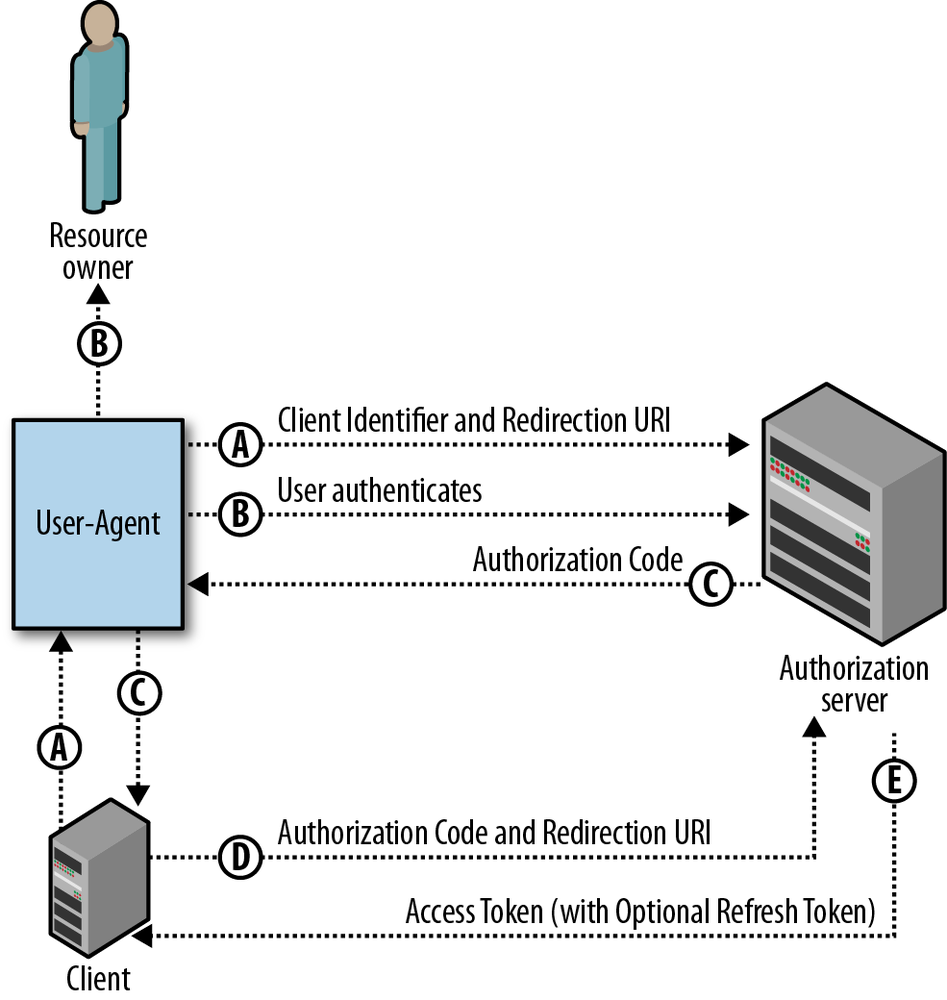
- This grant type is most appropriate for server-side web applications.
- After the resource owner has authorized access to their data, they are redirected back to the web application with an authorization code as a query parameter in the URL.
- This code must be exchanged for an access token by the client application.
- This exchange is done server-to-server and requires both the
client_idandclient_secret, preventing even the resource owner from obtaining the access token. - This grant type also allows for long-lived access to an API by using refresh tokens.
When to use it?
- Long-lived access is required.
- The OAuth client is a web application server.
- Accountability for API calls is very important and the OAuth token shouldn’t be leaked to the browser, where the user may have access to it.
Security Properties
- The Authorization Code flow does not expose the access token to the resource owner’s browser.
- The exchange process only succeeds if a correct
client_secretis passed with the request, ensuring confidentiality of the access token as long as client security is maintained. - because the access token is never sent through the browser— there is less risk that the access token will be leaked to malicious code through browser history, referer headers, JavaScript, and the like
- Although there is less chance of the access token leaking because it’s not exposed to the browser, many applications using this flow will store long-lived refresh tokens in the application’s database or key store to enable “offline” access to data. There is additional risk when an application requires long-lived offline access to data, as this creates a single point of compromise for accessing data belonging to many users.
How access is revoked?
- Applications are not usually informed when a user revokes access, and the specification does not define any way to implement a notification—the app will simply see an error the next time it attempts to use an access token or refresh the token stored for that user.
- While users can revoke their access manually, some OAuth 2.0 authorization servers also allow tokens to be revoked programmatically. This enables an application to clean up after itself and remove access it no longer needs if, for instance, the user uninstalls the app. Example:
curl "https://accounts.google.com/o/oauth2/revoke?token=ya29.AHES6ZSzF"
2. Implicit grant
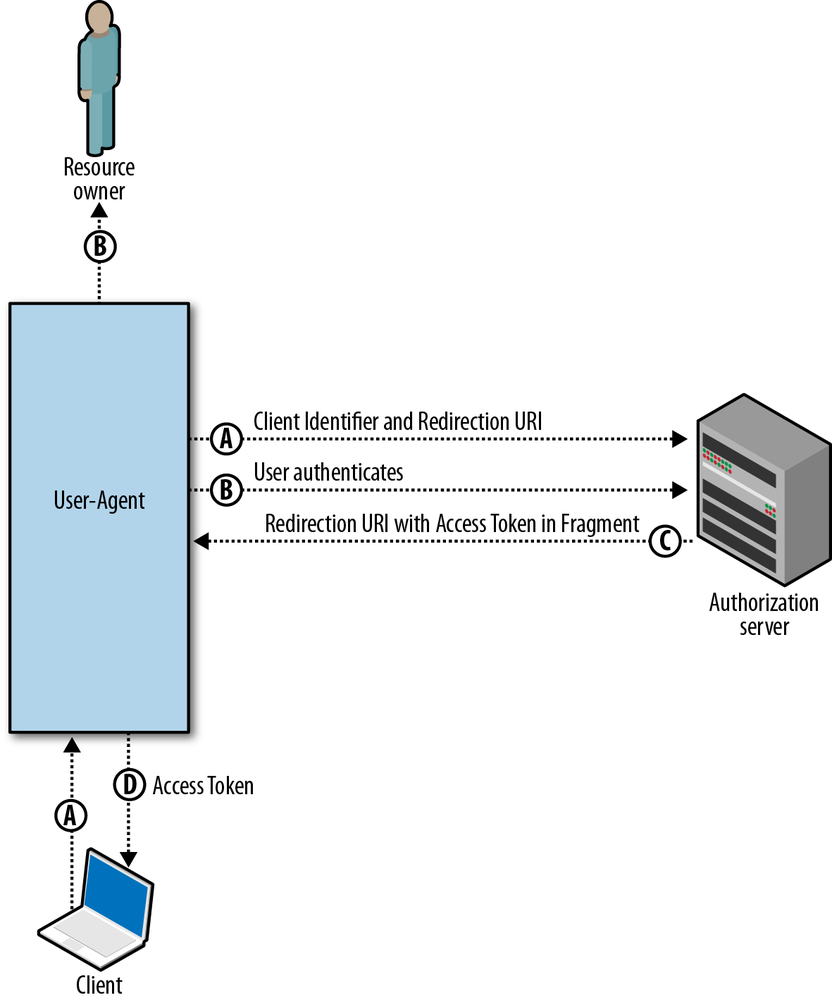
- This is the most simplistic of all flows, and is optimized for client-side web applications running in a browser.
- The resource owner grants access to the application, and a new access token is immediately minted and passed back to the application using a
#hashfragment in the URL. - The application can immediately extract the access token from the hash fragment (using JavaScript) and make API requests.
- This grant type does not require the intermediary “authorization code,” but it also doesn’t make available refresh tokens for long-lived access.
When to use it?
- Only temporary access to data is required.
- The user is regularly logged into the API provider.
- The OAuth client is running in the browser (using JavaScript, Flash, etc.).
- The browser is strongly trusted and there is limited concern that the access token will leak to untrusted users or applications.
Limitations
The Implicit Grant flow does not accommodate refresh tokens. If the Authorization server expires access tokens regularly, your application will need to run through the authorization flow whenever it needs access.
Security Properties
- In this flow, the application does not store long-lived refresh tokens on a server, limiting the exposure if the server is compromised.
- Because the access token is sent to the user’s web browser, this flow offers less accountability than the Authorization Code flow.
3. Resource owner password-based grant
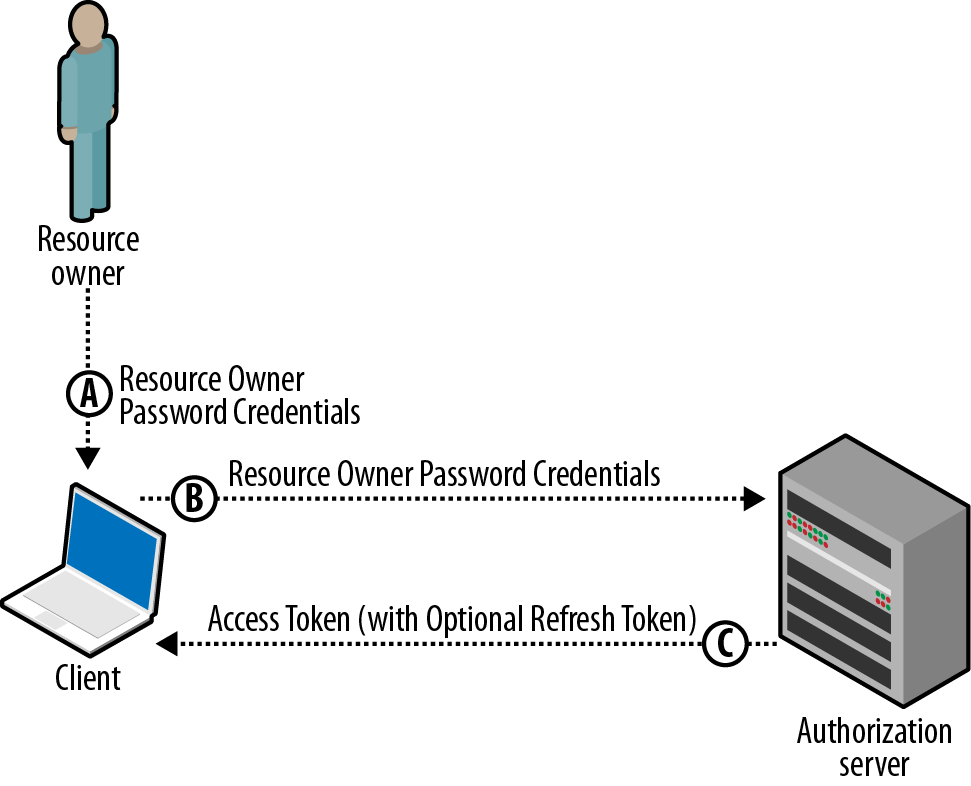
- This grant type enables a resource owner’s username and password to be exchanged for an OAuth access token.
- It is used for only highly-trusted clients, such as a mobile application written by the API provider.
- While the user’’ password is still exposed to the client, it does not need to be stored on the device.
- After the initial authentication, only the OAuth token needs to be stored. Because the password is not stored, the user can revoke access to the app without changing the password, and the token is scoped to a limited set of data, so this grant type still provides enhanced security over traditional username/password authentication.
When to use it?
It is recommended only for first-party “official” applications released by the API provider, and not opened up to wider third-party developer communities.
Security Properties
- Although the application has access to the resource owner’s password, there are still some security benefits to using this flow versus authenticating API calls with a username and password (via HTTP Basic access authentication or similar).
- Http Basic
- With Basic authentication, an application needs to have continuous access to the user’s password in order to make API calls.
- It also requires the user change their password and reenter the new password in all applications which require it, should the user no longer want an application to have access to their data.
- Resource Owner Password
- However, if the OAuth Resource Owner Password flow is used, the application only needs access to the user’s credentials once: on first use when the credentials are exchanged for an access token.
- This means there’s no requirement for the app to store these credentials within the application or on the device, and revoking access is easy as well.
1 2 3 4 5 6 | |
1 2 3 4 5 6 7 | |
4. Client credentials
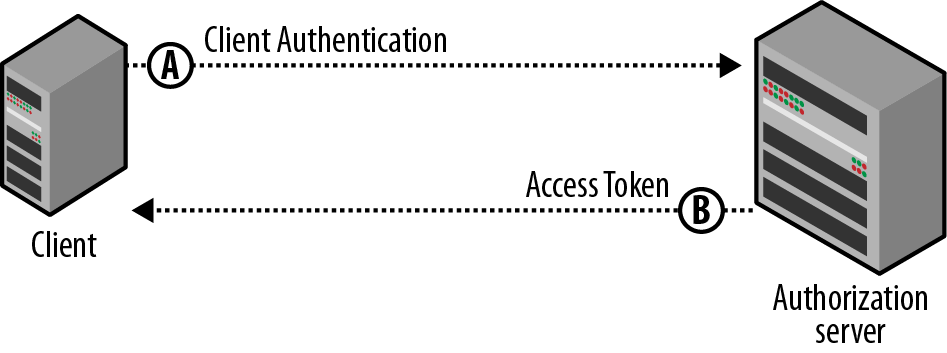
- Most of the OAuth flows are for handling delegated authorization, when a resource owner grants access to an application to access her data. However, there are cases when the client itself owns the data and does not need delegated access from a resource owner, or delegated access has already been granted to the application outside of a typical OAuth flow.
- Imagine a storage API, such as Google Storage or Amazon S3. You want to build a tool using one of these APIs to access the images or documents. The application needs to read and update these resources, but acting on behalf of the app itself rather than on behalf of any individual user. The application can ask the OAuth authorization server for an access token directly, without the involvement of any end user.
Here is an example using Facebook API. If the client credentials are successfully authenticated, an access token is returned to the client
1 2 3 4 | |
When the Access Token Expires
The Client Credentials flow typically provides a long-lived access token. The authorization server may indicate an expires_in time; however, the protocol does not support issuing a refresh token in response to the Client Credentials flow. Instead, the application simply asks for a new access token if the current one expires.
JSON Web Tokens
TBD
SAML
TBD
3. Cryptography
Cryptography is the process of hiding or obfuscating data so prying eyes can’t understand it.
When a client is interacting with a RESTful web service, it is possible for hostile individuals to intercept network packets and read requests and responses if your HTTP connection is not secure.
Sensitive data should be protected with cryptographic services like SSL. The Web defines the HTTPS protocol to leverage SSL and encryption.
Hashing (a.k.a Message Digest)
- Hashing/Message digests are secure one-way hash functions that take arbitrary-sized data and output a fixed-length hash value.
- They turn any amount of data into a fixed-length “fingerprint” that cannot be reversed. If the input changes by even a tiny bit, the resulting hash is completely different (see the example above).
- Cryptographic hash functions
- regular hash functions used in hash tables are designed to be fast, not secure
- used for protecting passwords. Safe even if the password file is compromised, but at the same time, allows to verify that a user’’ password is correct.
- example: SHA256, SHA512, RipeMD, and WHIRLPOOL
java.security.MessageDigestclass supports MD5 and SHA digests.- Shiro supports hex-encode and Base64 encoding.
Salt Hashing
Source: https://crackstation.net/hashing-security.htm
- There are several ways in which even a cryptographic hashed password can also be hacked.
- Dictionary Attacks
- uses a file containing words, phrases, common passwords, and other strings that are likely to be used as a password. Each word in the file is hashed, and its hash is compared to the password hash. If they match, that word is the password.
- Brute Force Attacks
- Lookup Tables
- The general idea is to pre-compute the hashes of the passwords in a password dictionary and store them, and their corresponding password, in a lookup table data structure. e.g., https://crackstation.net/
- extremely effective method for cracking many hashes of the same type very quickly
1 2 3 4 5 | |
- Lookup tables work only because each password is hashed the exact same way. If two users have the same password, they’ll have the same password hashes. We can prevent these attacks by randomizing each hash, so that when the same password is hashed twice, the hashes are not the same.
- We can randomize the hashes by appending or prepending a random string, called a salt, to the password before hashing.
-
To check if a password is correct, we need the salt, so it is usually stored in the user account database along with the hash, or as part of the hash string itself.
- The salt does not need to be secret, but should be generated using Cryptographically Secure Pseudo-Random Generator (CSPRG)
- DO NOT use the username as the salt
- DO NOT reused the salt for all users. Use a separate random salt string for every user and every time the password is changed.
- DO NOT use a short salt. To make it impossible for an attacker to create a lookup table for every possible salt, a good rule of thumb is to use a salt that is the same size as the output of the hash function. For example, the output of SHA256 is 256 bits (32 bytes), so the salt should be at least 32 random bytes.
- DO NOT use double hashing or wacky combination of hashing functions.
- Cons
- creates interoperability problems
- makes the hashes less secure, if the hacker gets hold of the open source code (Kerckhoffs’’ principle - A cryptosystem should be secure even if everything about the system, except the key, is public knowledge)
- If needed, use a ‘wacky’ function like HMAC (Hash-based Message Authentication Code).
- Cons
1 2 3 4 5 | |
- Key Stretching
- Salt ensures attackers can’t use specialized attacks to crack passwords using large collection of hashes. Using high-end GPUs and custom hardware it is possible to generate billions of hashes in seconds. To make these attacks less effective, we can use a technique known as key stretching.
- Key stretching is implemented using a special type of CPU-intensive hash function. e.g., PBKDF2, bcrypt
- Key stretching may make it easier to run a DoS (Denial of Service) attack on your website. It can be eliminated by making the user solve a CAPTCHA.
Cipher
Ciphers are cryptographic algorithms that can reversibly transform data using a key. We use them to keep data safe, especially when transferring or storing data, times when data is particularly susceptible to prying eyes.
Types
- Public-Private key cipher
- AES 257-bit cipher
Miscellaneous
- Kerberos - how it works
- PGP/GPG
- How to secure passwords - http://www.youtube.com/watch?v=6bR110r-RfY&list=WL08D7E897CDBD47CB (Salt, Bcrypt, Ascrypt, Blowfish algo, AES 256)
4. Session Management
Apache Shiro enables a Session programming paradigm for any application - from small daemon standalone applications to the largest clustered web applications. This means that application developers who wish to use sessions are no longer forced to use Servlet or EJB containers if they don’t need them otherwise.
Books and Trainings
OReilly Spring Security for REST APIs
- https://www.katacoda.com/jzheaux/scenarios/local-authentication
-
https://github.com/jzheaux/oreilly-spring-security-rest-apis
@SpringBootApplication(exclude = SecurityAutoConfiguration.class)- doing this in a Spring Boot app disables Spring Security. DON’T DO THIS.
- once the
excludeis removed, every single url is now protected by Spring Security. Accessing the urls now would throw http 401 unauthorized error. - Accessing invalid/non-existent urls also would throw 401 instead of 404 by design. Spring Security uses this approach to avoid hackers from fingerprinting the valid url patterns by trial and error.
Username-password
- Spring Security has a default user (called
user), but not a default password (by design). However, it generates a new GUID password for every Spring Boot run.http -a user:0b44ffc6-db54-4220-8b0d-27f55806c602 :8080/goals
- Example of using a custom username-password hardcoded in the code. Spring supports JDBC, LDAP also.
1 2 3 4 5 6 7 8 9 10 11 12 13 14 15 16 17 18 19 | |
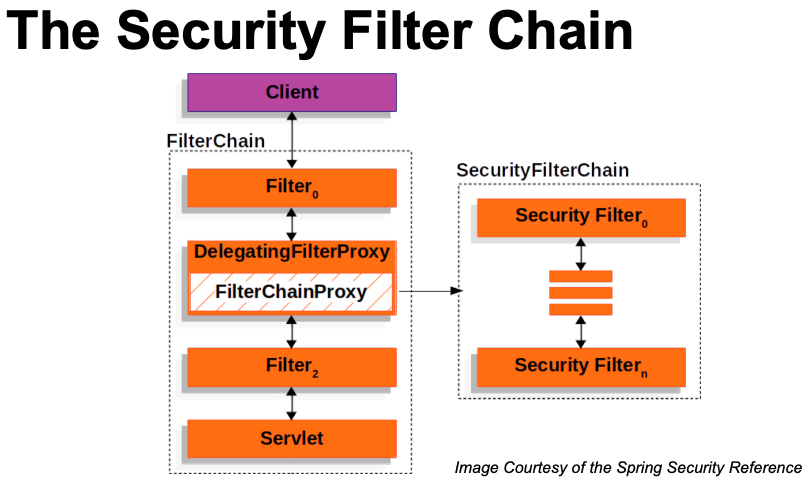
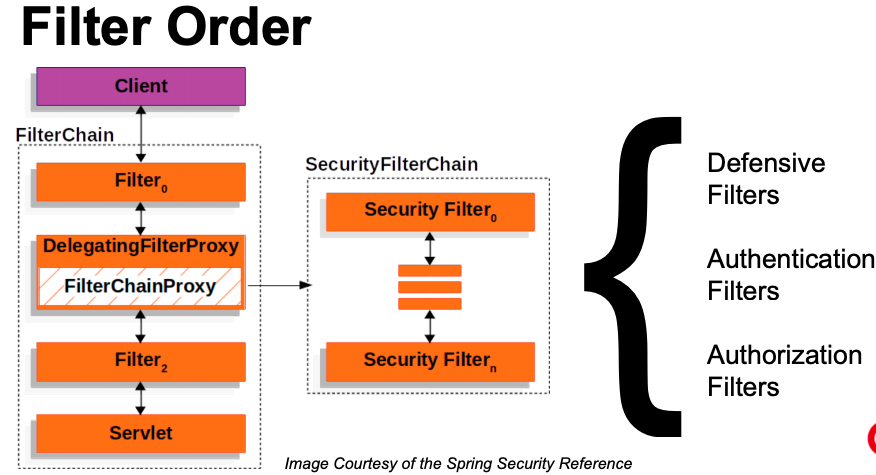
Authentication
- Spring Security is a set of servlet filters chained together. e.g., Authentication filter, authorization filter, defense filter (
HeaderWriterFilter)
 |
 |
 |
- Once the user is authenticated successfully, from anywhere in the app one can get the authenticated principal details (e.g., username) using the
SecurityContextHolderas follows. Another way is to ask Spring to inject it for you.
1 2 | |
1 2 3 4 | |
1 2 3 | |
1 2 3 | |
CORS
- When a web app running on an origin (say, http://localhost:8081) tries to connect to a web service hosted on a different origin (say http://localhost:8080), then the browser blocks the call by default throwing a CORS error.
- To whitelist certain origins to make the call, do as follows:
1 2 3 4 5 6 7 8 9 10 11 12 13 14 15 16 17 | |
- Pre-flight request: A browser sends an
OPTIONrequest to the server before the actual user request asking what kind of requests are you ok with me sending, e.g., the origins, http methods, etc. - When authentication is enabled in an app, all requests are expected to be authentication including the pre-flight
OPTIONrequests. This means the pre-flight requests will fail with 401 error. To avoid this, customize the SecurityFilterChain as follows:
1 2 3 4 5 6 7 8 9 10 11 12 | |
CSRF tokens
- Spring security performs CSRF checks before authentication for any non-GET HTTP calls with side-effect (
POST,PUT,DELETE). This is to protect the app from cross site forgery even before the app tries to authenticate the request. - Since CSRF checks happens earlier than authentication, the app would throw HTTP 403 instead of 401.
1 2 3 4 5 6 7 8 9 10 11 12 13 14 15 | |
https://github.com/spring-projects/spring-security/blob/main/config/src/main/java/org/springframework/security/config/annotation/web/configuration/HttpSecurityConfiguration.java#L87-L98
References
- Books
- RESTful Java with JAX-RS - Chapter 12 - Securing JAX-RS
- REST in practice - Chapter 9 - Web Security
- O’Reilly Getting Started with OAuth 2.0
- Links
- Application Security With Apache Shiro
- Java EE Security - http://docs.oracle.com/javaee/6/tutorial/doc/gijrp.html
- Encyclopedia of Security - http://www.microsoft.com/mspress/books/sampchap/6429.aspx
- OAuth Roles - http://tutorials.jenkov.com/oauth2/roles.html